
How to Mix Vocals
Introduction
Ever heard a contemporary hit record with a poorly mixed vocal? Most likely not. Seemingly, because it doesn’t exist. The sad fact is In case your vocals don’t sound nice, you might be dooming your music to obscurity.
However, figuring out this alone doesn’t make mixing them any simpler. Vocals are tough. They’re typically the loudest factor in a mix, which leaves little room for error. And since we’re so accustomed to the sound of the human voice, we’re fast to note any imperfections.
When you’re struggling to craft studio-quality vocals, these five ideas are a terrific place to start out. Read on to find the keys to mixing vocals like a professional.
1. Comping and Modifying
Step one to mixing vocals isn’t mixing at all — it’s editing. When you’re accountable just for mixing, it will probably be taken care of by the artist earlier than they send you the session.
If not, it’s as much as you to help create the most effective vocal sound out of the obtainable takes, which is a process known as comping.
This process will differ a bit depending on the DAW you’re using, however, the concept is identical: to compile the very best of a number of takes of a part, fitting them collectively in a manner that sounds cohesive, pure, and makes up the most effective overall performance.
Except for comping, different editing duties could embody trimming away sections of a tune while the vocalist was not performing, or modifying breaths that stick out too much.
How a lot of the breath you trim is up to taste – it’s typically depending on the type of music, and in the end, as much as the way it sounds within the mix. Generally, you do need them there, and typically you don’t. In both methods, modifying breaths is simple, using a plugin like DeBreath.
Whereas comping ought to always be completed first, the opposite detailed editing duties will be taken care of at a later time if you really feel you want a break from the creative work.
Switching psychological gears all through the mixing process will be very useful in sustaining a fresh ear and a transparent perspective.

2. EQ
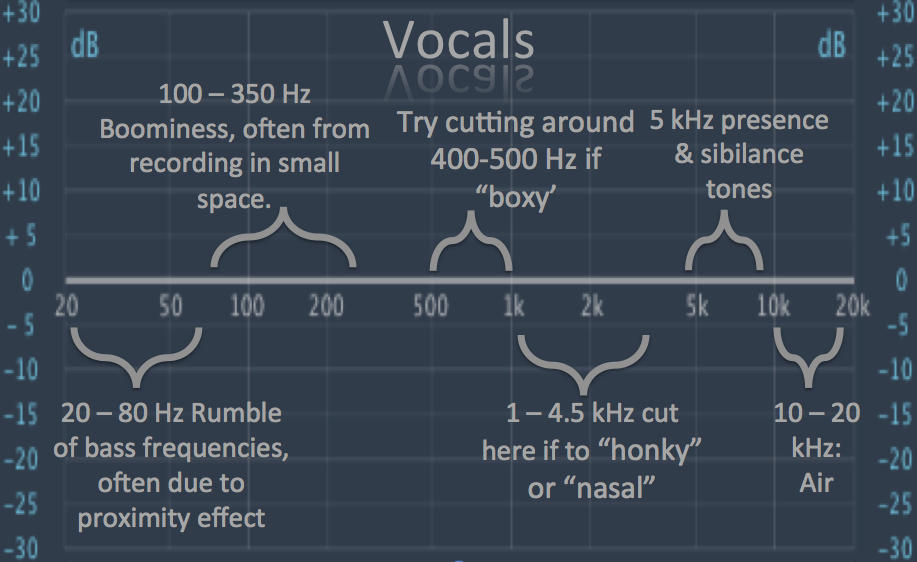
“Magic” Frequencies for Mixing Vocals
Figuring out particular frequencies and the way they impact vocals means you may make fast, exact changes with much less guesswork. Take a look at these 5 areas of curiosity for vocal EQ:
- 120 Hz: Fullness
- 240 Hz: Boominess
- 5 kHz: Presence
- 4 to 7 kHz: Sibilance
- 10 to 15 kHz: Air
Experiment with each of those frequencies or bands and see how they impact your specific vocal sound mix. If a performance feels muddy, attempt chopping a bit around 240-250 Hz. Of course, we are just going to mention the high pass filter here, because we believe it is already the first thing you do.
You might be after a perfect balance in the frequency spectrum, but you should try out different options as well. A slight bump with a low-shelf filter on the low end or using a high shelf for the high end might get better results for you.
In hip hop, for example, the vocals have more low power in them, while in the new popular music, it has some extra sheen in it.
If sibilance is especially harsh, sweep between 4 and 7 kHz to seek out essentially the most offensive frequencies and tame them. As at all times, hear and use what most accurately fits your personal style. It is up to your taste how to mix the vocals that are proper to your genre.
Vocal Range
The vocal sound range is the standard of a singer’s voice which represents the span of musically helpful pitches the singer can produce. A singer is categorized based on their vocal range as such*;
- Soprano: C4 – C6 (261 Hz to 1046 Hz)
- Mezzo-soprano: A3 – A5 (220 Hz to 880 Hz)
- Contralto (Alto): F3 – F5 (174 Hz to 698 Hz)
- Tenor: C3 – C5 (130 Hz to 523 Hz)
- Baritone: F2 – F4 (87 Hz to 349 Hz)
- Bass: E2 – E4 (82 Hz to 329 Hz)
*Letter/number combos signify the “note location” whereas C4 could be Center-C on a piano.
Associated with EQ’ing and mixing vocals, these ranges offer you a thought of where the basic frequencies are positioned for singers of those varieties.
Subsequently, when you’re mixing a soprano, you could have an idea of the bottom frequency range from which you’d be working. These ranges don’t suggest frequencies above the upper limit should not be used.
Anyway, you will always be able to use the high pass filter to cut down the unnecessary stuff from the vocals and enhance the upper vocal sound.
Harmonics are present effectively above these listed frequencies and may be present as high as 8-10 kHz. Subsequently, a soprano singer may have frequencies lower out utterly above the 1100 Hz mark and the resulting sound wouldn’t seem natural.
Male Vocals vs Female Vocals
You may ask, “how do I mix a female vocal in comparison with a male vocal.” When it comes to mixing, we haven’t discovered gender-based vocal mixing to be a difficulty.
Where there are slight variations within the vocal cord building across genders, and women and men do have a tendency to talk in different patterns and intonations, in terms of mixing vocals we deal with everyone as unique.
We had a project where the male artist had very high vocals and we approached it as it was. Also, we mix a female that has a shocking amount of low-to-mid-range frequencies within the voice. Mix vocalists by their voice, not their gender.
3. Compression
When you’ve received the tone of the vocal down, it’s time to tighten up the dynamics in order that the efficiency can stand sturdy at the entrance of the mix. There are various compressors on the market that are used generally on vocals – many with barely completely different tonal characters and dynamics dealing with.
It’s widespread to use between 3-6 dB of compression using a peak limiter model compressor just like the CLA-76, or the SSL E or G Channel compressor. The compressor ought to solely interact to tame the loudest peaks: it shouldn’t be working throughout the whole vocal performance.
Next, it’s time to set the attack and release instances in your compressor. Right here’s a straightforward approach to discovering the most effective settings:
- Begin with the slowest attack and quickest release instances
- Slowly improve the attack time till you begin to shave off the preliminary transient of the vocal, then back off
- Next, slowly lower the release time till the compressor begins to “breathe” in time with the tune
It’s common to compress in order that the needle exhibits 3-6 dB of gain reduction in the course of the loudest peaks, then simply earlier than it returns to 0, the next peak will get compressed once more.
You don’t want to squash the life out of it, however, you do need to add vitality and energy. Discovering that happy stability is what takes a developed ear and practice. Mixing the vocals is mostly routine after many many finished songs.

Serial Compression
Serial compression is one other thing that you can consider. This is the process where you add two compressors in a row, and you need to find the right settings for both of them. The first compressor and the second one need to work in harmony to get the best possible outcome.
With using multiple compressors, you will need to take care not to overdo it. We like to have the first compression doing the rough technical part, where we set the threshold just to have enough gain reduction to balance, and the second one to add some vintage coloring to the vocal and finalize the compression if any imbalances are left.
Pay attention when you use compression, again, you can ruin the signal if you are in doubt about your moves! But if you know what to do, you will achieve high-end vocals and this is a great way to do it!
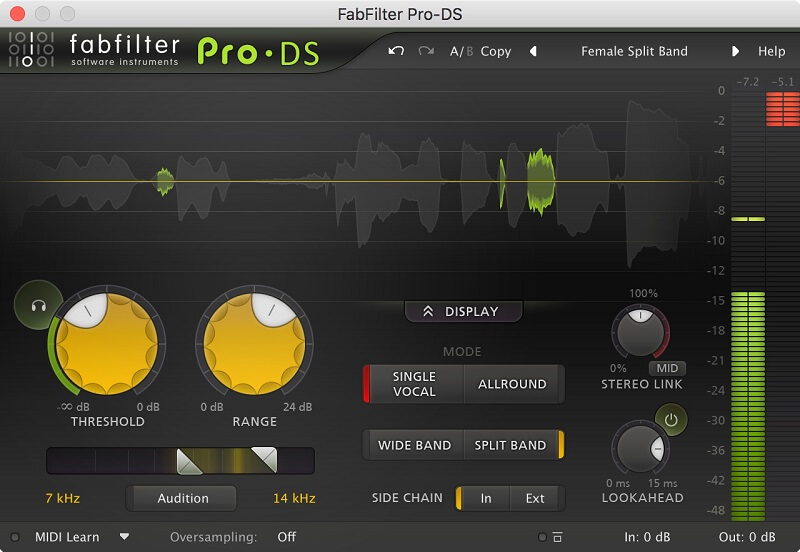
4. De-esser
An issue that may happen when mixing vocals, particularly when boosting excessive frequencies, is that the “s” sound of the vocal will get too sharp. That is known as “sibilance”. Listed below are two stable solutions on how one can clear up this downside using the de-esser. Also, take de-essing seriously, because you can improve or ruin a great vocal.
1. Barely minimize the annoying frequency away with an equalizer. This frequency is usually someplace around 8kHz. In case your EQ has a spectrum analyzer, look ahead to the spike within the highs when the vocalist makes an “s” sound.
That is the frequency it’s best to minimize. It is always key to fix the little things because this is important on how to mix your vocals and tame them accordingly.
2. The issue with the primary possibility is that additionally, you will be filtering out the identical frequency for the rest of the vocal. This might trigger it to lose its brightness.
To resolve this, you possibly can use a dynamic equalizer as a substitute. With a dynamic equalizer, you possibly can minimize or increase based upon a threshold and an attack and release – very very similar to a compressor and the de-esser itself.
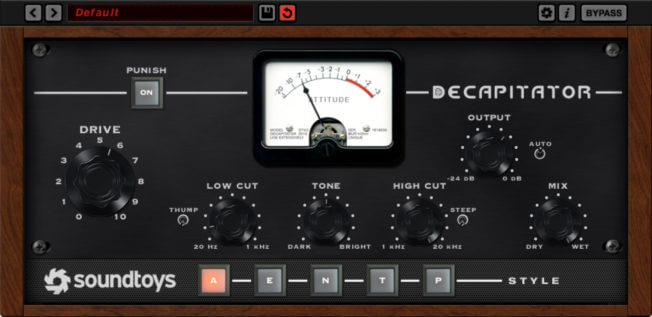
5. Saturation/Distortion
Very small amounts of saturation and distortion can fatten up a vocal and make it minimize by means of a busy mix by including harmonics.
With analog recording setups, saturation was added via preamp gain, the circuitry of the channels on the console, and the tape machines used. Fortunately, trendy plugins permit you to emulate these distinctive types of saturation simply in your DAW.
The Scheps 73’s preamp part works nicely for this, in addition to the ‘drive’ part within the NLS Channel console emulation.
When you’re going for an extra aggressive sound, attempt sending the vocal to an aux channel and apply saturation and/or distortion liberally. Then, mix within the affected channel to style. Bear in mind, a bit goes a long way!
6. Effects
After we use a time-based effect like reverb, we’re attempting to create an “area” for a mix factor to dwell. Oftentimes we add it with the intention of bringing our vocals to the front when in actuality we discover we’ve only pushed them further away.
The fast repair? Pre-delay. Many reverb plugins have this parameter, and its capabilities by separating the dry signal from the wet signal through a user-set delay. The result’s listening to the space and dimension that we wished from our reverb without pushing the dry vocal into the recesses of the mix.
You too can get very inventive with delay in a wide range of methods. One of many extra widespread methods is to automate the delay on certain words or phrases. If a selected line bears repeating, have the delay bypassed till you attain the specified lyric and automate it on.
One other factor to recollect is to EQ your reverb and delay returns. More often than not, we don’t need our reverbs and delays sharing the very same frequency area as our dry vocals. When you bandpass your effects return–say between 600 Hz and 4 kHz–your wet/dry indicators won’t be competing for a room.

Other Effects
There are a number of different methods to process your vocals with effects. The artistic choices are in your hands. Experiment with further effects like chorus, flanging, pitch shifting, vocal doubling, multiband compression, limiting, and different creative effects.
Automation can even go a long way. Attempt to automate your different results all through the vocal performance so as to add excitement and motion. Or, to emphasize words or phrases. There are numerous potentialities!
How to Mix the Vocals Properly
When you follow these steps, you’ll find yourself with a tremendous sounding vocal.
The more you apply, the better outcomes you’ll get. Ultimately, you’ll be placing out vocal sounds that rival the stuff you hear on the radio.
Carry on working and also you’ll get superb outcomes!
Simply keep in mind these steps when mixing your vocals:
- Eliminate any room resonances with an EQ
- Tame your sibilance with a de-esser
- Control your dynamic range with serial compression
- Form your tone with another EQ
- Add a bit of space with some reverb or delay
- Add some flavor with effects
Extra Vocal Mixing Tips
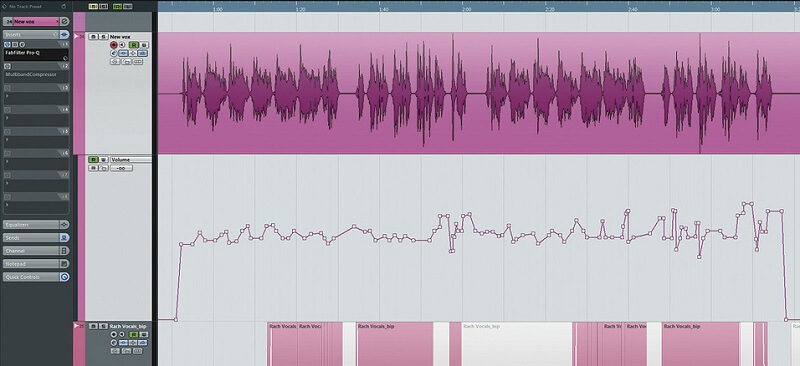
Automation
Automation is the cherry on top of your vocal mixing process. Merely varying the volume of the vocals all through the tune could be a very efficient approach to bring them to life as it develops.
Equally, automating very slight adjustments in reverb and delay or saturation to suit the development of the tune can add a delicate lift that may allow the musical or lyrical content material to have more of an influence on the listener.
Experiment with this system in delicate methods in order that the effects are more emotionally ‘felt’ than heard.
Within the vocal mixing process, it’s okay to leap around with certain steps. In case you hear an idea in your head, do it! For those who open the session and listen to the raw track, but you may perfectly imagine how the EQ and compression ought to sound, go for it!
Don’t snooze on inspiration.
Ducking
As in the action of “getting lower,” not as within the waterfowl. Ducking automation may be set up so that when one channel volume exceeds a specific level, one other channel’s volume makes a gain reduction for a specific amount.
Ducking can be utilized alongside the main vocals for mechanically decreasing the volume of an instrument when the lead vocalist beings singing.
An instance of lead instrument/lead vocal ducking can be in a tune where the lead instrument begins the tune with a really up-front arrangement. Utilizing ducking, the second the vocalist begins singing, the lead instrument is “ducked” all the way down to a lower volume stage.
Ducking is a “nice-to-have” feature within the live setting but it’s undoubtedly not a deal-breaker. We have mixed most of our life with no ducker. It simply meant we needed to ride the channel faders once in a while and we are completely comfortable with that.
Have the Vocals in Multiple Channels
A vocalist will usually sing in a unique tone or volume for every part of a song. A dynamic vocal efficiency makes it hard to use the identical EQ or compressor setting that works nicely for each part of the music.
For instance, a compressor setting that works within the verse might not work as well within the chorus.
An answer to this problem is to separate the vocal throughout multiple tracks. Have a separate vocal track for the verse, chorus, breakdown, and so forth. This method provides you with extra flexibility to deal with every vocal track differently.
Duplicate / Pitching
Duplicating and pitching vocals is an incredible, easy approach to “beef up” your vocals and add tonal clarity and character. This method is primarily utilized in electronic or pop music production however might be utilized in a variety of modern genres.
This vocal mixing method includes duplicating a vocal track, then pitching the duplicate monitor either +12 or -12.
By pitching +12, you might be including a pitched-up layered vocal, which might usually add depth and “crisp-ness” to the vocals. Pitching -12, will add a lot of depth and energy to your vocals.
Ensure you add compression, reverb, and scale back the volume of the duplicated track, so the vocals don’t really feel crowded and artificial.
Tuning
Typically, there will probably be pitch and tuning imperfections in vocal performance. Whereas that’s not inherently a nasty factor, it’s possible you’ll wish to touch up any questionable notes with pitch correction software programs.
After using pitch correction, it’s a good suggestion to commit or print the effects (non-destructively) to set the brand-new audio into play and to avoid wasting processing power throughout mixing.
Mix the Vocals in Context
Keep away from mixing your vocals in solo! The objective is to make your vocals sound good with all the other components of a tune. It will likely be tough to make good mixing choices with your vocals in isolation.
It’s additionally a good suggestion to bring in your vocal early. Then make your processing selections based on how they sound in context with everything else!
Listen In Context
Before stepping into the nitty-gritty details of mixing vocals, it’s necessary to consider the context of the track within the tune. That’s to say, one thing that sounds good on a vocal when soloed might make things worse when mixed with different instruments.
To keep away from this problem, make main adjustments to the vocal EQ with different mixed parts in the background. Alternatively, you may flip solo on and off on the vocals as you make adjustments and listen to the way it impacts everything else.
Mix Every Part Around The Vocals
The alternative to the above point is that making adjustments to the other mix parts will even have an effect on the vocals. A giant drawback many newbie engineers overlook is that the lead vocals are an important aspect of a mix. Due to this, they might not convey them in till the end of the process.
This strategy could cause unnecessary work down the road for the mixing engineer, who unknowingly buried the voice in different components. As a substitute, bring in the vocals early on and mix every part around it in a manner that enhances the vocals.
A correctly mixed track won’t need a lot to the lead vocals as a way to get them to sit correctly.

Conclusion
These suggestive strategies provide a place to begin mixing your vocals. They’re a piece of common information that can assist you to make more informed mixing choices. It’s inspired to experiment. Attempt altering the order of the plugins and play with completely different settings.
Finally, bear in mind to not go overboard. Studying to mix vocals with the least moves and plugins offers you extra pure outcomes. We hope that we brought you closer to having vocals that sound professional and that we improved your mixing techniques a bit.
Good luck!
Check our eBook on Mixing Tips! If you want to get a more in-depth breakdown of those tips we share, follow our link and get the “Ultimate Mixing Tips Booklet” and up your game quickly!


You are the best of all the times
My mixing sounds greater than before
Thanks so much
Thanks for the love!