What is Frequency Balance
Introduction
All of us undergo periods of both improvement and frustration in our careers.
Each time you are attempting to improve your ability degree or acquire extra data, you’ll have moments of epiphany followed by darkish intervals of hopelessness and self-doubt. The frequency balance is no different.
Our first mixes are sometimes rudimentary, as we are inclined to give attention to balance more than something that’s attention-grabbing or specific in regards to the track. We persuade ourselves that when you can hear every little thing then it must be a superb mix. That’s why we go after the frequency balance as a gateway to a great mix.
As we turn into more comfortable with the process, we are sometimes left questioning why our decently-balanced mixes are so boring and accomplish that little to capture the listener’s attention. We might wonder why one other mix that’s clearly not that perfectly-balanced could be so thrilling and compelling to the listener. “What about balance? I believed that was an important factor?”, we might imagine.
What is the tonal balance?
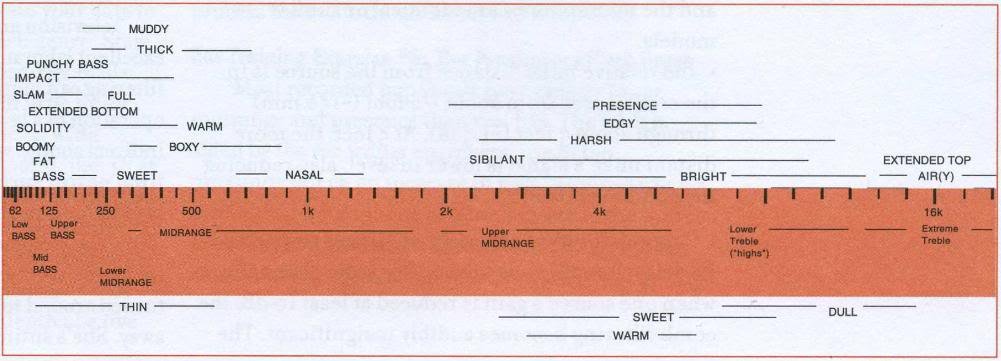
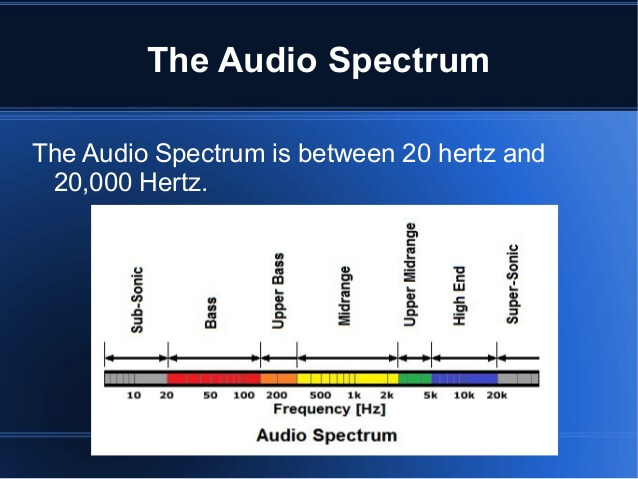
Tonal balance describes the relative distribution of power throughout the frequency spectrum. The interaction of all of the elements of a tune contributes to the general tonal balance. Also referred to as spectral balance, additionally, it is accountable for the perceived timbre of a mix or sound.
Tonal balance additionally distinguishes a mix as sounding darkish or bright, full or thin, clear or muddy, warm or harsh, and so forth. In different words, tonal balance is vital to a great-sounding mix.
Moreover, correcting tonal imbalances in a mix produces an extra pure pleasing sound that’s more cohesive. Furthermore, a tonally balanced mix additionally has a fairly constant frequency response. It also has perceived equal loudness throughout the frequency spectrum.
Conversely, a mix with poor tonal balance might have noticeable peaks and dips within the frequency response. These inconsistencies both exaggerate or cut back frequency areas. For instance, an emphasized low-end or a missing midrange. Lower frequencies ought to mix easily with higher frequencies.
1. Filter first
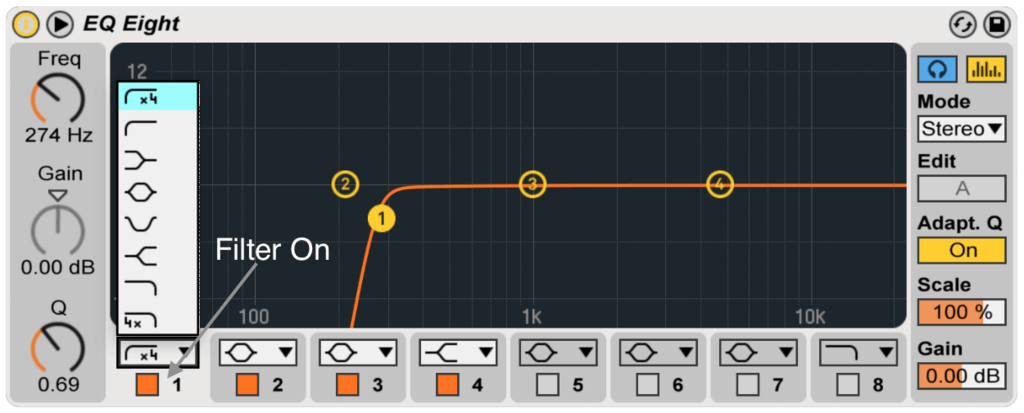
First things first, take out all of the stuff you don’t want. The way to perfect frequency balance starts here.
When you simplify your mix into groups of instruments, as I present you within the Mixing e-book, it’s simple to filter out all the pointless data using just a few EQ plug-ins on the groups.
Listed below are the general pointers to get began. Filter up to 100 Hz on most instruments besides bass and kick drum. Additionally, when you have a piano or another low-end instrument similar to a synth that you just consider essential within the lows then don’t filter that one as a lot.
Add a low-pass filter on instruments as well. That is an underutilized trick. Something that’s simply hissy and loud like a rock guitar and even on kick drum to cut back bleed from the remainder of the drums can focus your instruments.
2. Clean and repair
It’s more enjoyable to mix after you clear up your tracks. The same goes for EQ’ing, however, on this case, I mean slicing out the problematic frequencies that trigger annoying resonances or add something adverse (like boxiness) to the instruments.
Sweep around to seek out frequencies that come out and make the instrument sound worse. This is usually a weird resonance because you recorded it in a nasty room that triggered weird comb filtering or reflections to be introduced into the sound. Or it could possibly simply be the standard problems inherent within the recording, like boxiness in the kick drum for example.

3. Deciding where sounds should go
You often have some decisions as to where you need to accent every instrument. Take the kick drum and the bass guitar within the lows as an example. You may need to do the standard trick of boosting one frequency in the kick after which subtract the identical frequency in the bass. However which frequency do you have to select?
That’s actually up to your style as a mixing engineer and also the texture of the tune. Is it the kind of tune where the kick is felt rather than heard? Then possibly a boost at 60 Hz is the place the kick sounds the most effective.
The style of music can actually dictate whether or not you need the bass guitar sitting on top of the kick or under the kick within the low-frequency spectrum. And two mixing engineers may do two utterly different things but still obtain an awesome mix. The frequency balance they are able to bring out is important, no matter what element will come forward. So at that time, it’s up to you, simply so long as you continue to separate them in some way.
4. Sweep and cut
After I hunt for problematic frequencies inherent within the sound, versus cutting out frequencies to make room for different instruments, I tend to solo the track. Folks say you shouldn’t solo and in case you’re attempting to make things match collectively within the context of the mix you have to hear the entire thing playing at once to take action.
When you’re repairing or slicing out stuff that’s making the instrument itself sound unhealthy then it’s simpler to do in solo. It’s as simple as sweeping across the frequency spectrum with a bell curve EQ with an excessive Q after which slicing the annoying frequencies you discover along the way.
Then it’s a matter of going again to the mix as a whole and listening to how every instrument relates to the others. As an example, in case you do the identical sweeping exercise in the bass and rapidly the guitars feel really nice, then you’ve in all probability discovered a frequency to cut in the bass to make room for the guitars. You then simply repeat the exercise with different instruments that need extra room within the mix.
5. Don’t boost the same frequencies on more elements
It is a surefire method to make all the elements of a mix conflict collectively, leading to a cluttered and unclear mix. Consider it like a division problem. You could have a set amount of apples, and you have to divide them among a set amount of people.
Equally, you may have a set quantity of instruments that you have to divide among the frequency spectrum. The kick drum, bass guitar, acoustic, and vocal can’t all have a 12 dB increase at 4 kHz.
Discover totally different frequencies that complement every instrument individually and unfold them around.
When you’re boosting a frequency in a certain instrument, then it’s often a good suggestion to cut on the same frequency in an instrument that occupies an identical range. Divide the frequencies evenly amongst instruments and obtain higher separation and readability in your mixes. Frequency balance is the key to clarity in your mix.
6. Add character
Subtractive EQ is fairly boring. Efficient, however boring.
Generally, you still want to add boosts to your devices to essentially deliver the character. If a kick drum wants extra weight, then boosting the lows is the best way to go. If the snare wants extra attack, then a lift within the higher mids is the place you find it.
If the guitars want extra thickness you possibly can bring it out within the low mids (so long as you don’t mask the bass guitar).
7. Rebalance to get to the initial gain-stage
After EQ’ing your complete mix it may be a little bit out of balance from the static mix you had before. At that time it’s time to rebalance to get the mix again to the place it was earlier, besides this time, you can hear all of the elements better.
You are able to do this by rebalancing the faders or adjusting the output gain in your EQ. Relying on whether or not you used a variety of cuts or boosts, you may have to both increase or lower the output gain.
As soon as your devices are correctly balanced (and rebalanced) within the frequency spectrum you should be capable of hearing all the things a lot better. Nonetheless, you might have some dynamics issues with an instrument being too loud in some elements and too quiet in others.
You could possibly all the time sort out that with automation on the fader, however, it’s extra enjoyable to give the mix additional character with compression.
Conclusion
As you can see, the correction when frequency steadiness mastering is simply not some magic method info and isn’t as troublesome as you might think about it.
There may be actually 1 fairly essential scenario to meet – we have now to listen to exactly what’s happening to our signal, and it’ll take a superb listening ambiance and impeccable monitors – inexpensive monitors, laptop audio system, or headphones.
Check our eBook on Mixing Tips! If you want to get a more in-depth breakdown of those tips we share, follow our link and get the “Ultimate Mixing Tips Booklet” and up your game quickly!
Best Mastering Equalizers: Shape Your Final Frequencies!
Best 500 Series Equalizers: Top 10 Models To Shape Your Frequencies!
Bettermaker Stereo Passive Equalizer Review: New Pultec-Style Equalizer!
Heritage Audio Motorcity EQualizer Review: Amazing 7-band Mono Passive EQ!
API Select SV14 Review: Great New 500 Series EQ from API! (2023)