How to EQ Acoustic Guitar
Introduction
In this article, we’ll be showing how you can EQ an acoustic guitar to assist it cut through the mix. We will present you with how you can discover the very best settings for an acoustic to make it sit effectively in a mix without clashing with different sounds.
These EQ methods will work effectively for a live recorded guitar in addition to a VST guitar. Whether or not the acoustic is recorded through an amp or audio interface, make certain it sounds like heaven from the source much before you mix it.
Also, similar methods can be applied to various other string instruments, like ukuleles, banjos, or ethnic guitars.
You’ll discover this tutorial helpful even in case you’re utilizing a guitar with some low-cost strings. Beneath is a lowdown of how one can get one of the best settings if you’re mixing an acoustic guitar.

Make Things Proper From The Start
Before you begin recording and mixing, take a minute to consider the way you need the ultimate model of the guitar to sound, and plan things accordingly.
For instance, if you need the guitar to be shiny and clear, use a diaphragm condenser microphone, and get a bit farther from the microphone (5-10 inches).
However, if you need a warm and intimate sound, use a dynamic microphone, and get nearer to the microphone (2-5 inches).
Since this matter is so essential, we’ve wanted to emphasize the importance of this step at the beginning of this article, so do it right.

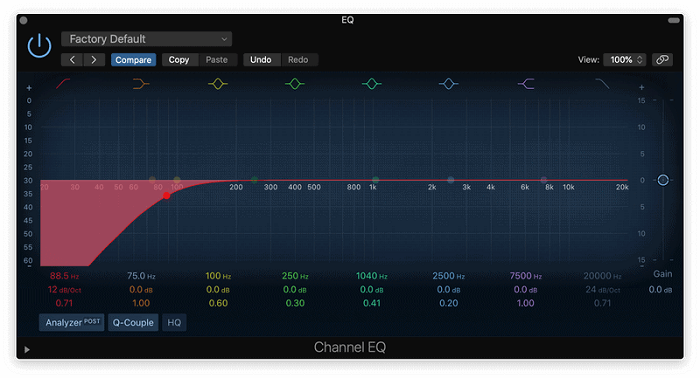
Trim the excess frequencies
Mixing consoles have channel-level management labeled “HPF.” This stands for a high pass filter. The HPF will enable solely excessive frequencies to pass through the filter. Do not sleep on the high pass filter, because will help you balance the frequency spectrum, trim the low end and clear your acoustic guitars. This is what you want to make when you are at the early stages of acoustic guitar EQ point.
In analog mixers, the HPF has a set frequency range, corresponding to 100 Hz or it has a knob for controlling the range. Should you see a label by a button that reads, “/100” then that’s the HPF label indicating a 100 Hz set level.
Engage the HPF so that every one frequency beneath the set level is cut out. These frequencies can muddy the sound of the guitar. There are different devices on the stage that are better suited to producing these low-end sounds, such as the bass and kick drum.
In the case of an HPF with a controllable frequency level, begin it around 100Hz and improve it as you see fit. We’ve run them as high as 230Hz as a result of for that instance, for that guitar, a 230Hz HPF was wanted to get the sound we wished.
There’s an important distinction within the control you get with an analog mixer in comparison with a digital mixer. Apply these suggestions accordingly. You know how your mixer works and its limitations. No use in telling you what you already know.
Controlling Low Frequencies
At this level, you need to turn your consideration to the remaining bass frequencies within the upper bass range from around 80 Hz to 250 Hz. Usually, we are going to slap a low-shelf EQ and set it around 250 Hz – 300 Hz, and experiment with reducing it as a whole.
Often times this will get you very near the place you need your sound to be.
You might discover that while you’ve made huge enhancements with this straightforward approach, the bottom end now feels like it’s missing some “oomph”, particularly with the 5th and 6th strings.
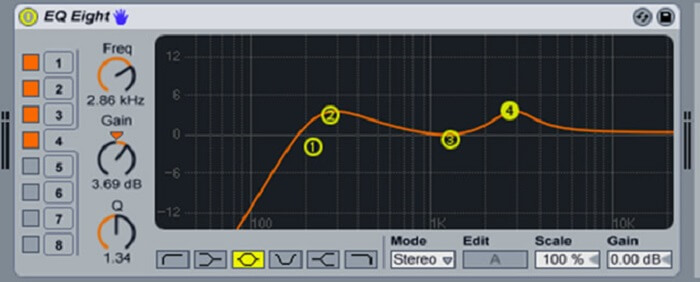
What you are able to do now is add a small boost around 150 Hz to fight this problem. We like to recommend utilizing a large Q and not more than 5 dB of boost.
The broad Q retains the transitions between frequencies sounding clean and musical, versus abrupt and noticeable. That is essential, particularly within the bass area where a lot of power resides.
Attempt transferring your center frequency round with varied amounts of boost to seek out the sweet spot, then you may alter your Q from there.
Character
Altering the EQ on the amp can considerably modify its character. Even when an amp does not have a midrange knob, there are nonetheless methods to regulate the midrange balance.
Take the Fender Princeton amp. Princeton does not have a midrange knob. Its midrange is preset within the circuit. By chopping bass or treble, you’ll enable more midrange to come through.
The Vox AC15 works in a similar method. The more you dial again the treble knob, the more the higher mids will come out. The more you chop the bass, the more the lower mids will come out. Study your amp!
You have to regulate the EQ relying on the guitar you are playing, the room you are in, and the effects you utilize. Throw out the notion that you can repair it later.
Match It Into The Mix
Un solo the acoustic guitar and place it back in context with the remainder of your mix. From this level ahead, avoid the solo button. You simply need to sway away from using the solo button and that’s it. There is no way around it. We understand that it might be a hard thing to do, but you need to try hard and unlearn this harmful method.
Pay attention to any competition between the acoustic guitar and different tracks in your mix. Pay close consideration to the low end—oftentimes, you’ll need to roll it off to create extra room for the kick and bass.
You may typically get away with taking out fairly a bit—typically everything beneath 300 Hz.
Additionally, listen to the connection between the acoustic guitar and vocals. Typically, a mild cut within the upper midrange will assist them to fit collectively. This is the right way to make room for the guitar and make it shine in the mix. If the acoustic guitar is the centerpiece of your music, then you need to pay attention to it.
Once more, all of that is context-dependent. We wish there was a formula, however, the secret is to pay attention to the mix as an entire and use it to guide your choices. Resist the urge to solo!
Don’t neglect to pan as well. If the acoustic guitar EQ is competing with one other track, attempt panning the 2 tracks to opposite sides of the mix first. This will typically create separation without EQ.
Pay attention To The Bigger Image
A typical mistake is to solo an instrument if you’re making modifications to its sound. Going back to thinking about the position of your acoustic guitar, this method can hinder your mixing.
You’ll find yourself listening to the acoustic guitar solely and making uneducated selections over what to change. You would possibly make the guitar sound good on its own. Nevertheless, as soon as un-soloed you’ll be scratching your head as to why it doesn’t sound good anymore.
It’s because all the different mix parts have an effect on the sound of your acoustic guitar EQ. Listening to it in the context of everything else is the one way to make changes that improve the general mix.
Clear it up and make it good
The next breaks frequencies into EQ ranges. Digital consoles can work inside completely different frequencies. Nevertheless, the essential analog channel EQ’ing with only 3-to-4 knobs won’t give the identical stage of control.
Try this article for exploring how to improve mixing on an analog mixer (it’s nice of digital mixing, too). Due to this fact, apply these as they match the finest to your scenario.
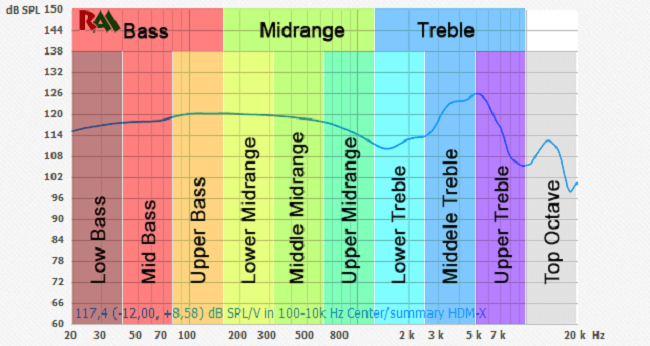
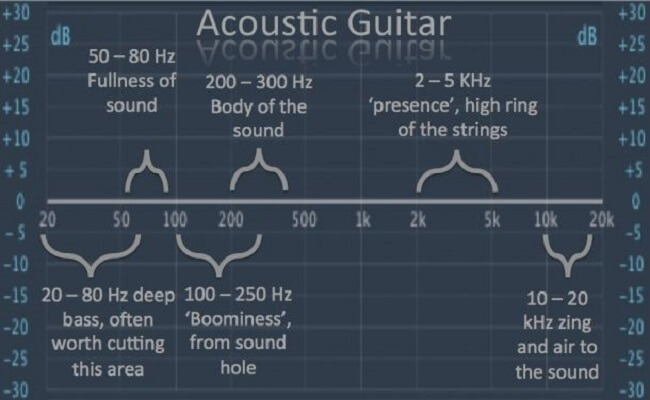
- 150 – 300 Hz range: Use to beef up the tone of the guitar however as talked about, it’s straightforward to get muddy again so only enhance frequencies on this space if it clearly improves the sound.
- 300 – 600 Hz range: This will be boosted if in case you have a thin-sounding guitar.
- 600 – 800 Hz range: Your meaty mid-range sound. Reduce this to present a higher tone and better distinguish the guitar from different instruments.
- 1,000 – 3,500 Hz range: These frequencies can push the guitar to the front of the mix and have an effect on note definition. Increase these frequencies when fingerpicking-style guitar and lead (not rhythm) guitar.
- 3,500 – 12,000 Hz range: It’s all concerning the sparkle. This range provides brilliance and might make the guitar leap out. This range could be additionally broken down into 3.5-5 kHz, 5-8 kHz, and 8-12 kHz. Begin at the 3.5 to 5 kHz range for including that sparkle to the acoustic guitar. If you’d like more, leap to the subsequent range and enhance a bit there.
Use Busses To Make Mixing Simpler
If the acoustic guitar was recorded utilizing a number of microphones or there are varied guitar components within the mixing session, it may be hard to maintain all the pieces under control.
When making an attempt to handle tracks and ranges, bussing is your buddy. Send all of the multi-microphones used on a single acoustic guitar to a mix bus. You might even send every separate guitar part to a different bus with all of the guitar components feeding it.
This may increasingly appear a bit redundant and pointless to start with. Nevertheless, as you mix additional and must make fast modifications, you’ll be grateful you took the time to arrange things early on.
How does EQ have an effect on a guitar’s tone?
As talked about before, any sound (whether or not isolated or made by plenty of sources like in a band) will type a sonic footprint. This sonic footprint is registered by our ears as one factor. How these totally different sources are put collectively will decide the way it sounds to us.
That is really what makes sound engineering such an artwork. They want to make sure that all the different instruments occupy totally different areas within the EQ spectrum in order that they are often heard and don’t overpower one another or sound like mush.
This may be significantly difficult with guitars because there are very a lot of mid-range centered devices that may typically compete with different instruments in the identical spectrum like the saxophone, vocals, drum toms, and different guitars.
The mid-frequency range is commonly occupied by these instruments so that you don’t need your guitar to be a) misplaced or b) too intrusive within the mix. You might want to discover that good little pocket of space and this may be achieved by utilizing an EQ pedal to shape your turn and put it into that area.

Three EQing Errors
“We’ll Simply Repair It In The Mix”
You’ll by no means obtain a great-sounding mix in case you rush via the recording part. Take the time to get a fantastic sound from the start. You’ll find yourself needing much less acoustic guitar EQ, and your completed mix will sound a whole lot better.
Including Too Much Top
High frequency boosts could be seductive. Carried out right, they could make the acoustic guitars sound clear and sensible. Go too far, nonetheless, and also you’ll find yourself with a track that sounds edgy and skinny.
And a word to the smart—be significantly cautious when boosting the upper midrange. This space can rapidly turn harsh and aggressive because it’s where our ears are probably the most sensitive.
Boosting Too A lot Bottom
We do not often enhance the low frequency on acoustic guitars (except the track was unusually thin to start with). In most mixes, you’ll need to let the kick and bass dominate this space of the frequency spectrum.
With that being mentioned, your ears ought to all the time be the ultimate judge. If it sounds good, it’s good! Simply be careful.
Some EQ tips for getting a fantastic EQ sound on guitar include:
- Curb the lows – Minimize through the mix if you’re playing with a band by eradicating any pointless bass frequencies. They’ll simply conflict with drums and bass.
- Take away any nasal frequencies – These are typically found within the upper mid-range and may simply be pulled right down to zero!
- Minimize the mud – The mud usually refers back to the lower mids and might be pulled down to offer you a clearer sound.
- Add clarity – Yes, add in high frequencies to make sure that your acoustic brims with sparkle and pleasure!
- Form the general tone – lastly, use your ears. If you might want to change a frequency that goes in opposition to the rulebook, do it!
Conclusion
For such an easy instrument, you’ve in all probability now realized that there’s quite a bit to think about when mixing the acoustic guitar. Don’t be intimidated, however, after making use of these methods on a couple of songs it’ll quickly turn into second nature.
The largest takeaway from this text must be to all the time think about the position of the acoustic guitar within the mix. This may inform how you utilize EQ, compression, reverb, and delay.
We always cherish a song that has some acoustic guitars in it. We simply love to process this instrument and make it shine in a mix. There are some other steps that you need to follow to make this element even better aside from the EQing, but here we focus only on this process.
Checking the phase of microphones and correctly balancing them with buses can also be essential to think about as you mix sound.
Lastly, utilizing automation will assist your guitar’s sound progress as the track builds. Comply with these tips and you’re sure to carry the sound of your acoustic guitar to the next stage very quickly.
Check our eBook on Mixing Tips! If you want to get a more in-depth breakdown of those tips we share, follow our link and get the “Ultimate Mixing Tips Booklet” and up your game quickly!
Best Mastering Equalizers: Shape Your Final Frequencies!
Best 500 Series Equalizers: Top 10 Models To Shape Your Frequencies!
Bettermaker Stereo Passive Equalizer Review: New Pultec-Style Equalizer!
Heritage Audio Motorcity EQualizer Review: Amazing 7-band Mono Passive EQ!
API Select SV14 Review: Great New 500 Series EQ from API! (2023)