
What is a Mix Bus?
Introduction
A mix bus is a method to send or “route” a number of tracks of audio to a selected place. Some frequent destinations or locations to route audio are aux sends, subgroups, and your main L/R mix. You’ll route your required channels or audio to the bus of your selection (Aux Send, Main L/R, VCA, and so forth.) after which feed that sign to the destination you want by turning up your faders or knobs for these channels within that bus.
Mix Bus is a term used within the live sound and recording worlds and is usually related to output channels/busses as mentioned above. Being able to regulate a number of sources or channels with a single “group” fader is among the greater benefits of having multiple buses at your disposal.
Why use a Mix Bus?
The idea of routing your whole mix to one channel, then routing that to the master fader, could appear unusual. In spite of everything, why wouldn’t you simply route everything onto the master fader itself? It’s because many DAWs present only a ‘pre fade’ master. Subsequently, if the fader’s position is altered, the input ranges of any plugins on that channel might be disrupted.
So the answer is to send all the things to an auxiliary channel first. One which is about to ‘post fade’. Then route the processed signal from the auxiliary track to the master fader. With a post-fade auxiliary track appearing as your ‘mix bus’, any modifications to the extent of that fader will not have an effect on the input ranges of any plugins on that channel. Now, you may turn the processed audio up or down utilizing the fader with no disruption to your plugin settings.
What is Bus Routing?
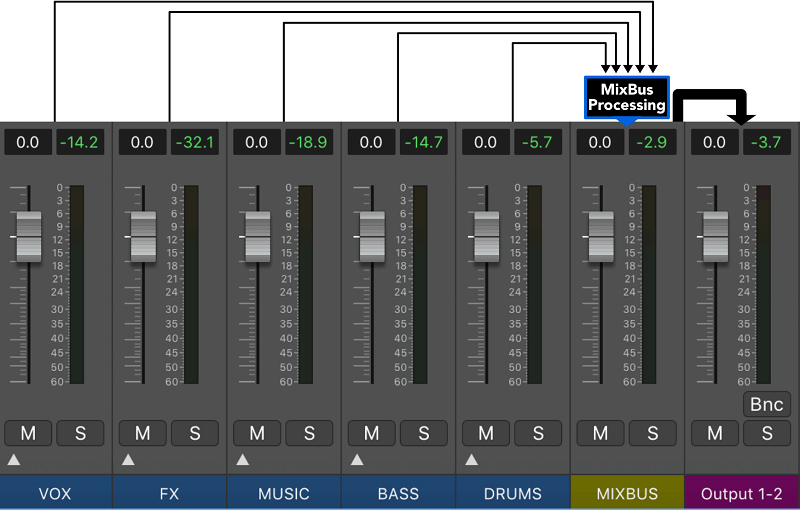
Bus routing is basically having totally different buses for various sections of the mix. Let us clarify.
When you’ve got drums (kick, snare, hi-hat, toms, overheads, room) after which you’ve gotten all the different instruments, corresponding to bass, guitars, vocals, and so forth, then you’ll have soo many channels all going into the master bus.
It is a bit of bit exhausting to maintain control of all these totally different instruments. However, if you happen to create an auxiliary channel and you set all of the drums there, and then create a distinct one and put the bass there, and so forth, you should have a lot better method of controlling tracks, doing automation, and applying compression to your mix.
How to Process Mix Bus
To be able to apply mix bus processing initially of a mix, you need to understand how every bit of analog gear or plug-in is going to have an effect on your sound. We suggest keeping your mix bus signal chain kind of the same for each track to take care of consistency.
Our mix bus is just about identical each session. We would pop just a few things in and out relying on the track, due to the different nature of every song.
Some songs could call for a clear, polished sound, whereas others sound better with a bit of grit and soul. It’s OK to add a splash of color to your mix bus in particular circumstances, however for probably the most part, your EQ and compression settings ought to stay identical.
However you approach mix bus processing, we like to recommend utilizing caution with how closely you apply EQ and dynamics processing. When you over-EQ or compress, or attempt to create a “mastered” sound in your mix, then you’ll possibly tie the hands of your mastering engineer – even if you happen to master yourself.
Particularly, mix bus processing shouldn’t be used to make the mix loud – compression and limiting ought to be used at this stage to glue and control the mix, to not enhance the level, which is best dealt with at mastering. Use simply as much processing as you need to get the mix where you need it, but leave room for mastering to work its magic.
Three Basic Plugins You Need on your Mix Bus
A Compressor
Selecting a good compressor is paramount when processing your mix bus. You need one thing that shapes the dynamics successfully, and each will leave a sonic imprint in your mix.
Listed here are just a few choices:
- Vertigo VSC-2
- FabFilter Pro-C 2
- UNISUM
- SSL Style Compressor
You can’t go wrong with an SSL-style bus compressor. It’s bought a brilliant, snappy sound that pairs effectively with most trendy genres. There are many nice emulations of this compressor, however, our favorite is SSL Compressor from Waves.
As of late, our go-to mix bus compressor is Api 2500. It’s more clear than the SSL and provides us the sound of compression without the added color and tonal shift.

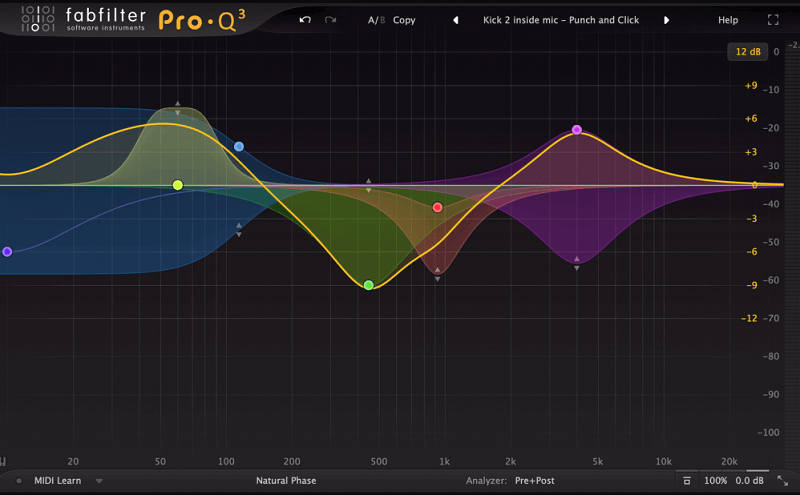
A Parametric EQ
EQ is among the strongest mixing instruments generally. When used carefully in your mix bus, it will probably assist your mix sing. We primarily use FabFilter Pro-Q 3, however here’s an extra comprehensive checklist of choices:
- Stock EQ
- FabFilter Pro-Q 3
- iZotope Ozone EQ
- DMG Audio EQuilibrium
Attempt to go for a digital parametric EQ right here. As nice as color EQs are (i.e. Pultec EQ), the above choices are way more versatile.
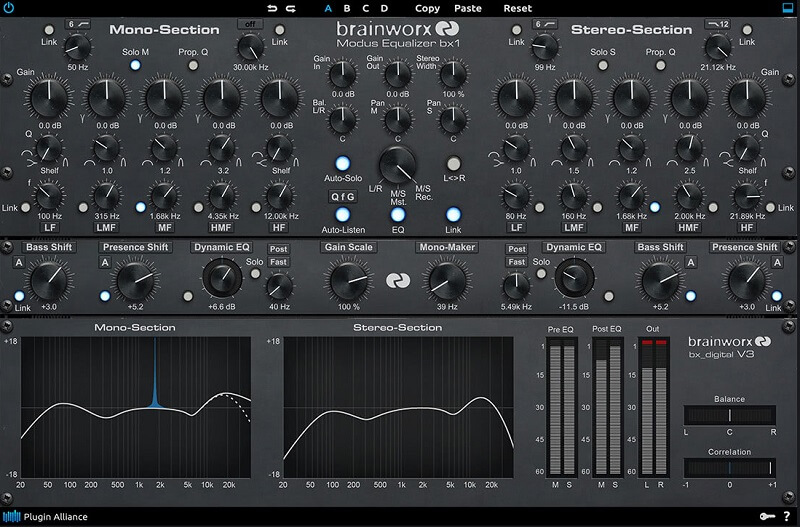
A Mid/Side (M/S) EQ
Mid/Side processing is a game-changer. It means that you can form the stereo picture precisely as you need it, and it may be nice for helping mixes breathe.
Most advanced EQ’s talked about before having a mid/side mode, however, listed below are just a few options anyway:
- Default EQ (if it has a mid/side mode)
- Brainworx bx_Digital V3
- FabFilter Pro-Q 3 (mid/side mode)
Tips on Mix Bus Processing
Now, other than the technical routing, let’s focus on methods to optimize your use of the mix/master channel.
- Keep your mix bus mild. We discover that you simply achieve better outcomes by flexing your creative muscles on every channel individually than attempting to repair all of it in the end. The more control you’ve gotten over your sounds, the more element you’ll have generally, however, remember the fact that in case you have too much to repair in your mix bus, you’ll even be affecting different channels that are perhaps simply fine.
- Don’t compress too much. You’ll lose in your dynamic range if you happen to compress the signal too much. When you’re missing a gain, in the end, you’ve gotten two choices: first can be to go on every channel and gain stage there first, or if you happen to compress on the mix bus, do it in parallel.
- Use your reference. So many individuals mix blindly that after in a club, they’ll see they’re fully off of their efforts. Test some instruments with a reference straight within the arrangements.
- Keep away from presets from do-it-all plugins! That is one thing we see so much with individuals dropping Ozone and choosing a preset, then export. If you’re going to try this, please test the compression ratio, ranges, gain reduction, and attack/release. These can actually mess up your track and that might be a complete loss once in mastering. The better mix we get, the higher master we may give you. Once we compress, we’ll attempt to maintain our gain reduction below 3dB, with a gradual attack and quick release.
- Use shelving EQ for tonal stability. As seen in one of our earlier IG posts, the shelving EQs are wonderful so that you can determine what tone your track may have and shortly readjust the low end or highs.
- No limiter in your mix bus. Keep your signal clear.
Routing the mix bus to the master fader
Lastly, set the output of the mix bus aux track to the master fader. In most DAWs this would be the name of the analog outputs that go to your audio system. ‘Master’ or ‘stereo output’ may additionally be terms used. The signals are actually passing by the auxiliary channel first before they reach the master fader.
It is as simple as that! Open up your DAW and give it a go. Arrange a master track and an auxiliary track. Attempt altering the level of the faders and see the best way that pre and post-fade have an effect on your plugin settings.
Conclusion
Whether or not you simply need to set up your tracks in sub-groups or set up complicated effects audio flows with auxiliary buses, mix buses generally are a huge timesaver and simplify your work. And, as always, much less work for you means extra time staying inventive! So get the best of each world: keep organized and creative.
In summary, mix-bus processing is a strong method to assist deliver your mix to a different stage. However, each motion you are taking should be in the best interest of a mix’s musicality. Listen to the record and let it tell you what it wants. Should it be punchier? Is it glued together? Brighter? Bassier? Louder?
Make choices based on your ear, and be very purposeful within the processing you select by constantly A/B-ing and listening back to the material.


