Mid/Side Mixing
Introduction
In the present day, the mixing of music has by no means been louder, wider, and clearer. The technological developments in music production software programs have proceeded to extend the standard of music production. In turn, new strategies have been developed to harness the ability of superior software. One method that has performed a vital role in the general quality of your mix is mid/side processing.
By now many have heard of mid/side processing or have even used sure mid/side processors or sure mid/side strategies to boost the mix of their songs, however still, the method is underused. Whether or not you don’t perceive mid/side processing or you’re in search of new methods to enhance your mixes through this method.
What is Mid/Side Mixing?
Once we sit down to make a brand new track we wish to ensure we have the cleanest and most professional sound out there. On the quest, we have come upon some strategies to essentially get an ideal-sounding mix. We haven’t shared these before, however needed to lastly let the knowledge be recognized about how we actually take control of the EQ and panning of the sounds.
Most individuals get the thought of panning a signal left and right, however, might not ever hear of mid/side Mixing. In this article we are going to clarify the fundamentals of mid/side Mixing, in addition, we will explain how you can use it in any DAW.
Definition of Mid/Side Mixing
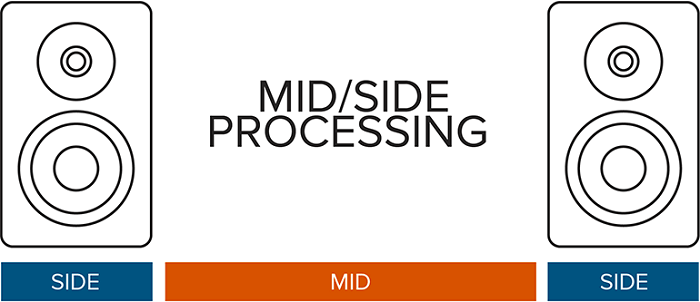
Mid/Side processing works by decoding a stereo signal into two parts. The ‘Mid’ channel incorporates simply the data that seems in both the left and right channels. In different words, it’s the mono signal.
The “Side-channel” incorporates all the data that differs between the left and right channels. In different words, that is the sounds only on the sides and not the place else. Once encoded into M/S, these two signals could be processed fully individually. They’re then summed collectively and you should utilize the regular panning left and right.
Think about it this way, you may change the standard of your stereo subject separate from the menu. This will provide you with quite a lot of new methods to control the sound.
1. Lead Vocal M/S Trick
Lead vocals need to be front and center in a song. Maintaining lead vocals centered helps them sit within the mix better, provides them extra definition, and retains their punch.
As a substitute for boosting the volume of the vocal track, strive to make space within the mix for the vocal. For instance, use mid/side treatment to carve out mid-range frequencies from instruments that battle with the vocals.
Begin by discovering the frequency range where the vocal has essentially the most power. Discover this range by boosting a bell filter on an EQ after which sweeping throughout the frequency spectrum. Pay attention to the dominant frequencies that give the vocal its power. Write the frequency range down and deactivate the EQ.
Next, group all of the instruments with conflicting frequencies at that range.
Lastly, use a mid/side EQ on the group to chop that frequency range from the mono channel.
These moves create a pocket for the vocals to sit within the mix. Additionally, dipping the mid frequencies preserves the broader side frequencies, not interfering with the vocals.
2. Improve your Bass
Are you utilizing stereo growth at all, whether or not on the mix bus or a particular instrument? You’ll have an additional use for mid/side EQ.
Stereo expansion tools are actually nice, however you have to watch out when using them. One purpose is to keep away from phase cancellation. But additionally to keep away from widening the bass.
When low frequencies unfold throughout the stereo field, they have the inclination to overpower your mix. Let’s say you add a stereo widener to the mix bus and you like the way it sounds. However, impulsively the bass is simply too big.
It’s occupying a lot wider part of the stereo subject than you need. That’s where a mid/side EQ may also help. You may add a high-pass filter to the sides and rein in these low frequencies.
So if we lower the lows in the sides, we take away potential muddiness and center the bass. Most subwoofers are mono, and our ears aren’t great at inserting the direction of low sounds. So there’s not a lot of threat of harming your mix by doing this.
3. Start with simple level changes
Before you start getting fancy with M/S processing – and there are many methods to take action – begin with the only usage of all: Play with the relative ranges of the mid and side channels. This straightforward operation can convey focus and stability to the center, and pleasure to the sides.
Boosting the sides channel by simply 1 or 2 dB can work wonders in certain conditions, giving the track a wider, extra open sound while at the same time gently making cymbals, guitars and different parts panned to the left or right turn into a little bit more alive. The vocals have a tendency to sit within the track a little bit better, too.
Conversely, dipping the sides a bit decrease (or elevating the mid-channel a little) will strengthen the track general by making everything extra mono. That is very true for the low frequencies, which generally live predominately within the center, in addition to making the middle or lead vocal extra outstanding.
4. Mid/Side Reverbs
Reverb is an integral part of any music manufacturing including width and space. Since it’s primarily used to create space in your mixes they’ll simply profit from a little bit of mid/side processing with the purpose to sustain the increasing clarity and width of modern tracks. Separating your mid and side signals into two separate channels will provide you with better management over your reverb and assist you to process every channel individually.
You may accomplish this by making a return or send and placing on and muting the side signal on one channel and muting the mid on the opposite. Since our purpose is to create a wider and clearer reverb, we process accordingly. On the side channel, we add an EQ and enhance the highs.
By doing so our reverb seems wider as there may be separate frequency content poking out within the stereo subject. After our EQ we add an over-the-top compression.
The OTT is a multiband compressor that applies particularly upward and downward compression and growth to convey the smaller elements of your sound in a slightly extra gritty and saturated fashion. Making use of a small quantity of this FX on our reverb will help bring out the complete reverb sound and enhance the quantity of the side signal which creates a better separation from the mid signal and due to this fact a good wider sound!
Tips For Band Practice: 100% Productivity Breakthrough (2023)
Song Arrangement Tips: 15 Quick Tips For Amazing Song! (2023)
Tips for Louder Mixes: 7 Great Methods and More Tips to Maximize Your Mix!
Tips to Improve Mix Translation: Get Your Song To Sound Great On All Systems! (2023)
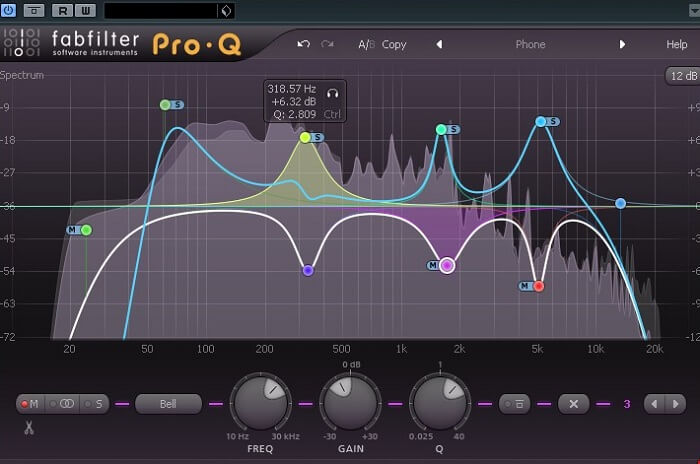
5. M/S Stereo for Fuller Sound
Use mid/side equalization to create a wider stereo picture on a full mix or individual components. You may create stereo width by altering the balance between mid and side ranges. For instance, widen a signal by boosting high frequencies within the side channel or attenuating low frequencies within the mid-channel.
Widening the stereo picture will make your mix sound fuller and extra pleasing for the listener. Equally, stereo widening can be useful for sound design. For example, when layering synths to create a wider, extra fuller sound.
The instance above widens a synth track by attenuating the mono signal and boosting the stereo signal with a high-shelf filter at 8,000 Hz. This step creates space to layer a mono-centered synth whereas additionally creating width. When mixed, each layer sounds extra cohesive, present, and immersive.
This mixing method might also work better than stereo-width plugins generally. For instance, stereo imaging plugins can have an effect on the phase of a sound, inflicting it to lose punch. Conversely, mid/side treatment will preserve the impact of the middle channel while only widening the side channel.

6. Use M/S for compression
Get things pumping in your effects return by making use of a compressor to the vertical, or mid-channel only with a quick attack time to squash the transients – a way that significantly reduces the chance of artifacts on the reverb and room atmosphere, both usually panned to the outer edges of a mix.
In the event you compress both mid and sides channels on a reverb buss, compressing the mid-channel more than the sides can have the impact of making the reverb wider.
Or, in your mix buss, strive to compress the sides channel to convey out the softer, textural parts. This may serve to accentuate the ambiance without overly squashing the backbeat – sort of like compressing the room mics on a drumkit.
When compressing the lateral, or sides channel, you’ll wish to simply ‘touch’ the gain reduction by a dB or two and use a pretty slow attack/release instances in order that the transients (i.e., cymbals, high-hat) get through; in any other case, things will start to sound very unnatural.
7. Improved Side Chain
By now, we all know what sidechaining is, however whenever you step into the mid/side dimension of the mix, you possibly can create even better dynamic curiosity and space. This side chaining will add one other layer of pumping, however, we’re only going to use it to the side channel of our wider sounding instruments.
This may give a three-dimensional pump effect that provides the appearance of a stretched-out stereo area. We accomplish this by grouping our wider stereo instruments and inserting the mid/side processor on the group to separate the channels. Subsequently, we place our compressor only on the side channel and set it to set off only to the kick and snare.
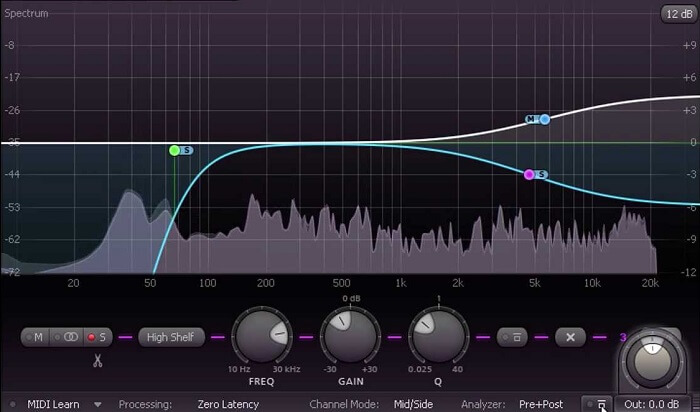
8. Mastering with Mid/Side Processing
If a mix sounds muddy, strive to decrease low frequencies within the side channel with a low-shelf filter. This is likely to be helpful, as an illustration, to surgically EQ the mud out of hard-panned guitars while preserving the vocal and kick drum within the middle of the mix.
If the mastering compressor is struggling to scale back dynamic range and not using a perceived narrowing or squashing of the signal, use a mid/side compressor to use much less compression to the side channel than the mid-channel.
Heavy energy within the middle of a mix, where the kick, snare, bass sit, could cause a compressor to kick in, which truly squashes the broader, extra ambient, and spatial parts in the mix. This method helps avoid that problem.
A dry acoustic mix could be warmed up with mid/side reverb. Add reverb to the mid-channel, however, filter out a few of the low end on the wet, reverberant signal to keep away from muddying the kick drum and bass. On the side channel, add 2-4% extra reverb than on the mid-channel, with no filtering needed.
Conclusion
Well, yet another informative post is done. We tried to briefly explain what is mid/side mixing and processing and provide you with several tips where you can practice this method.
If you are having any other usage for this mid/side process, feel free to shoot it out in the comment section and share it with the community of readers! Until then – have fun!
Visit our store and check our Mixing eBooks and Galeries!