How To Reduce Harshness In Vocals
Introduction
Many mixers encounter problems with harsh vocals. There are many common vocal issues that can be resolved with basic microphone placement and tracking techniques, especially for those who are not involved in the tracking process.
In the process of mixing music, you have probably encountered this situation countless times, when some frequencies in your vocal tracks are piercing your ear and you are unable to adjust them to match the context of the overall song.
You are unable to tame these harsh vocals with compression and are not quite sure what to do. The question is, how can you ensure that harsh vocal frequencies are removed from your tracks musically and effectively?
How do you eliminate harshness completely, how do you find it, and where does it hide? A professional’s mix can be improved by removing harsh vocal recordings. Here are some guides and tips.
1. Locate The Problematic Frequencies
In harsh vocals, a specific frequency resonance in the high frequencies of the song is at the root of the problem. When a certain consonant, phrase, or note occurs in vocal performance, such resonances often occur.
Therefore, when correcting harsh vocals, we need to make sure not to affect the parts that are not problematic. It is up to you to decide which approach is best for your session, and how to structure it in order to accomplish the best outcome. Use your best judgment to make the right decision.
You can reach out to several different approaches, like compression or EQing to address the problem and find the easiest way to do it and not affect the points that don’t need fixing.
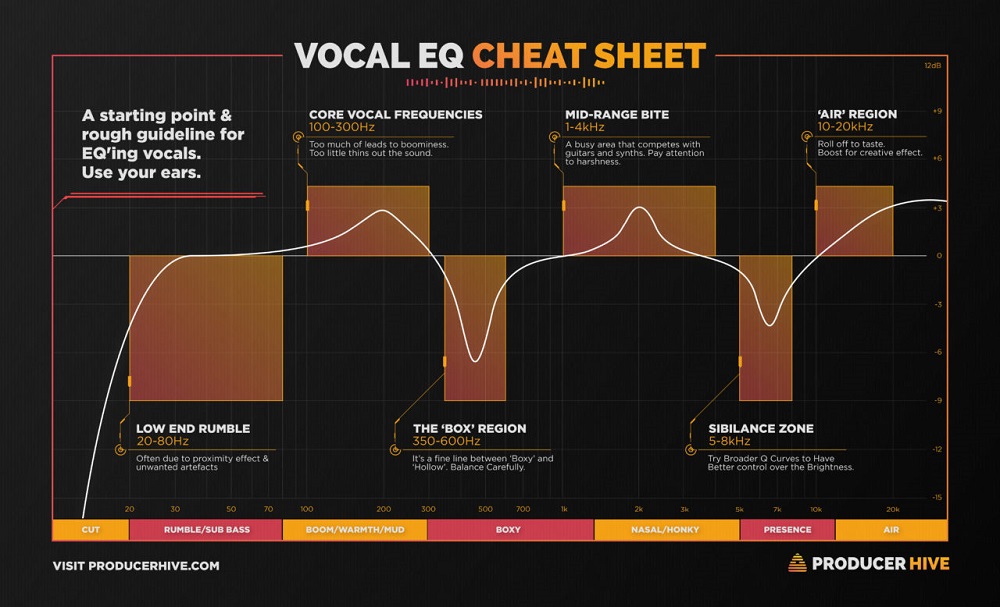
You should keep in mind that treating one frequency won’t necessarily solve your problem. In addition to that frequency, we also need to take into account its harmonics. You should also find harshness at 5 kHz and 10 kHz if your vocals are harsh around 2.5 kHz.
The significance of these issues will have to be determined on a case-by-case basis, but here are some ideas you can use to tame that harshness, whether in one spot or all over.
2. Subtractive EQing
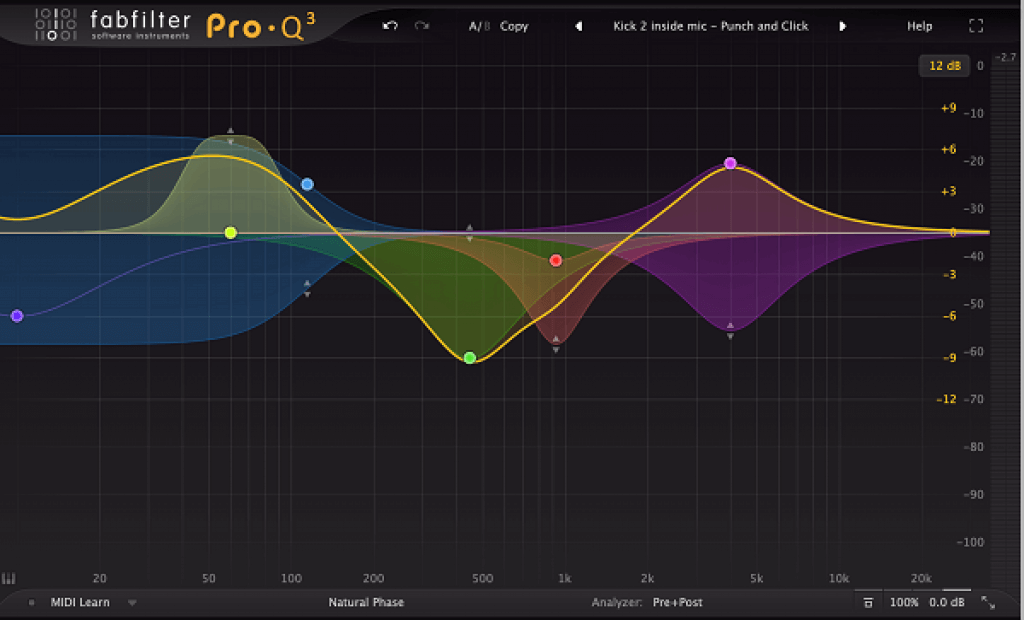
It is possible to reduce harsh frequencies by using an equalizer. The concept of EQ can be compared to having a volume fader on each frequency that constitutes the sound. Due to this, unwanted frequencies can be reduced and desired frequencies can be increased.
By sweeping a narrow Q across the high-end, you can identify harsh resonances (usually between 4-10 kHz), and reduce them accordingly based on your ear’s judgment. If you do this, please note that it will affect the presence of that frequency throughout the entire song.
It may be possible for me to notch out 3dB of 4.5khz and find that this solves my problems during harsh sections in the verse. It is important to note, however, that if a key change takes place during a chorus, the loss of 4.5 kHz could negatively affect its overall presence.
As a result of negative side effects such as these, we often turn to EQ after we have exhausted all other corrective measures.
In addition, automation may be useful for bypassing the EQ when it is not required, this will allow you to reduce harsh frequencies only when necessary.
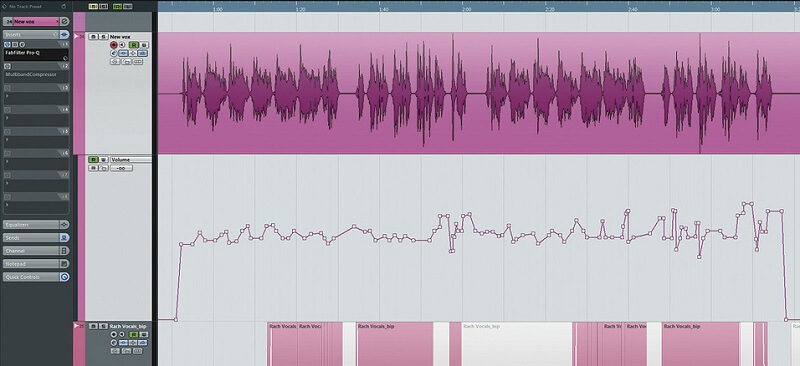
3. Gain Automation
It is now time to begin processing your vocals once you have recorded them. In order to make your vocal track sound as good as possible, we recommend automating the gain. It is important to keep in mind two things when automating gain. To begin with, it is necessary to level out the entire vocal track (this will facilitate the use of general compression).
Second, we are attempting to reduce any consonants in the vocal track that are still too prominent. Your de-esser will be less stressed as a result of all this effort and will perform better as a result. It is a lengthy process, but the results are well worth the effort.
4. Dynamic EQ
As a second method of taming harsh vocals, dynamic EQ is our favorite. It has been mentioned previously that the use of regular EQ can negatively impact source material as the sound changes consistently throughout a song, even when the frequencies you are cutting are needed at other points in the song. This problem can be remedied by automating the EQ, but that will require more effort to set up properly.
In addition, we propose a dynamic equalization solution. An added feature of dynamic equalization is that it only works when the frequency being adjusted exceeds a set volume threshold. In addition, it only attenuates a frequency when it exceeds a threshold determined by the user and becomes too loud in the track.
5. De-Essers
De-essers work by compressing frequencies between 8 and 10 kHz. It is within this frequency range that sibilance can be found. It is possible to effectively reduce sibilance by reducing transients in this area. FabFilter’s Pro-DS is one of our favorite de-essers. It is very transparent and offers a wide range of controls.
There is no difficulty in using de-essers. By selecting the frequency range you wish to affect, and then lowering the threshold level, you can achieve your desired results. Whenever there is a peak above the threshold, the gain will be reduced. In other words, all of those ‘s’ and ‘p’ sounds will no longer stand out.
With the assistance of a de-esser, these sounds are tucked into the mix so that they sound natural. Furthermore, it is not uncommon to use more than one De-esser in a vocal chain or back to back.
Regardless of what solution you choose, you should do whatever will resolve your problem. Several de-essers allow the user to select different detection modes that may be helpful in reducing harsh vocal frequencies.
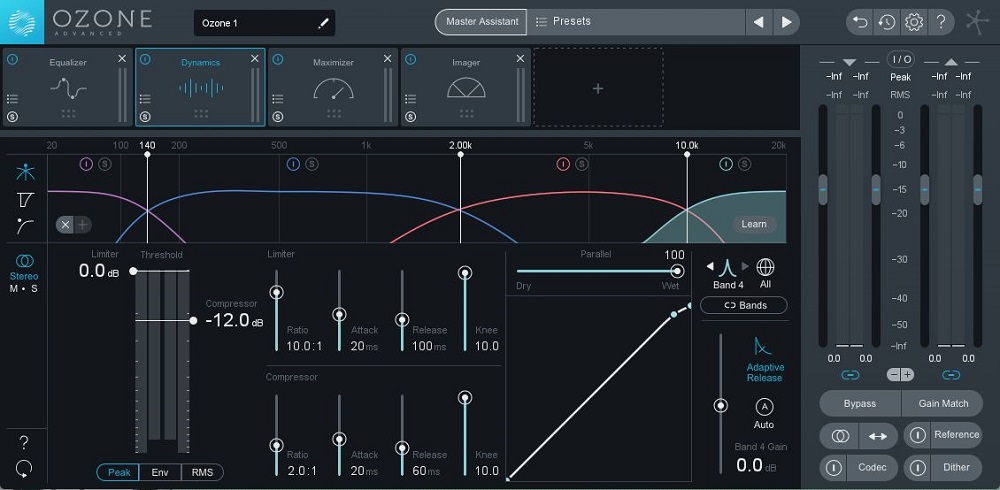
6. Multiband Compression
On vocals, this technique is particularly effective. We tend to use this technique when mixing sub-mixes, but it may be applicable to vocals as well. Multiband processing can introduce a wide range of issues, so be cautious and conservative as always. The best method of finding the exact crossover point is to use a multiband tool to address the upper mids and highs.
In the case of a multiband compressor, we tend to use lighter ratios; if a range is offered, we also tend to refrain from using high ratios. Taking action too quickly, too hard, and too often is not desirable. Time constants of medium length are recommended. If you wish, you can time them to the melody’s tempo in order to make the effect more subtle.
By using this technique, harsh frequencies can be mellowed out. There is a sense in which this process could be considered to simulate the way analog tape seems to subtly reduce high-end in the analog domain.
Conclusion
After taming a harsh vocal, you have a wide range of production options available to you. The key to a good vocal mix is not just a great melody and controlled vocal performance, but also an understanding of how to arrange and produce the track.
To tame harsh frequencies and fix harsh vocals you need to analyze your frequency spectrum and be after natural vocal sound. Every vocal recording has some issues that can be fixed, you just need to find the right tool for it.
No matter if it is a multi band compression, volume automation for clip gain, or static EQ, if it’s doing the work properly without sacrificing the good points, you did your job well!
If you think we missed something in regard to this topic, please let us know in the comment section below and we will be more than happy to update and elaborate!
Universal Audio SP-1 Review: New Standard Pencil Microphone Pair from UAD!
Lewitt LCT 440 PURE Review: Amazing Condenser Mic on a Budget!
Royer R-10 Ribbon Microphone Review: Amazing Ribbon Mic by Trusted Developer!
Tonor Orca 001 USB Microphone Review: Great Budget-Friendly Gaming USB Mic!