How to EQ Vocals
Introduction
One factor to recollect once you equalize a vocal is that the settings will be totally different in each project.
This may also rely upon a variety of elements reminiscent of the kind of microphone, singer’s position, mic method, room, and an entire lot of different things.
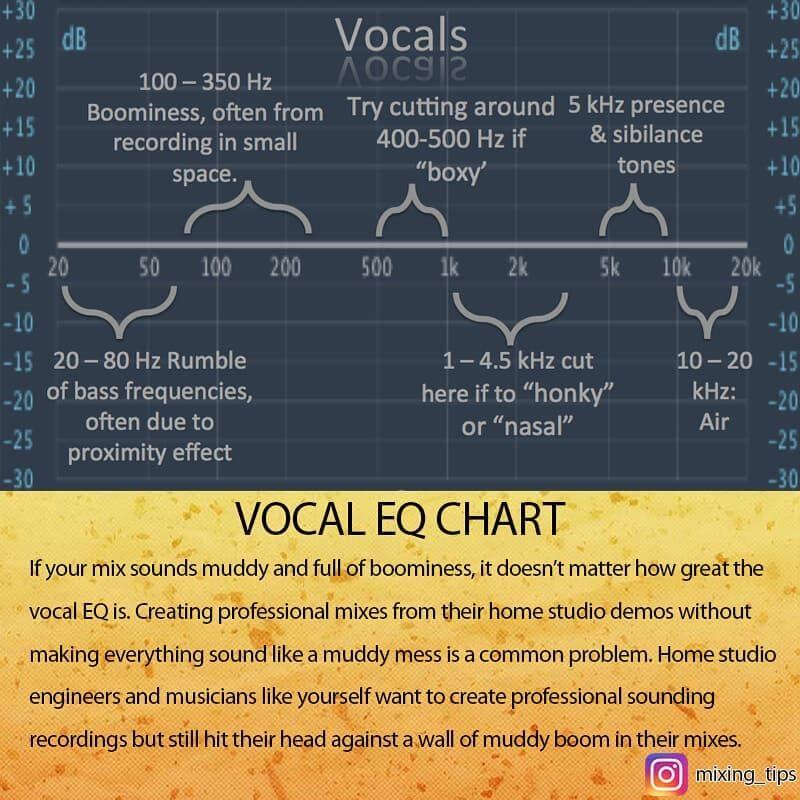
Low frequencies: It’s essential to reduce everything beneath 80 Hz, this space is simply noise flooring and it’ll create rumble and dirt in your mix, so reduce it out you don’t want it. Particularly if the vocalist keeps dancing and kicking the mic stand. A high pass filter will work wonders here.
Do it with caution though, because if you overdo it, your vocals will appear to be thin and lose some of the basic/root frequencies that the vocal has. Always double-check what you are doing with the filter.
Boominess: This “effect” is mostly found across 100 Hz to 300 Hz. Keep away from boosting this space as a result of it is going to make your vocals sound boomy and it’ll not sit nicely in a mix. More often than not you’ll want to chop it out, particularly on a male vocalist or if the vocals are recorded in a small room.
Many engineers find that this is the area that causes most of the problems but also keeps some of the nice and warm frequencies with the vocal. Our suggestion here is to try and add dynamic EQ or multiband compressor to tame this area and get the best from both worlds.
Mud & Boxiness: The muddy space could be found around the 350 Hz to 500 Hz frequency range. However, watch out for your cut in this space as result of it might make your vocals sound hollow. Zero it right down to the precise problem frequency and use a medium to narrow the Q factor.
This is something that everybody is talking about. The infamous mud. It is simple. Create a band that is in this frequency range and simply lower it until there is no more mud. Always do it carefully and tastefully – do not rush.
Nasal & Honkiness: The area around 800 Hz to 1.5 kHz is usually honky and has a metallic sound. You will want to chop that out to keep away from any nasal quality.
As the name states, this makes your vocal sound like you have a clogged nose. But this area also has some sweet spots for vocals, so be careful when working on it.
Clarity & Presence: After slicing out all the problem frequencies your vocals ought to sound extra clear and present. However, if you happen to feel like you need to add extra clarity and presence then make a boost within the 4 kHz to 9 kHz range. Watch out to not add an excessive amount of sibilance or plosive sounds.
Above this area, we want to have these slight boosts on the vocal, because that is what gives the vocal kick to shine through the mix. Always boost this area if your microphone is lacking it.
Breath & Air: To help the vocals cut through the mix, make a bandpass filter increase from around 10k Hz to 16k Hz.
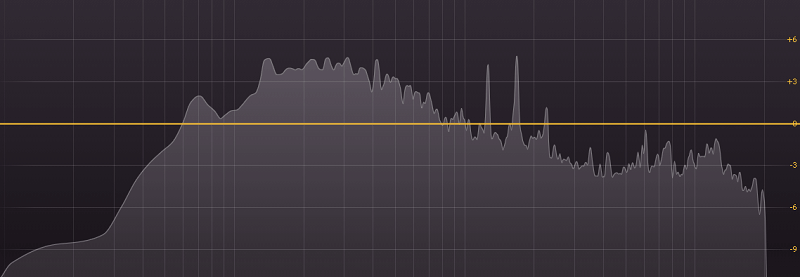
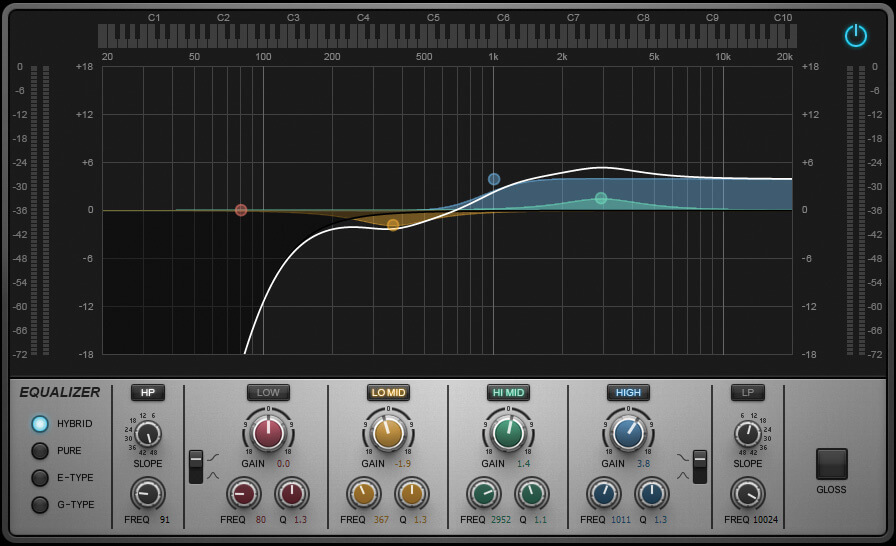
If you are not sure where exactly to boost, you can go with a high-shelf filter and boost above 10kHz. A high pass filter in combination with a high shelf creates the image with the EQ settings that is significant when seen on a parametric EQ.
All other vocal EQ options in between will depend on the vocal you have in hand.
Bear in mind to use a narrow Q factor once you’re slicing frequencies and use a large Q factor when boosting. But rules could be broken, simply as long as you produce sound good enough. Your ears should always decide how to approach these spots. No matter if you need to boost or cut, believe them.
Here are some fundamental tricks to get you started on how to EQ vocals correctly:
Tip #1 – Cut before you boost
Typically, low-end frequency cuts are referenced in relation to vocals. The worship band has a number of instruments that create low-end sounds, to a point. The drums and bass are filled with low-end frequencies.
Then move as much as electric guitars and yes, even acoustic guitars. Add to this the presence of stage amps and flooring monitors and the stage is being stuffed with a variety of low-end frequencies. Is that dangerous? A simple high-pass filter might help you out there to reduce some unwanted frequencies that sound harsh.
A great mix will have the correct ranges of low frequencies that benefit the music. However try this; during the next soundcheck when the band is playing music, put on a pair of headphones and solo the lead singer’s microphone. Listen to all the extra sounds the microphone is detecting.
Whereas they’ll all be filtered out, a little bit of slicing will assist. Oh, and the nearer the singer’s lips to the microphone, the greater likelihood of getting extra bass because of the proximity effect. The proximity effect can sometimes be a good thing, sometimes bad, it depends on the situation. Does anybody say this was speculated to be easy?
All these problematic areas are best approached with subtractive equalization. When you are trying to fix something, it’s best to cut the specific range. If you are going for some creative touch with EQ, then you can boost frequencies. In case you go for that option, try to use some analog-modeled EQ to boost for some extra flare that this plugin has.

Tip #2 – Take away the mud
Muddiness is among the greatest issues in most mixes. Particularly when we have the everyday band set up of a number of guitars and a vocalist. Most of those instruments are centered around 250-350Hz, so we quickly get a build-up of frequencies on this space.
Attempt a cut of 3-5dB around 300Hz (move it around a bit till you discover a sweet spot).
This can only work on vocals that already sound full. If the vocal sounds thin, cutting around 300Hz will only make it sound worse! In case you have a muddy mix but the vocals can’t afford to lose something around 300Hz, reduce the opposite instruments round this frequency as an alternative.
The balance is really important to have all the frequencies right. Focus and listen especially to this area to check if you are able to notice any inconsistencies in the frequencies. If you are having a hard time with this, use some visual aid plugin to assist you down the road. They will tell you if you need to boost or cut some areas.
Tip #3 – Boost where it works
“Boost within the 8-10 kHz range so as to add some air or breathiness to their voice,” is a sentiment typically shared relating to lead vocals. That sounds good and for essentially the most part, I do this sort of boosting. How to EQ vocals is also based on your decision. You might need to boost somewhere to achieve a better outcome for your recording.
Simply as talked about before, the vocal microphone can pick up a variety of sounds, even when you could have the gain at an optimum stage. Drum cymbals could be LOUD on the stage and boosting a vocal microphone that’s picking up a lot of cymbals means now boosting the presence of the cymbals within the mix.
Backing down a bit from that top-end space, let’s take a look at getting a pleasant brilliant sound. Begin by making use of a boost within the 6 kHz range. Be careful you don’t bring in any sibilance. A normal mixing rule is to enhance wide and reduce narrow. Cutting is eradicating only what’s dangerous, very similar to a surgeon’s work.
Boosting will usually contain a lot of wider frequency range. In case your analog mixer has Q values (bandwidth) with the EQ controls then you possibly can control how wide/narrow the EQ adjustments shall be across the frequency level.
Tip #4 – Increase fundamental frequencies of the vocal
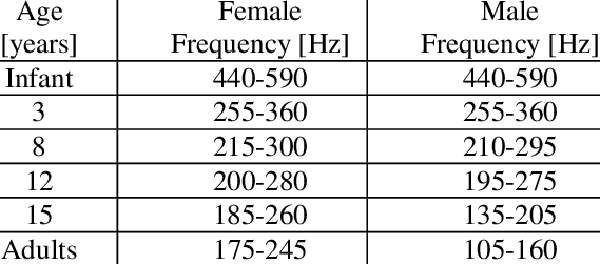
You might or might not want this, which is why it is virtually final within the list. Generally boosting (and even cutting) the core frequencies can easily out the quality of the vocals. This can change depending on if it is a female or male vocal take, however, the range is all the time identical. Determine where are your spots and make the right decisions on how to do vocal EQ if they are problematic.
However, for now, know you’ll be looking within the 1 kHz to 2 kHz frequency range to seek out this core frequency. Boosting it should add some clarity to the phrases being spoken, making it simpler for the listener’s ear to grasp on and maintain on to the vocals.
Tip#5 – Lower resonances with a bell filter
A vocal must be particularly smooth, with any resonances being managed or turned down. This isn’t true for all vocals; a jazz vocal typically has extra nuance and resonance than a pop vocal to remain extra “natural” sounding, and typically to emulate traditional devices like horns.
Pop, however, is outlined more by its brightness than its mid-range. To attain that stability, it is advisable to identify and attenuate resonant frequencies within the vocal.
Resonant frequencies are factors and ranges within the voice where there’s an abundance of power. We might use phrases like “nasal,” “metallic,” and “brassy” to explain them. Every voice has a unique amount of resonance in numerous areas of the frequency spectrum. Resonances can even rely tremendously on which mic is used, the range of the music relative to the person who’s singing it, the time of day, the particular efficiency, and loads of different factors. As a way to remove resonances, you should use a method referred to as ‘peak and sweep.’
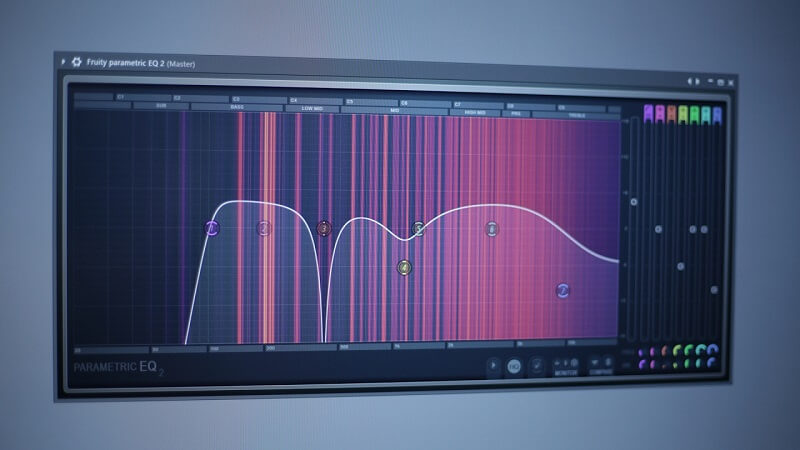
Take a bell filter, set the Q parameter as high as possible to restrict the range, increase the gain to around 10dB and then sweep throughout the frequency spectrum while the vocal is playing. Hear till you hear something that makes you wish to cover your ears. When you’ve identified where that resonance is and the way wide the range is, you may then attenuate and widen the band accordingly. Parametric EQs like ProQ3 from FabFilter work perfectly for this process.
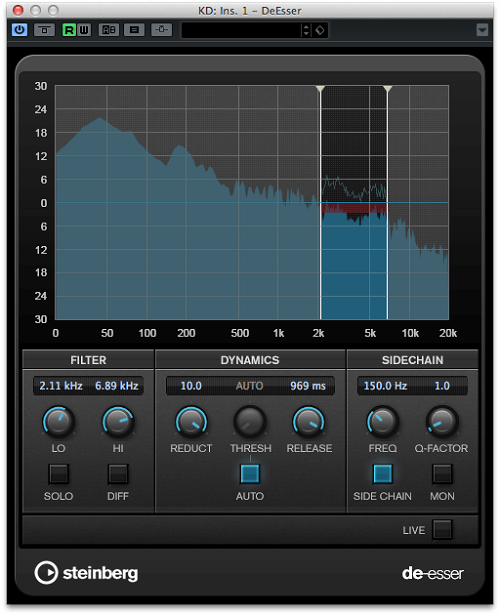
Tip #6 – Use De-Esser
Sibilance right here refers to these hissing sounds we make when saying some letters like S or Z. For instance, listening to Daffy Duck repeat the phrase ‘Nervous’ while grilling Porky on the witness stand.
However, a good microphone will amplify the slightest hiss sound made when saying the letter ‘S’ or the phonic ‘Sh’. This may be annoying to listen to and may make your vocals sound unprofessional.
But not all sibilance is unhealthy. There’s good sibilance like in Michael Jackson’s ‘Wanna Be Starting Something’. You may spot some good sibilance in George Michaels’ Careless Whisper too. And in case you are an old-school hip-hop head, you in all probability jammed to the sibilant hook in Vanilla Ice’ Ice Ice Baby.
All of it comes all the way down to the ear and your creative verdict. If the sibilance doesn’t add worth to your vocals, it is advisable to cut back the Ss.
Conclusion
These are simply beginning points, not magical solutions, because each instrument, each vocal, each mic, and each recording chain, sounds completely different, but, it is a great way for you to create your personal presets for a place to begin in your favorite EQ plugin.
At all times bear in mind is best to attenuate than to emphasize, and when you must boost, is best to make use of wide Q and enhance a small quantity of dB. The more instruments you might have in your mix, the extra you’ll have to attenuate and filter, and vice-versa. And naturally, don’t attempt to emphasize something that’s simply not there.
Now, once you solo the EQed instrument, it just would possibly sound terrible. Well, fortunately enough, nobody besides you’ll ever listen to it in isolation.
Keep in mind, EQing is one of the simplest ways to make room for everybody to fit in the mix!
It’s our hope that these steps present sufficient specifics to be helpful on the right way to EQ vocals, but, enough generality to make sure you can apply the steps to each vocal. The purpose is to arrange your methodology into a list of sequential functions. With that method, you can be smart and efficient as you progress down the road with every process. Might these tips serve you nicely!
Check our eBook on Mixing Tips! If you want to get a more in-depth breakdown of those tips we share, follow our link and get the “Ultimate Mixing Tips Booklet” and up your game quickly!
Best Mastering Equalizers: Shape Your Final Frequencies!
Best 500 Series Equalizers: Top 10 Models To Shape Your Frequencies!
Bettermaker Stereo Passive Equalizer Review: New Pultec-Style Equalizer!
Heritage Audio Motorcity EQualizer Review: Amazing 7-band Mono Passive EQ!
API Select SV14 Review: Great New 500 Series EQ from API! (2023)