Studio Monitor Placement
Introduction
In order to identify flaws in a mix, studio monitors are the most effective tool available. In spite of this, owning a pair is not necessarily indicative of anything in and of itself.
Although studio monitors are more suitable for music production than consumer-grade speakers such as high-fi speakers, it is important that you consider the room in which your monitors will be stationed and the manner in which you will place them on your desk.
A good set of speakers can make anything sound good, however, studio monitors are designed to identify the flaws in a mix. However, poor acoustics and sound reflections make it difficult to identify those imperfections, even if the speakers are properly positioned.
In this article, we are going to suppose that all your acoustics are sorted out and that you are at the point of setting up your monitors properly and getting ready for mixing.
In case your room is not yet acoustically treated, you will be able to find some articles about acoustic treatment units on our website that you can make on your own and where to place them to sort the acoustic part of your room.
Why Placement is Important
The importance of creating a conducive listening environment cannot be overstated. It is essential that studio monitors are positioned properly in order to create mixes that will translate correctly on different speaker systems.
Additionally, you will be able to hear your music accurately. It is also possible to create problems in your room’s frequency response if you place your studio monitor incorrectly.
You will also be unable to hear your music correctly if you are in a poor listening environment, which will lead to poor mixing decisions. During the setup of your studio monitors, the following tips should be observed for the best outcomes.
It is important to note that these best practices may not be appropriate in all studios. However, these tips should serve as a good starting point for creating a comfortable listening environment.
1. Room Dimensions
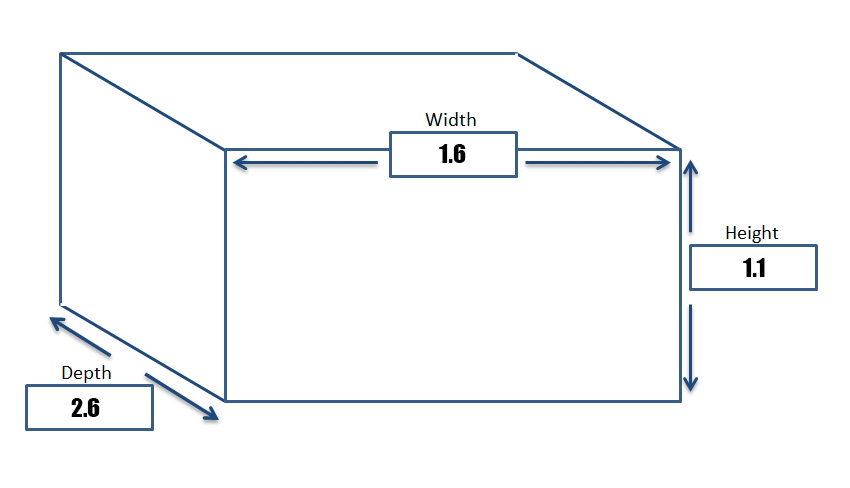
It is widely debated as to what the ideal room size for recording studios is. Generally speaking, the larger the better. However, you do not require a large room in order to accomplish this. A room has an acoustically pleasing proportion of 1:1.6:2.6 (height x width x length) when using the Greek Golden Mean Proportions.
The golden rule for recording studio dimensions says you need a room that is 8 ft tall x 13 ft wide x 21 ft long if you have an 8-foot ceiling. There is more space for sound waves to bounce around in larger rooms, so they can travel further. By doing this, you create a more controlled environment and give the sound a chance to settle.
Standing waves, wall reflections, and low end are sometimes a problem in small rooms. Standing waves are caused by sound waves reflecting back into the room when they hit a wall. Read more on standing waves in this article here.
There can be a difference in the volume of certain frequencies as a result of this. Furthermore, it can cause the room to sound “boomy” or “dead”. In smaller rooms, treatment is of utmost importance.
This is just a point we want to make if in case you will be able to build the mixing room from the ground up. It is best for you to find the average size of the room you wanna have where you will place all the equipment and after that shape it to the golden rules using this formula or a room calculator.
2. Find Your Listening Position
You should divide your room vertically into three equal-sized areas: the front, the center, and the rear. In the case of music production, your listening setup should be located in the front area. Monitors should be positioned so that they are aimed at the listening position.
Standing waves or room modes are the resonances that occur between surfaces in a room. When resonances occur, the surface of the object experiences a maximum sound pressure. It is recommended that the listening position is placed at least one meter from the wall in order to avoid the zone of maximum pressure.
It is recommended that the listening setup be arranged symmetrically in a left-right direction. The monitor should always be positioned so that it faces the listener. Reflection-induced frequency response irregularities are reduced as the monitor is raised above the floor.
At low frequencies, however, it is not recommended to place the speakers at half-room height since the ceiling is also typically reflective at these frequencies.
Another thing to mention is to avoid the dead center spot of your room being your mixing position. This is the place where all the waves collide and will end up with very muddled sound reproduction. Every reflected sound and direct sound meets here, so it is a good idea to avoid this spot.
3. Monitor Positioning Angle
In terms of studio monitor and speaker placement, positioning angles are one of the most important factors. It is possible to improve your mix’s accuracy by using proper angles by making it sound much closer to the mix you are after.
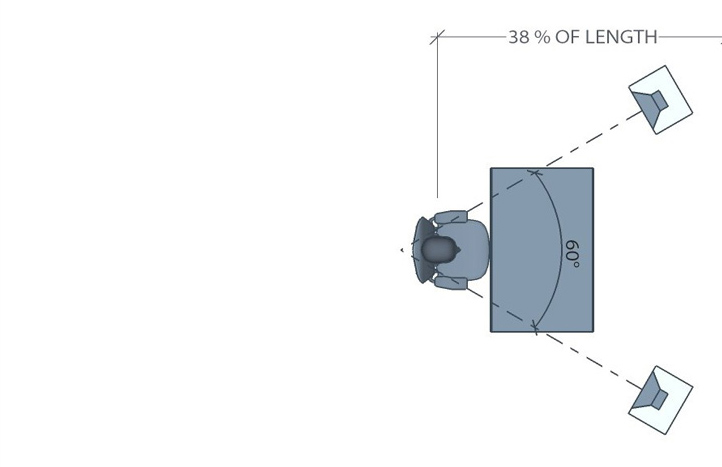
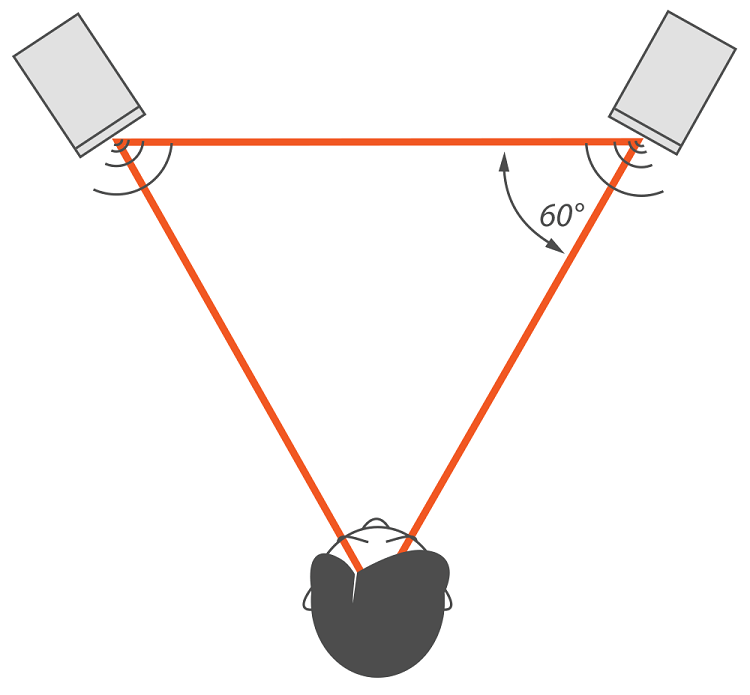
The 60-degree rule dictates that the speakers should be angled at a 60-degree angle with respect to one another, to form an equilateral triangle. Putting this together correctly will result in coherency, the fact that the sound waves are meeting at the same place at the same time.
Therefore, 30-90 degree angles can also be used in order to disperse sound more widely. Generally, though, 60-degree angles are optimal for mixing accurately. It is important to have a good listening distance when placing angled studio monitors. In order for the speakers to be effective, they must be located at a point just outside the first reflection point of your head.
By doing so, you will ensure that the speakers (and, therefore, your mix) are not delayed or reverberated. Setting this primary point is important for the mix and the sound you will perceive from your monitors later on, resulting in a listening point that will have all the benefits of your speakers.
4. Height of the Monitor Spot
It is recommended that your studio reference monitors be at least 47 inches (120 cm) from the floor. If you need to orient your tweeters slightly off-axis with your ears, then don’t let them sit directly in the center of the room.
Free-standing studio monitors without a tilt-down function normally have a height of 47 to 55 inches (120 to 140 cm). If you are listening from a listening position, the tweeters should be firing from left and right speakers, at your ears.
Keep your speakers at least 15 degrees off vertical if you’re determined to tilt them toward the listening position. Your frequency response changes as you move forwards or backward with your speakers tilted down. So have this on your mind when you move around your spot when mixing. Every move might end up with a slightly different image of your mix.
In recording studios with flush-mounted main monitors (not tilted down), midrange drivers are typically located between 57′′ and 58′′ (145-148 cm) above the floor. In this way, people can be in the sweet spot regardless of whether they are seated or standing, provided that the speakers are mounted vertically.
There is a common belief that speakers should be positioned at a height parallel to our ears, but we recommend a little higher than this. There are many sources that suggest this method, and even some of the most respected acoustics engineers follow this approach.

5. Space Behind The Monitor
Is your monitor not producing enough bass? There is a significant impact on your bass performance depending on the distance between the room walls and the speakers. Low-frequency speakers tend to be omnidirectional, which means that bass waves propagate in all directions, resulting in a rumbling ruckus.
As bass waves travel backward from your speakers, they impact the wall in front of you, and when they hit the wall, they are reflected. As a result of acoustic interference, sound waves reflected by your wall combine with sound waves coming from your speaker.
During a certain frequency, wave cancellation occurs if your speaker is one-quarter wavelength from the wall. Frequency response is adversely affected by this, resulting in a horrible dip, notch, or null.
Here we suggest to you test out different room calculators to find the best spot for your speakers and also where exactly you should sit in your room. Also, these calculators will help you to properly space out the speakers from the wall behind them and get the best possible outcome.
It is always best to place the monitors at least 1 or 2 ft from the rear wall, which is something under a meter. If your room allows for such placement, then go for it. Another point that can be helpful for reducing the bass clutter, is to get speakers with frontal bass holes.
5.1 Avoid Wall Monitor Mounts
The installation of studio monitors on a wall is not recommended. In addition to adding extra reverberation, walls are also capable of distorting certain keys as well as nullifying other aspects of your music. Crisp, clear sound cannot be achieved through walls. A certain amount of space should be left between your monitors and your walls.
The biggest problem with wall-mounted monitors, however, is how they accentuate low-frequency notes. The most common cause of overestimation of bass levels is the hanging of monitors on walls, which could easily be avoided.
You can keep your monitors 1 or 2 ft away from the wall in a small room with padded walls and minimal acoustic issues. However, this represents the bare minimum most studio owners can get away with without adversely affecting the quality of sound that monitors produce.
5.2 Try Monitor Stands
Your speakers may not produce clear, balanced audio if placed directly on your desk since the sound waves traveling from them bounce off a hard, reflective surface (your desktop) before reaching your ears. Your desk, as well as any surface on which the monitor rests, is also subject to the vibrations generated by the monitor.
It is possible for loose screws to rattle and other less-obvious noises to be heard, which can muddy up your mix. Additionally, your desk is likely to have a resonant frequency, so as your monitors are turned up, your desk is sympathetically resonating with their vibrations, boosting particular frequencies.
Most speakers are also placed below ear level when mounted on a desktop, which is not ideal. Monitor stands allow you to elevate your speakers closer to your ear, preventing early reflections. Your speakers may need to be placed on your desk if you have limited space (or a tight budget), and do not have the space (or spare money) for conventional speaker stands.
Check our article on studio monitor accessories here!
Conclusion
To conclude, how you position your monitor speakers in your mixing studio will affect the quality of your audio output. Keep your monitors away from walls and corners, as well, to prevent unwanted reflections and resonances that could negatively impact your audio quality.
Also, make sure that the tweeter on your monitor is at ear and a bit above this level by adjusting the monitor’s height. Monitoring from this position ensures that higher frequencies are audible and provides an optimal listening position.
You should also consider the acoustics of your room when placing your speakers, and you may need to treat your room with acoustic treatment in order to minimize unwanted reflections and standing waves that could have an adverse effect on the quality of your audio.
In general, improving the quality of your audio output can be significantly improved by setting up your monitor placement correctly. Hit us up if you have any questions regarding this topic.