Best Stereo Miking Techniques
Introduction
Are you looking for a way to give your recordings some life and air? Make stereo recordings with two microphones of some instruments. It is possible to angle or space the mics apart in order to create a stereo effect. The purpose of this article is to examine several stereo-recording techniques.
A single mic is usually placed on an instrument, the track is recorded, and it is panned somewhere between our two monitor speakers. Next, we get an idea of the position of each instrument – left, center, half-right, etc. However, pan-potted mono tracks do not represent true stereo in any way.
It is a method of recording an instrument, or an entire ensemble, using two microphones. An ambiance or sense of depth is added to a recording, giving it a more lifelike appearance. Stereo recordings made of the members of a musical ensemble create the impression that they are in a shared space.
It is possible to do stereo overdubs in a live room by setting up a stereo pair of microphones. Make sure each instrument you wish to overdub is recorded in stereo at a separate location. It will sound as if a group of players has been gathered together in one room when you mix stereo overdubs.
Stereo Recording: What is it and Why is it Important?
In the stereo recording, two microphones are used to record one instrument simultaneously. A stereo track is composed of left and right channels for each microphone, resulting in the stereo spread and the illusion of width.
This technique creates a stereo effect by varying the sound level between the left and right studio monitors. There are two ways in which this difference in sound can be observed:
- Different timing – By placing the microphones at various locations, the sound emanating from the instrument will arrive at each microphone at a slightly different time. Stereo effects can be created by a difference in timing of a few milliseconds.
- A different balance of frequencies – If you angle the microphone differently in relation to the instrument, you will hear a slightly different balance of frequencies. As the angle increases, the stereo effect becomes more exaggerated.
A stereo recording lacks the pleasant sense of stereo width created by hearing one mic through the left monitor and the other through the right.
Select Your Microphone Pair
The most important piece of equipment is a pair of microphones, or a stereo microphone, which will simplify setup. There is an important distinction to make between stereo microphones that only feature one microphone in stereo configuration and those that include two separate microphones.
Make sure you get the same model and make of mics if you decide to go with a pair. As a result, you will not be able to receive a frequency-balanced signal on both sides. Having said that, there is no rule that prohibits you from using different microphones; it is possible that the results may be satisfactory for you.
When recording most instruments, a pair of small-diaphragm condenser microphones (sometimes referred to as “pencil microphones”) set in a cardioid polar pattern will produce the best results, although omnidirectional microphones may also perform well in some instances.
When you are looking for the same exact response from each microphone, you should use a pair that has been factory matched. You should not be too concerned about that, however, as unmatched microphones can also produce good results.
It is also advisable to purchase a stereo bar, although it is not strictly necessary. You will find that it is a small holder that attaches to a microphone stand. Using this method, you can connect a pair of microphones and adjust their distance from each other and their angle to the source, which makes it easy to position them.
There is also a type of microphone stand that consists of a single, non-swiveling bar with adjustable posts that can be used to arrange the microphones side-to-side.
Stereo Microphone Techniques
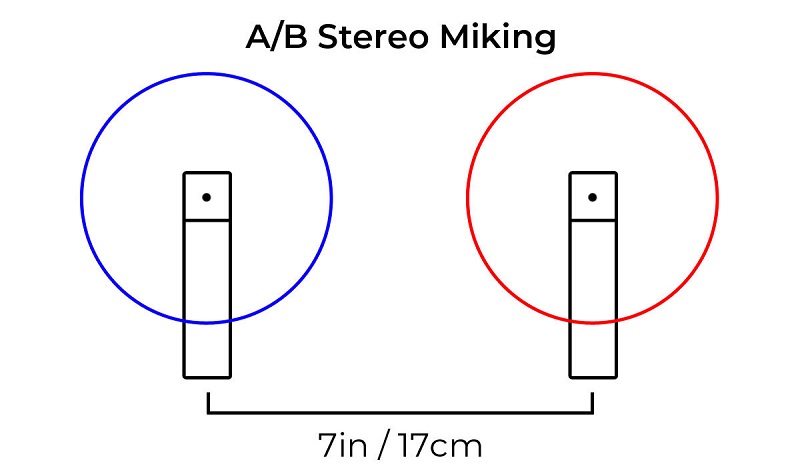
1. AB Stereo Pair – Spaced Pair Technique
Spaced pair or AB stereo is a common stereo miking technique. Using either two cardioid microphones or omnidirectional microphones aimed straight ahead at a moderate distance from the sound source, this technique uses two cardioid or omnidirectional microphones.
The best way to improve the quality of your recording is to use a pair of matched microphones, which means that the mics were assembled one after another at the factory. Consequently, each mic has as similar a sonic imprint as possible.
While it may appear to be just two mics sitting there, it’s actually quite complicated. In order to prevent phase issues, microphones must be placed at least three times as far from each other as they are from the source of the sound, according to the 3:1 rule.
The other microphone must be at least three feet away from the first microphone if you place it a foot away from the sound source. This technique is ideally suited to large mid-sized ensembles like choirs or orchestras since both microphones are pointed straight ahead and tend to pick up the most room noise.
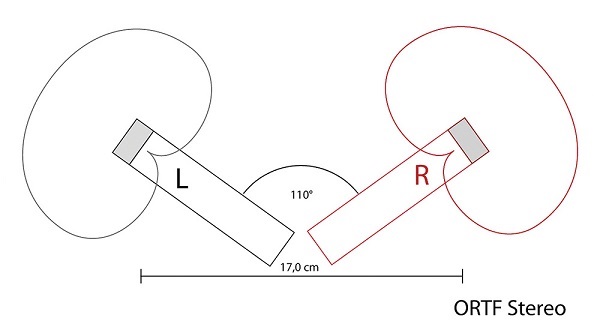
2. ORTF Stereo Technique
ORTF, or Office de Radiodiffusion Télévision Française, developed the ‘Side Other Side’ microphone technique in the 1960s. In ORTF, the mic capsules are angled precisely 110 degrees apart from each other.
A distance of exactly 17cm must also be maintained between the mics. Diagrams of this setup show that it approximates how ears are positioned on a human head (but don’t confuse it with binaural stereo recordings). Setting up this mic stand is easy and quick with a mic stand adapter.
Since the mics are so close together, there shouldn’t be much phasing problem because the sound will likely arrive at every mic at the same time, mitigating any issues. Furthermore, you won’t generally run into mono compatibility issues with this setup.
As with X/Y, the ORTF placement should be fairly close. With this method, you get a wider image than with X/Y, and the central information remains relatively intact.
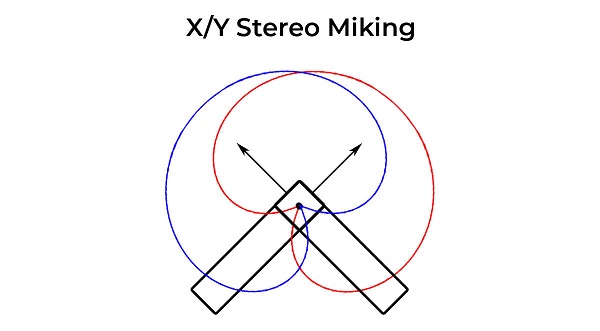
3. X-Y Stereo Mic Techniques
This set-up utilizes two directional microphones (cardioid-type) in a near-coincident pair of patterns. X-Y is ideal for applications involving close miking and less suitable for applications involving distant/room miking. Despite providing a narrow stereo image, it is clear and crisp.
It is recommended that the two-directional microphone capsules be positioned at a 90° to 135° angle from one another with their capsules as close as possible (coincidence pair). In most cases, the polar patterns of the microphones are parallel to the ground or horizontally.
In addition to top-address “pencil” microphones, side-address microphones are also suitable for X-Y stereo microphone techniques. The reason for this is likely due to the smaller diaphragm of pencil mics, which can generally be positioned closer together for a pair of mics that is “more coincident”.
If you want to position mics in X-Y, it is advantageous to use a stereo bar microphone mount, which provides simplicity and stability. Start with a distance of 90° between the microphones, and if a wider image is required, extend the distance to 135° (listen for the hole-in-the-middle effect). In close-miking situations, X-Y works best.
4. Blumlein Sterep Pair Technique
In the Blumlein technique, bi-directional (figure eight) microphones are used instead of cardioid ones, and they are also positioned at 90 degrees to each other.
In other words, the microphone that captures audio from the front and left of the room (away from the source) also picks up the audio from the back right of the room. It is also possible to pick up voices from behind and to the right of the mic, just as it does from the front and right.
In the result, as you can see, the resulting audio has a stereo image of the sound source along with an additional ambiance that was captured from the back room of the recording studio. In order to get the best possible results, you will need to have a nice-sounding room in order to increase the size and depth of your recordings.
To achieve this, you’ll need a microphone with a Figure Eight polar pattern, such as the NT2-A, or a valve microphone such as the K2. When you want to mount two microphones close together, you can use the set of pencil microphones.

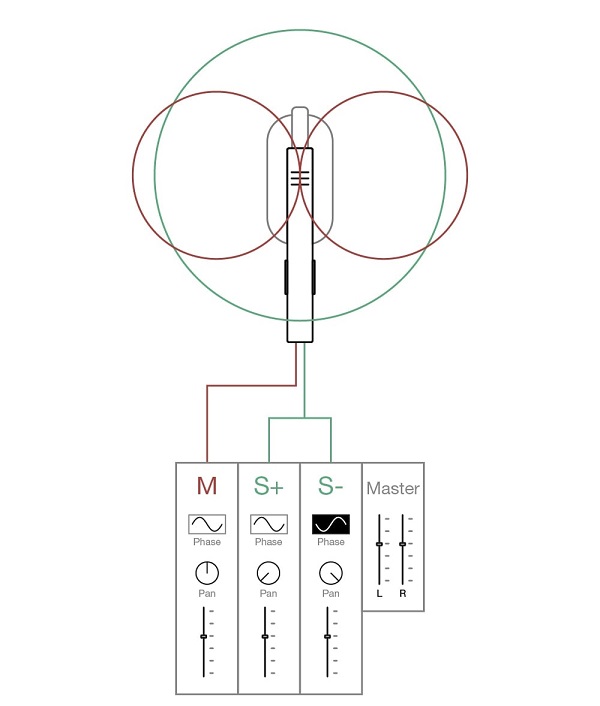
5. Mid/Side Recording Technique – Our Favorite!
A very interesting stereo miking technique is the mid-side or MS technique. This technique involves using a cardioid microphone referred to as the mid in the center and pointing it towards the stage. A mono sound is picked up by the microphone in the same manner as a stereo sound.
For the side microphone, a bi-directional microphone should be used. It should be positioned just under the mid mic, so that it faces left and right. As a result of the side microphone, the ambient environment and positional information are picked up.
There is a small matrix circuit that combines the signals from the mid and side microphones so that you are left with a left channel output and right with a right channel output.
It is possible to make mid-side recordings with two separate microphones (one cardioid and one bidirectional) or with one dedicated stereo microphone that contains two elements and is equipped with the processing circuitry.
It is easier for the listener to visualize exactly where the players are on stage with a mid-side recording since both microphones are at the same point in space.
Stereo images can be controlled by varying the level of the side microphone. This means that you are able to control the amount of spaciousness, even during post-production. The setup is also more convenient and less distracting for the musicians and the audience since there is only one microphone to be mounted on a stand.
6. Decca Tree
With this configuration, the spaced pair setup (A-B) is taken to the next level by adding a central mic to the mix. As with spaced pairs, it is recommended to place the left and right microphones approximately equal distances from the source.
However, the ratio may vary from time to time. As a rule, Decca Trees operate on a 2:1 or 4:3 ratio, meaning that the distance between each microphone and the central microphone is approximately twice as long as the distance between each microphone and the left microphone.
In this configuration, height plays an important role due to the fact that the Decca Tree was originally designed to record orchestras and ensembles. Ideally, the central microphone should be placed directly over the source at approximately 10 feet above it. It is recommended to use omnidirectional mics for this application.
This technique is similar to the Mid/Side technique in that the left and right mics contribute to the creation of a wide stereo image, with the center mic providing a solid mono foundation.
The Decca Tree was originally designed for orchestral recordings, but it is equally effective with any ensemble (even drums) and is particularly effective in studios with high ceilings.

Conclusion
There are six tried and true stereo mic technique options that work best for different recording scenarios. If you want your stereo signals to be phase coherent and wide, you’ll want to experiment with different configurations.
Always play around with the microphones, patterns, placements, and distances to end up with the best possible result. A stereo microphone technique should be viewed as a guideline, not as a set of strict guidelines.
If you have any questions or concerns about this topic, please let us know in the comments and we will be more than happy to elaborate on the topic furthermore.