Introduction
As we already covered some basics about processing your mix bus after you are done with the mixing process, now it is time to go over the compression part of it and give a little bit more insights about it.
Even though there are separate opinions about this, where some engineers add compression and some don’t (leaving the whole compression process to the mastering engineer), we are going to give some pros and cons about this process and provide you with some tips, tricks and guides how to properly do it.
So without any further ado, let’s look more precisely at what this process is and then we will start with all the points you need to know before you apply to mix bus compression.
What is Mix Bus Compression?
Mix bus compression is when you apply a gentle type of compression to the entire mix before even applying mastering processing to it. There was a noticeable difference in sound between what artists heard in the studio versus what they heard on the radio and on their home record players in the late 1970s, which prompted the development of this technique.
A plugin compressor or an outboard hardware compressor can be used to accomplish this. Plugins of today are capable of accommodating both styles equally well. In the end, it comes down to personal preference and the availability of the best compressors. The important thing to remember is that when printing the mix, we are not applying compression. This is a process that we usually leave for the mastering engineers.
There was another round or two of compression made during broadcasting and mastering that caused the vinyl records to sound different from the radio broadcasts. So soft compression was added to even out the mix and glue it. Every single mix now has a few dB of compression added, naturally.
Using compression on the mix bus before any other processing will allow us to make appropriate sonic choices in the beginning rather than disrupting our careful balance later on. A waveform that consists of a single sound provides this glue.
For example: Imagine what happens when you compress a waveform with a single sound in it. Consider compressing a waveform that is composed of multiple sounds combined together. There will be a mutual impact between them and this is the key difference.
So that now everything seems to be a little bit clearer in terms of what is mix bus compression, let’s see the pros and cons of the process:
Pros:
- Your mix will be glued and your song will sound coherent.
- You will be able to tame any inconsistencies that might appear that were missed in the mix.
- You will get a touch of coloring from the compressor on the mix.
Cons:
- It is easy to overcompress it and ruin the mix.
- Adding wrong attack and release settings can also ruin the dynamic range.
- Too much gain reduction is also harmful.
So please have these points above in mind before you dive deep into any mix bus compressor and smash your mix down. You are free to go nuts on individual tracks, but when it comes to the whole mix bus chain, you need to be careful and not kill it.
But if you are here reading this article, means that you already know that errors can be made and came looking for answers. We strongly believe that is the case, so we are going to give some more precise pointers and tips now on how to do this without negatively affecting the mix and actually improving it.
How Much Gain Reduction is Enough?
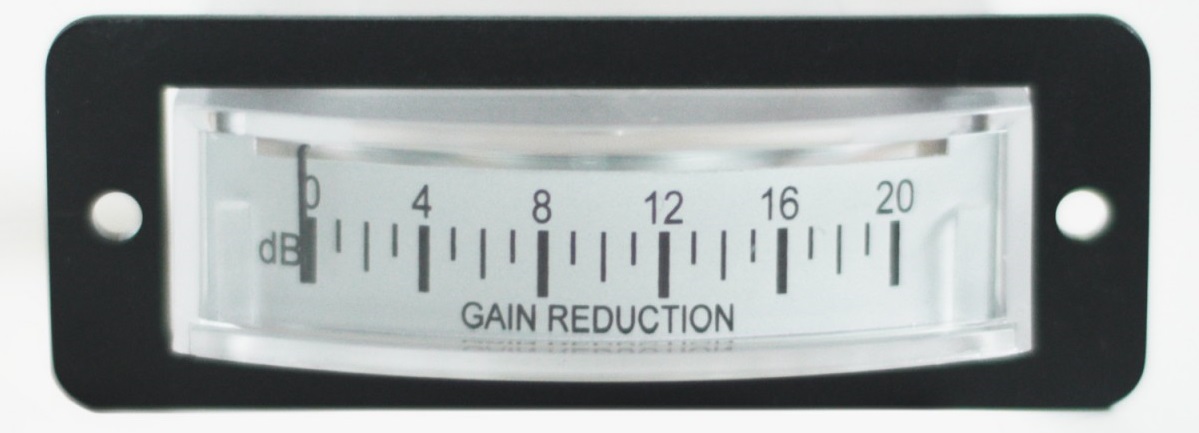
Firstly, when we talk about a compressed signal, the first thought that comes to our mind is to check how much amount of gain reduction was added before setting the other parameters. Well, in the case when we add a compressor to a mix bus or master bus in other words, we add around 1 to 3dBs of gain reduction.
What does this mean? Well, this means that we do not smash the compressor’s threshold down and kill the dynamics, but we only add it to tame any sudden peaks and most importantly – glue all the tracks in the mix together.
Another important point here is to always test it and check the mix before and after you add compression. It is important that the level of the audio is “make-up gained” so that no variety in volume can trick you into thinking that your mix is better or worse than before.
Always follow the gain reduction meter to see how much you are compressing. This stage will tell you if you did a good job or not, so always check before and after the meter to see what you’ve done with the mix bus compression gain reduction.
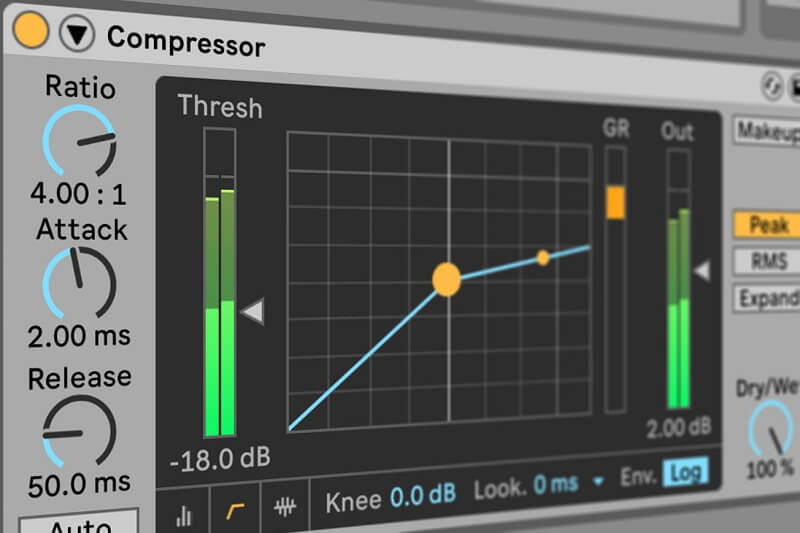
Setting the Ratio, Attack, and Release Time
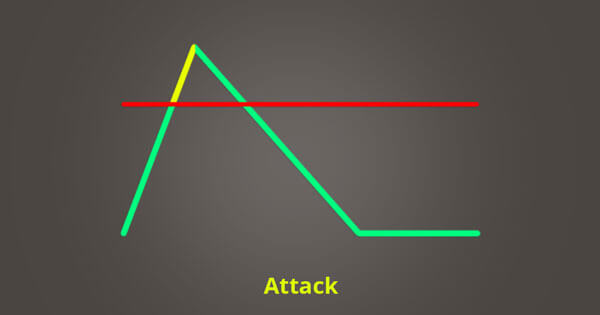
Attack
If you are setting an attack time on a mix bus, a medium to slow attack time is a great starting point. In order to understand relative attack times, engineers must memorize two essential numbers. It is 8 and 25. The attack times between these two numbers are considered medium.
An attack time of more than 25 milliseconds is considered slow. An attack time of fewer than 8 milliseconds is considered a fast attack too. Some individuals find it helpful to think about 10 milliseconds and 30 seconds as an approximate reference that is easier to remember. Nonetheless, let’s keep it simple and move on – start around 20 milliseconds and listen to what your ears are telling you.
When you are having slower attack times, you are letting some of the transients pass through the compressor, meaning that if you intended them to be like that, leave them intact. But in case you left something unattended in the mix, you might go for faster attack times, even though we advise you to go back in the mix and fix it from there.
Every point in the results of these parameters that will end up having your track sound worse and worse is probably connected with the attack and release time. If you went for 1 or 2dB gain reduction and you have a pretty low ratio, then there must be a problem and you need to play around with these parameters to get the best outcome.
Release
The medium release time is a great place to start when setting a release time on the mix bus. The release time should be between 100 milliseconds and 300 milliseconds. The release time should be set using your ears around 200 milliseconds. Thus, somewhere between 100 and 300ms should be the best position for your release setting on the mix bus without having the risk of destroying the mix.
It is advantageous to accept the assistance of computers and look-ahead algorithms since we are no longer talking about individual instruments (which are thus predictable). There are some compressors that offer an auto-release function that determines how long it should “hold on” to the compression before it lets go and returns to full amplitude.
All of the tracks will be added to the mix bus, so there will be no regular dynamics from which to determine the release. There will be a great deal of variability. You can achieve the sense of “musicality” that we mentioned earlier by allowing the auto-release to handle it for you.
So to summarize this point. Eighter go for around 150ms manual release or activate the auto release setting on the compressor. Eighter way, use your ears and eyes as well since the gain reduction meter will tell you everything you need to know in regards to how much the compression is held before it is released back to normal.

Ratio
In our opinion, this is the easiest parameter to set. Even if we didn’t give you guidance about this, you should know that light compression is needed for the mix bus. So for light mix compression, we need low ratios.
To be in the safe zone, you should add ratios between 1.5:1 and 2:1. The lower ratio means that you needed only a touch of compression and the higher ratio means that you needed the compression to be more apparent and actually give it a little bit more sense of compression to the whole mix.
To be honest, we do not have much more to say about this parameter, since we think that it is pretty clear and that lower ratios are standard beginning and ending point for mix bus compression.
Mix Bus Compression Tips, Tricks, and Guides
1. Should You Mix Into The Compressor?
Well, if you are aware of the compression that is added to the mix bus, then why not. If you often forgot that you are already taming some of the peaks with the mix bus compressor, then it’s better to add it at the end.
Our preference? Add the compressor at the end and mix it into a clean mix bus channel with only a meter plugin on it. We often made that mistake in the past and we want to avoid doing it again, so we practically leave the mix bus clean without any processing on it while we are in the mixing stage.
2. Go Back In The Mix
This is something that we mentioned earlier. If you notice that there is a dynamic “error” in the mix before you add the bus compression, we suggest to you go back and fix this error on the track.
What you need to do here is to locate where the problem is and go back to it and revisit the compression settings on that particular signal. It might be a single track or a group bus, but no matter what, it is good practice to fix it in the mix and not leave it for the end, because that might cause many different problems later on.
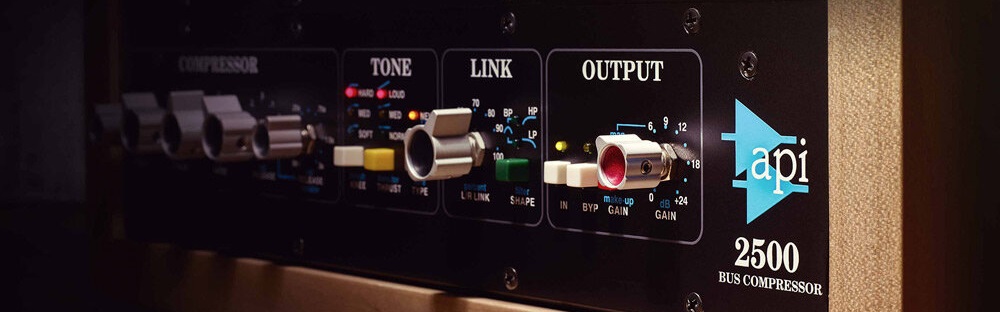
3. Choose The Right Compressor
When we are at the stage of picking the compressor we want to add on the mix bus, it’s always a good practice to have a compressor that has all the needed parameters on it and not some internally set attack and release times, as the LA2A has.
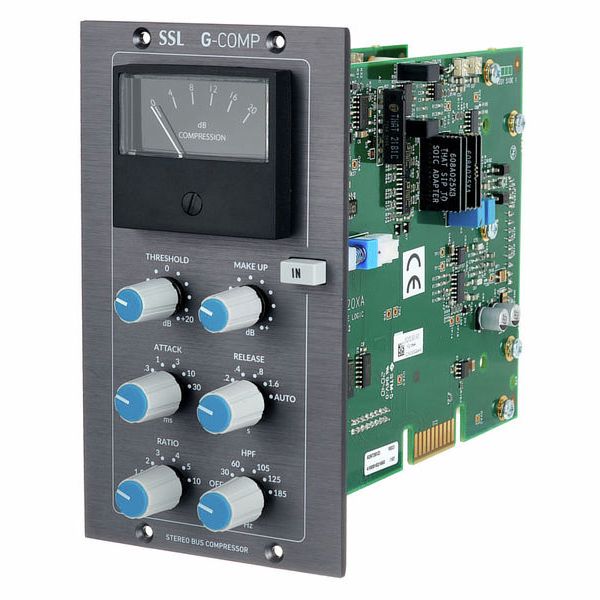
The compressors react differently to this and we want to have complete control over it. So the compressors we most commonly used for mix bus are the API2500 and the SSL G Bus Compressor. These plugins gave us what we needed and we were completely satisfied with how they sounded.
We also believe that many mix engineers have these compressors in their arsenal and that they are studio standard for this purpose. No matter if you are using hardware or software models, they are great choices.
4. Multiband Compressors
This is another type of compressor that is likely to be used on the mix bus. Using a stereo compressor in multiband is giving us more flexibility because we can address certain bands of the frequency range and actually make more precise adjustments.
This doesn’t change the fact that you need to go for light settings, just apply them separately on each band, adjusting what needed to be done in the specified ranges. Maybe you have a more exaggerated low end? Add a touch more compression here. Or maybe you have properly timed kick drum snaps – you can add slower attack time in the range of 1 to 2kHz.
See what we did there? Even though the mix is already done, this little finesse will make it perfect, because the multiband mix bus compression affects separate areas, which gives us the chance to maybe fix something minor that was left out in the mix stage.
5. Add Harmonic Distortion
Some compressors might offer you what is called harmonic distortion, meaning that will add color to the signal and make it rounder and give it something recognizable for that compressor. When you compare the compressed and uncompressed signals, you will be able to notice these changes.
Depending on the style of music you are working in, you can choose a compressor that will add this saturation or soft distortion that will benefit the whole song. For more vintage-sounding genres, use analog-modeled compressors or compressors known for their color. On other hand, if you work on modern music production, adding a modern compressor will add a modern flare to the song.
Conclusion
If you now feel confident, apply mix bus compression without any worries. We provided you with some basic starting points, choices of mix bus compressors, and some general tips. We really believe that we covered all and give you an idea of what this process means to your production and also the mixing stage of your song.
If you think that we missed something in regard to this topic, please let us know in the comment section below and we will be more than happy to elaborate and update our article to provide our readers with complete material. Until then, happy mixing and compress with care!
Best Mastering Compressors: Top 9 Units For Your Mastering Studio!
What Are Optical Compressors: Top 5 Opto Compressors Listed!
What is FET Compressor: Best 5 Models, Guide, and Plugins!
What Is VariMu Compressor: Key To Achieve Classic Sound!
Top 10 Best 500 Series Compressors: Best Models Shown!