Compression Tips and Tricks
Introduction
It is obvious that compression is one of today’s most indispensable tools for producers, allowing them to increase the punch, volume, and consistency of their instruments and vocals, often exerting a positive ‘analog’ influence on their sound.
It has never been easier to maintain a library of quality compressor plug-ins, thanks to the power and affordability of today’s virtual effects, and there are hundreds to choose from, including the popular solid and VC series.
Understanding how to use equipment is one thing, but knowing how to put it to use is another. There are times when the best compression tips aren’t super-secret formulas. Having an understanding of the barebones basics, knowing other techniques, and understanding what the end goal is more important than anything else.
Below you will be able to find the 10 compression tips and tricks that will help you shape your signals to your liking!
1. Set Release Times To Match The Song’s Rhythm
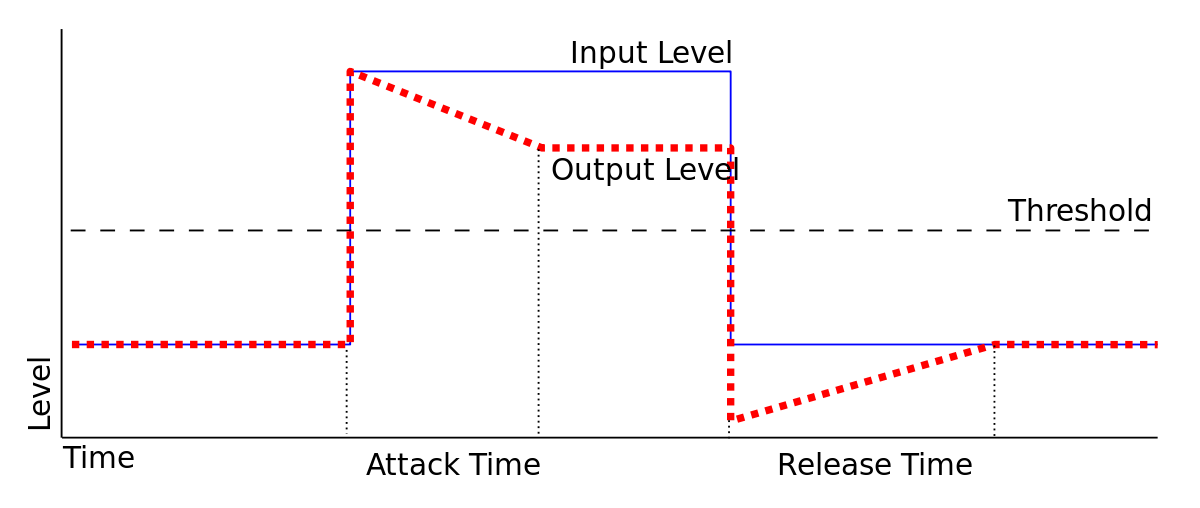
In a compressor, release time refers to the period of time it takes for the signal to drop below the threshold before the compressor disengages. Similarly to attack time, it represents the rate at which the compressor disengages slowly over time. In other words, it is not a delay in action in which the compressor suddenly ceases to compress after a given period of time.
Short release times will cause the compressor to quickly return to zero gain reduction when dealing with very short release times. By releasing the compressor just before the next transient peak arrives, pumping will be reduced and the track will be able to breathe.
It is important to note that the audio material itself will take some amount of time, which means that the release time should be reduced slightly from the calculated time.
2. Compressing Delays and Reverb
Because reverb and delay are time-based processes, they are intrinsically rhythmic. Whenever we set a reverb or delay, we make sure that the tail complements the feel of the recording. When it comes to getting the right feel, it isn’t just about how long the tail is set, but also about how it decays.
In order to fill out the space between phrases, it may be helpful to hear the delay repeated audibly. Depending on the decay rate of the delay, we may be able to listen to the first echo clearly, but the second one may be low, and by the third echo, it may be virtually inaudible.
The delay tail can be extended, but the echoes may run over into the next phrase if the delay tail is extended. Using a compressor to even out the echoing a bit more will be helpful to make the delay even more noticeable.
3. Parallel Compression for Best Outcome
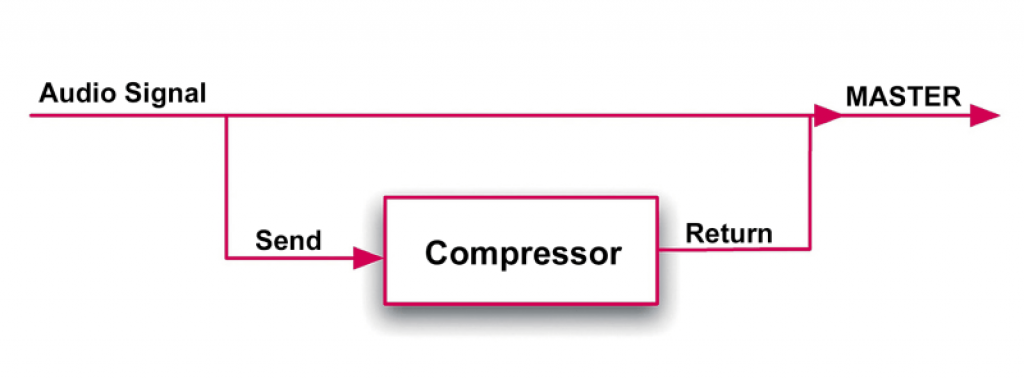
The parallel compression technique is commonly used to embolden drums, and it is also referred to as ‘New York style’ compression. It combines unprocessed signals going into a compressor with compressed signals coming out of it to blend the characteristics of both signals.
It can either be achieved by using a compressor with a wet/dry mix control or by sending the subject track to an auxiliary bus on your plug-in. Using the mix knob or sending control, reintroduce the dry signal until you obtain a good balance of transient impact and overall solidity after increasing the compression ratio to at least 20:1 and lowering the threshold.
4. Use Parallel Compression for Excitement
And one of the best usages of parallel compression now. Compression in parallel (also known as New York or Manhattan compression) involves sending one audio track to a send/return (aux bus) and then heavily compressing the return.
A punchy sound is achieved by mixing both versions of the audio together without losing the dynamics of the dry signal(s). A track (or a group of tracks) can be compressed in parallel with another track by sending them to an auxiliary track in a mixer (whether hardware or software).
The signal should be compressed or limited on the return channel (low threshold, high ratio). If you are practicing parallel compression, experiment with different amounts of compression to determine what works best for your mix. Oftentimes, excitement in the signal is introduced and that can be added on many various tracks to achieve this wanted effect.
5. Don’t Just Compress
Even though this last point may seem contradictory to everything we have said, it cannot be overstated: you do not need to compress every sound in your mix.
It is a common mistake among inexperienced producers to assume that compressing a channel should always be beneficial, even if it is lightly applied; however, if you find yourself inserting a compressor into a channel without a specific reason, do not do so.
Even though compression has found many creative applications beyond that, it is still, in essence, intended to control volume levels. It is a problem-solving technology initially invented as an automatic alternative to manually riding the volume fader.
6. Mastering Low-End Punch
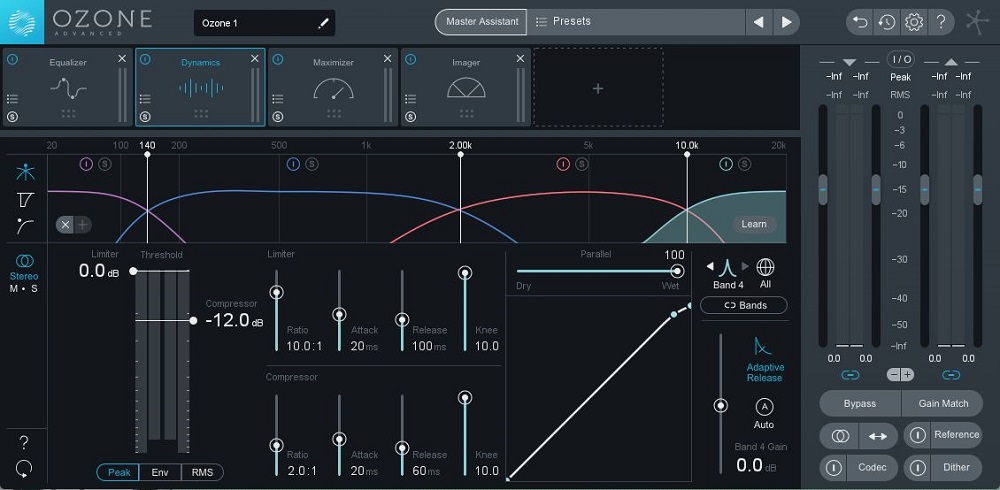
It is really helpful when you have sub-notes that do not hit as hard as those in the E0-G#0 range. You can actually increase the size and impact of your hard-hitting electronic track by reducing the dynamics of your sub.
You may wish to attempt to tighten up the kick-sub relationship below 150Hz by compressing only this lower band and re-adding the make-up gain below 150Hz. Your mix will gain more presence and constant sub-energy as a result. The basis of electronic music is powerful and full of low-end.
Compared to properly mixed reference tracks, this can be one of the most challenging tasks to accomplish. Compression with multiple bands can provide a solution to maintaining constant, full, and consistent sub-frequency.
7. It’s All in the Attack and Release
We suggest starting with an attack time of 30–40 ms and then increasing it to 100 ms as necessary. You may not be able to determine the optimum attack time until you have correctly set the release time – and the percussive elements of the mix will not be damaged by incorrect release times.
In general, a compressor with a short attack time can have a negative effect on the music, as it will add to the compression’s ability to capture and squash transients. Transients are those brief bursts of sound that provide all the punch in music. A long attack time will, on the other hand, result in too much audio being passed through before the compressor is able to react.
8. Frequency Focused Compression
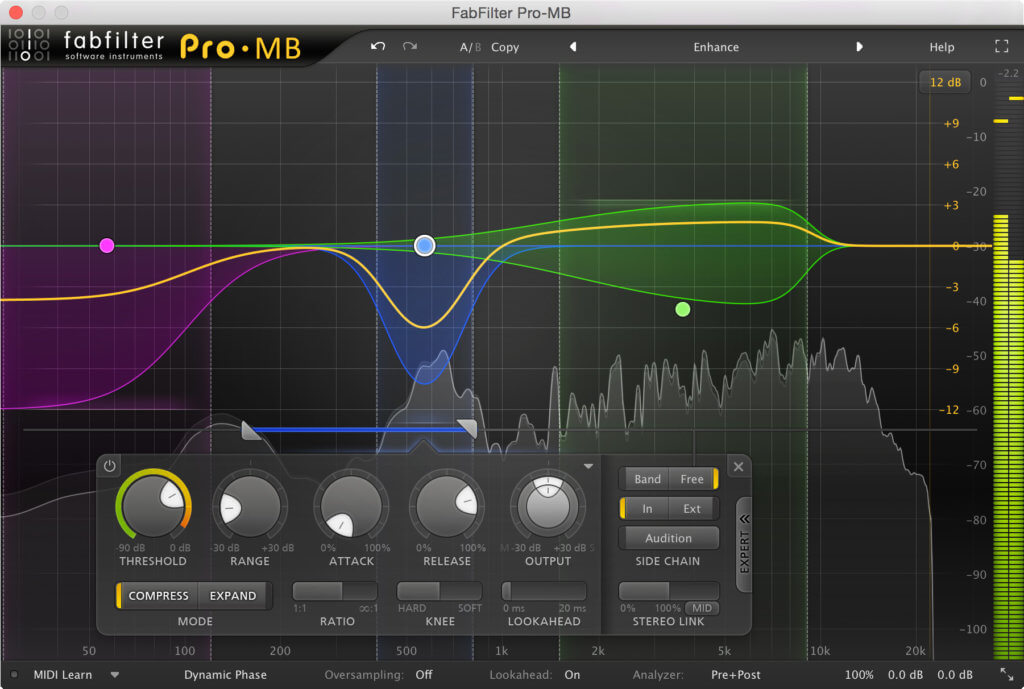
The sibilance of a voice can be brought out when it is compressed, while the cymbals can be brought out when it is compressed. Due to the brightness and cutting nature of the esses and cymbals, despite their smaller physical amplitudes than the vocal body or the snare and kick of the kit, we perceive them as much more prominent.
Our perception of sound is not affected by dynamics. They are concerned with total amplitude but do not consider how we listen to sounds. The compressor can be made to respond better to certain frequency ranges as a result. It has a unique effect when applied to fast-moving elements.
Describe a voice in which every “i” vowel bursts forward with energy between 1k and 2k. It is similar to multiband compression but without any phase artifacts.
9. Know The Genre And General Mix Outline
The best way to compress audio is to take into consideration the genre or style of music that you are mixing. This tip can be applied to a wide range of mixing processes, not only compression.
The compression levels of some genres are generally higher than those of others. The aesthetics of certain genres of music are mixed, as listeners have come to expect. Generally, the mix of an EDM hit would differ from the mix of a country song, which would differ from the mix of a metal song, etc.
We can, therefore, be on the side of more compression or less compression, or even no compression at all, by keeping these “standards” in mind. Whether it is a track, a bus, or a mixed bus, this applies.
10. Controlling Harsh High-End
There is a high risk of having harsh high-end frequencies ruin your mix. It can be particularly problematic when you use impacts and high-transient materials in your track (usually as a result of white noise effects or crashes/cymbals).
The use of multiband compression on the highs of your mix or even just on the high-end elements helps significantly to reduce the shrill impact of most sounds. Basically, this is a set of piercing, high-frequency transients that need to be handled.
Experimenting with just the sides of your mix can also be a lot of fun. It is easy for the high end on the sides to become harsh, so it may be better to focus on fixing issues there rather than applying this type of treatment to the entire stereo sound.
Conclusion
Among the most powerful and versatile audio processing instruments are compressors. It is possible to master a compressor despite the fact that there are many parameters and combinations of parameters.
Following a thorough understanding of several basic “starting points,” minor adjustments can be made to enhance or diminish the audibility of the compression. It is important to compress with a purpose when you are compressing.
The amount of information we have to cover cannot be covered in the time we have available. You should, however, focus your initial attention on these concepts when you are acclimating to the discipline.
After carefully considering all of the above, you will be on your way to ensuring that your vocals sit well within a mix, yet stand out and grab the listener’s attention.
Best Mastering Compressors: Top 9 Units For Your Mastering Studio!
What Are Optical Compressors: Top 5 Opto Compressors Listed!
What is FET Compressor: Best 5 Models, Guide, and Plugins!
What Is VariMu Compressor: Key To Achieve Classic Sound!
Top 10 Best 500 Series Compressors: Best Models Shown!

