
What is Compressor Ratio?
Introduction
Compression is complicated.
And if you’re a home studio musician, producer, or engineer who’s struggling to wrap your head around it, you’re not alone.
However don’t fear, because, in this article, we’re going to make issues simpler by zeroing in on one of the vital essential controls you’ll discover in your compressor — the ratio knob.
First, we’ll discuss what ratio is in plain English (no geeky stuff). Then we’ll speak in regard to the geeky math behind it. (Don’t fear — you’ll be able to skip this section if you desire.)
And eventually, we’ll discuss how to set your compressor’s ratio knob like a professional. We will even provide you with beginning points. Also, take this just as a starting point, because everything will depend on the signal you have at hand, so go with a reserve on this process.
At the end of this text, you should really feel 100% assured working with your compressor’s ratio knob in any combination of compression ratios.
What is the Compressor Ratio?
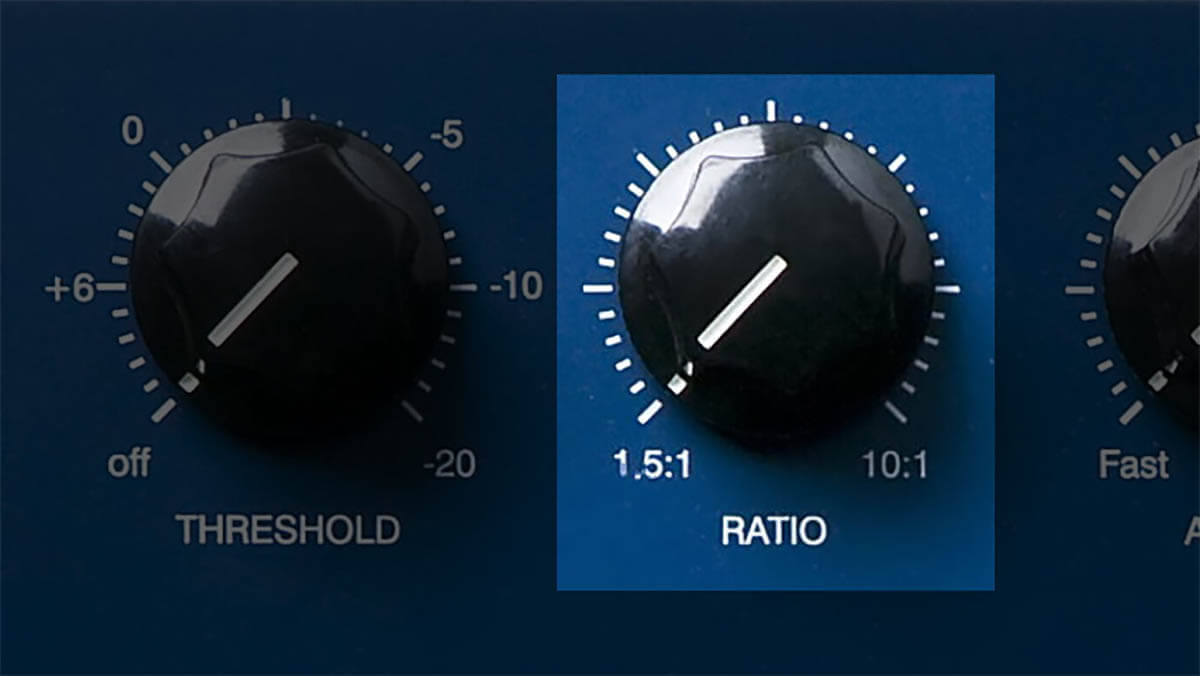
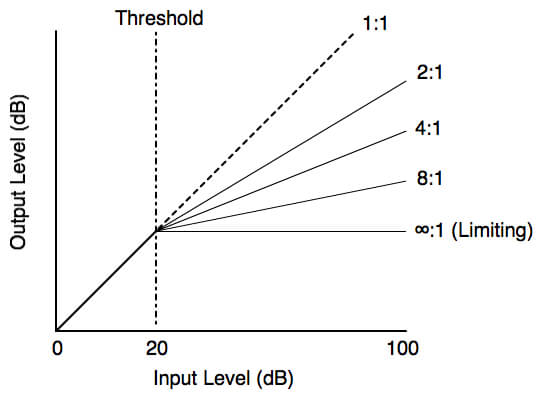
The ratio knob sets the quantity of applied compression. The numbers on the knob point out the ratio of input to output. The higher the ratio, the extra excessive the compression.
Compressors often express ratio ranges in decibels (dB). For instance, with a compression ratio of 2:1, the enter signal should cross the threshold by 2 dB for the output level to extend by 1 dB.
This hugely influences the gain reduction and this is one of the reasons you should know exactly how much of a compression ratio you need. Compression ratios vary and there is simple math behind it.
Nonetheless, the available ratios rely on the kind and manufacturer of the compressor you’re using. For instance, listed below are primary ratio settings obtainable on most compressors.
Ratio Variations:
- 1:1 applies no compression. The input and output ranges stay identical whatever the threshold level.
- 1.5:1 applies subtle compression. This ratio is mild and clear sounding. It should preserve pure peaks and valleys.
- 2:1 applies gentle compression. This ratio easily controls the dynamics without inflicting noticeable modifications to tone and punch.
- 3:1 applies average compression. This ratio setting is barely extra aggressive. It applies mild transient control while retaining pure dynamics.
- 4:1 applies medium compression. This ratio has tighter control over transients. There might be subtle changes to tone, punch, and loudness.
- 10:1 applies heavy compression. This ratio is aggressive. It should dramatically cut back dynamic range, inflicting a signal to lose punch, clarity, and presence if pushed hard.
- 20:1 to Infinity:1 is limiting. At Infinity:1, the compressor primarily blocks the signal from crossing the threshold.
Notice: All the controls on a compressor work collectively. It’s finest to regulate them in tandem as an alternative to specializing in the ratio knob in isolation. For instance, the ratio and threshold work collectively.
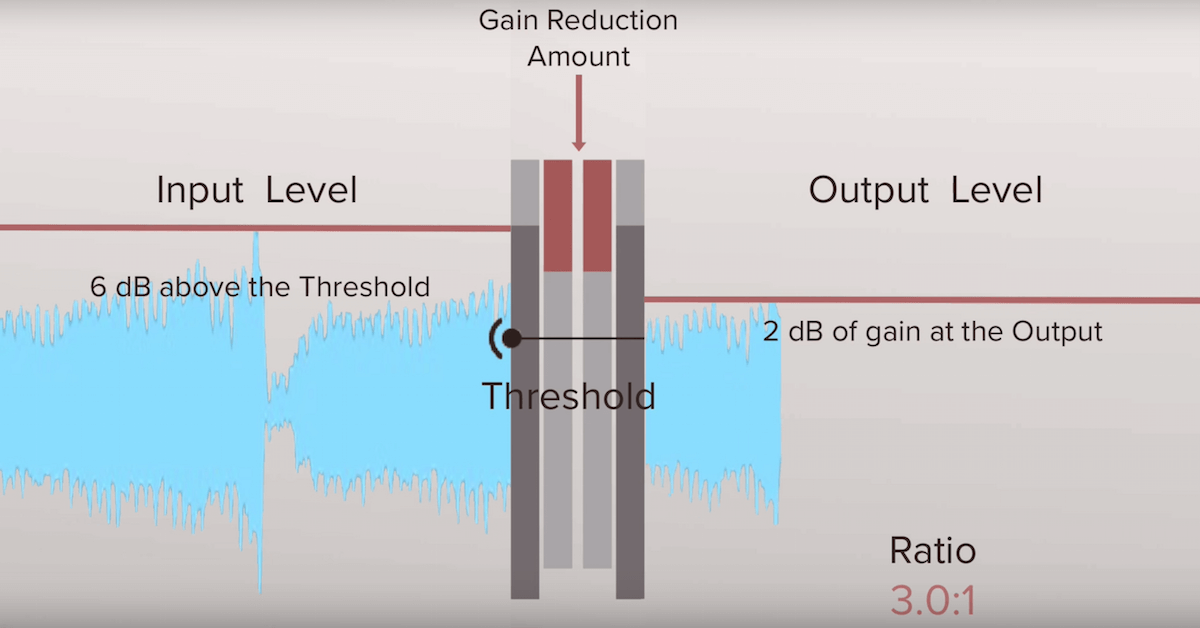
Compression solely takes place when the sign rises above a set threshold stage. The compressor will then decrease the extent of alerts exceeding the edge stage at a ratio set by the ratio management.
Compressor Ratio Basics
There are not any particular ratio settings that work finest on any specific sound. It could be deceptive to list particular ratio settings because each sound and compressor is completely different.
The ratio settings you select additionally rely on the source audio, the other compressor control settings, and the outcome you’re aiming to realize.
The most effective method is to make use of your ears and meters to find out the best ratio for every sound. There are additional basic suggestions that will help you discover a place to begin when setting the compressor ratio.
Examples of Compression Ratio
Contemplate these what is compressor ratio fundamentals:
- Low Ratios: Lower compressor ratios are natural and clear sounding. They work finest for making use of subtle compression whereas additionally preserving the pure peaks and valleys of a signal. Nonetheless, lower ratios can have much less dynamic control.
- Medium Ratios: Moderate compressor ratios apply mild dynamic control that retains a signal’s pure sound. They offer you tighter control over transients without inflicting noticeable modifications to tone and punch. You might also notice a sound that’s fuller and louder.
- Heavy Ratios: Higher ratios will trigger an extra processed, aggressive sound. They work the finest for excessive tone shaping and dynamic control. Nonetheless, use heavy compressor ratios with a warning. They will cause a signal to lose punch, clarity, and presence.
- Limiting: An infinite ratio will prevent the signal from exceeding a digital ceiling. The outcome reduces dynamic range and will increase the perceived loudness of a signal. However, limiting comes at the price of losing elements and punch. It additionally introduces digital distortion and clipping when pushed hard.
Once you are over the basics and after you analyze your signal at hand, you will be able to bring the best decision for the right ratio. This is an important step that you should do to nail the whole compression.
In fact, every parameter in the compressor unit is important, so you will need to know exactly what they do. In case you are having any doubts about the compressor, you better not engage it or if you do it, try with parallel compression – where you are not affecting the original signal, but only one other in a separate fader.
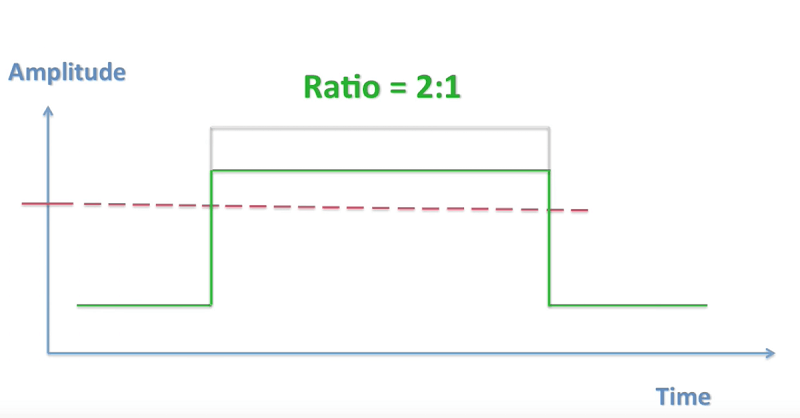
Example of 2:1 Ratio
Examples
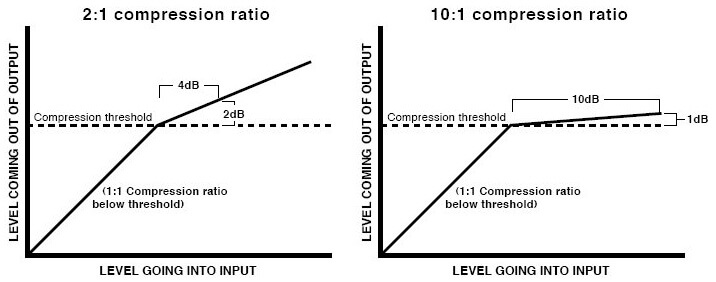
You load up a compressor on the vocal and it goes over the threshold by 10dB (extra on the threshold in a second). We have set the ratio to 2:1. Which means that the sound might be lowered in volume by an element of 2. So, as an alternative of getting 10dB louder, the vocal now will get 5dB louder. With me?
Right here’s another one:
If we set the ratio to 4:1, the sound would be lowered in volume by an element of 4. 10 divided by 4 is 2.5. So our sound now only will get 2.5db louder. A ratio of 10:1? Our sound now only will get 1dB louder!
Once again – the ratio determines how much the sound is compressed (lowered in volume). But at which level is the amount of the sound reduced? Is the entire track reduced? No. Only when the sound hits the compressor threshold.
Conclusion
Understanding your tools is important for your mixes to sound polished and professional. Compression would possibly just be the most important one, so make sure you’re getting it properly.
Try to learn the sound of the compression engaged. Play with the bypass button and try to notice any differences you are making in the song. Once you master this step of compression, you will have no issues listening to it in other songs as well. That will improve your knowledge and specter for the process itself.
As you get increasingly more used to listening for what compressors do to your recordings, begin exploring different compressors and the way they’re helpful to your sessions. Quickly you’ll be obsessed and drooling over the vintage classics.
Now you already know the ins and outs of what is compressor ratio. So get back to your mix and squash one thing just right. To use compression you will need to have a goal in mind, so decide that and do it!
Check our eBook on Mixing Tips! If you want to get a more in-depth breakdown of those tips we share, follow our link and get the “Ultimate Mixing Tips Booklet” and up your game quickly!
Best Mastering Compressors: Top 9 Units For Your Mastering Studio!
What Are Optical Compressors: Top 5 Opto Compressors Listed!
What is FET Compressor: Best 5 Models, Guide, and Plugins!
What Is VariMu Compressor: Key To Achieve Classic Sound!
Top 10 Best 500 Series Compressors: Best Models Shown!


Super explanation
Thanks for the post, really helpful