What Is Audio Headroom
Introduction
As an engineer or a musician, headroom is extremely important not only for mastering but also for buying an amplifier and recording songs at home. A musician or producer can find all the information they need about headroom here.
It is universally acknowledged that if the master output of a mix does not have any headroom, there is little room for improvement. In order for your music to stand out today, it is essential to have a high-quality mix and master. Achieving the right mix and getting the best master requires consideration of headroom throughout the production process.
Dynamic and headroom are two crucial characteristics of a great mix. Mixes that are dynamic are characterized by a great deal of variation between loud and quiet sections. Throughout the mix, there is a change in energy that keeps the mix interesting. In order to avoid compromising those all-important dynamics, it is important to make sure you optimize your headroom at each stage of your mix.
The purpose of this article is to give you everything you need to know about keeping good headroom everywhere you need it. Here we go.
What Is Audio Headroom?
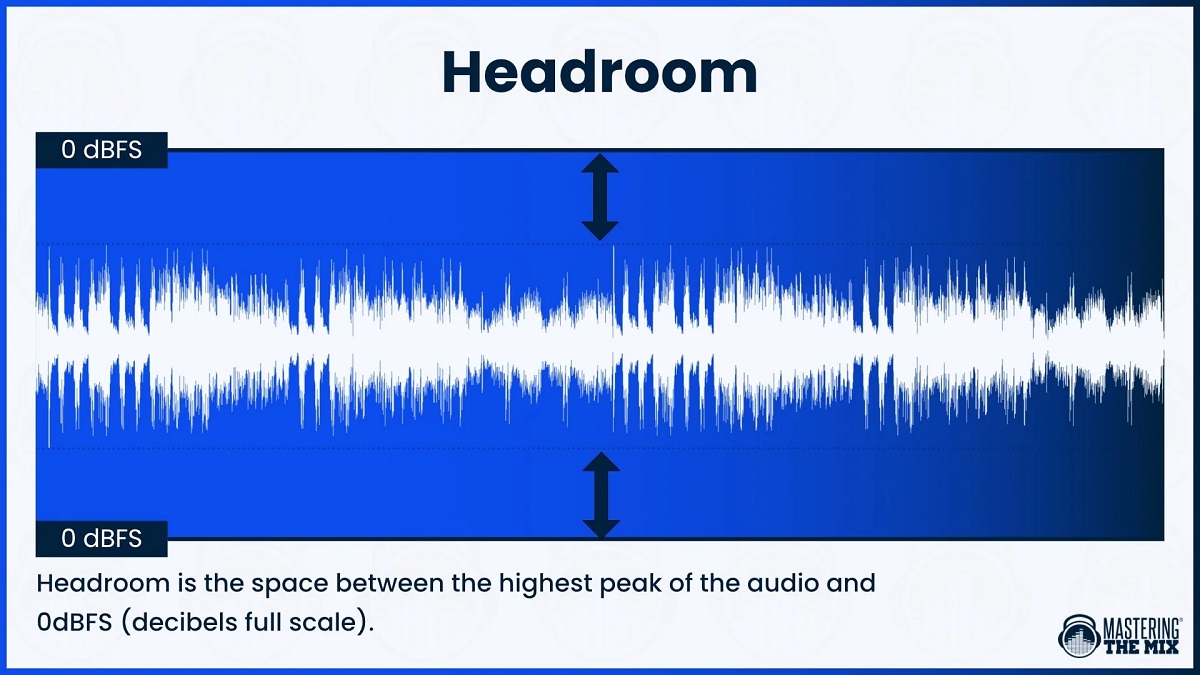
In audio engineering, headroom is the difference between the loudest peak level (transients) and the 0 dBFS (decibel full scale) level. It is a space that you do not use. It is important to remember that headroom serves as your safety zone.
Generally, headroom refers to the area between your highest peaks (transients) and 0 dB rather than between the average signal level (RMS) of your track and 0 dB (which will still clip). There are many people who are unclear about this.
The sound level that can be recorded on any recording medium is limited. As soon as you exceed that limit, the tops of the waveform of your signal will be abruptly cut off. Upon exceeding the limit, the audio signals and information is discarded, resulting in harsh distortion and unpleasant artifacts.
A bad headroom can lead to this phenomenon known as clipping. A channel meter in your DAW should display 0 dBFS (or decibels full scale) as the clipping point. A signal’s headroom is the space from its clipping point to the signal. The headroom above the nominal level is simply the difference between the two levels before clipping takes place.
Headroom for Recording
The definition of headroom in simple language is still quite complex. In light of this, why do we care about it and why do we need it to exist?
As you play any instrument, including most of those that are now pressure-sensitive, the volume changes as you play it. As well as being able to control the emotional impact of your performance, this allows you to control a lot of other things too.
The main point is to get your average recording volume to be at the sweet spot for full-resolution recording so that as much of your performance is recorded.
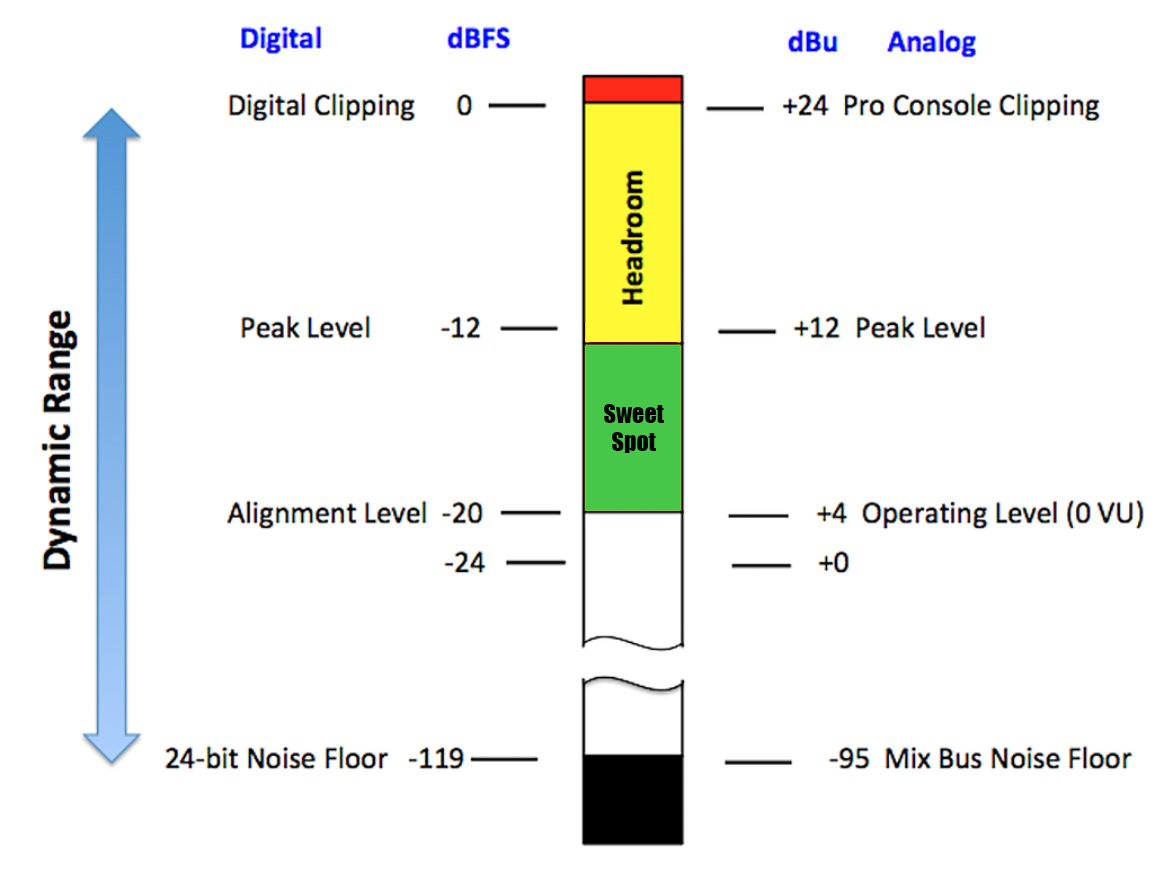
Below the -18dB digital level, the noise level will be quieter, and above it, it will be louder. Whenever you perform, it is impossible to predict exactly how loud it will be. It’s inevitable that you’ll clip if you’re recording as hot as possible.
With the sweet spot, you’re not only getting the best quality for the longest amount of time, but you’re also leaving yourself with a solid 18dB of safety margin in case something goes wrong. Dynamically performing artists need 30dB of safety margin, so they won’t aim lower or try to play less naturally.
Headroom for Mixing
There may be some confusion about how headroom relates to phrases like, “make sure to leave some headroom.” The ultimate meaning of something like this is to make sure your highest peaks aren’t right up at the clipping point or to ensure that you don’t use up all of the headroom available on the system. But why is this important, and how to make this happen practically during a mix?
The first thing we need to consider is why it is important to leave some headroom during mixing. The first thing to keep in mind is that you can put yourself into a corner very easily if you work on a mix and set up your peak levels near the clipping point of 0 dBFS early on.
There are a number of ways to get into unwanted distortion, whether you are adjusting the level, or finding that a certain section of the song just becomes a bit louder naturally. When you have already gotten into level automation or bus compression, this can turn into a pain very quickly. To fix it, just pull down the master fader or all the individual faders. Using ample headroom means setting your levels from the beginning.
The crest factor of your mix can be played around without worrying about clipping if you start utilizing headroom during mixing. In simple terms, the crest factor represents the difference between an average and peak signal level.
Headroom for Mastering
Headroom is an important part of audio production, even when it’s not one of the most exciting aspects. Although, understanding what this term means as well as some of the measurements that are associated with it will be helpful to any engineer.
When it comes to ‘How much headroom should I leave for mastering,’ there are certainly many numbers floating around, with some mastering engineers even claiming that no headroom is required as long as the track does not clip; however, this topic needs to be explored further, as well as mastering in general, in order to better understand it.
Even though the exact amount of headroom a mastering engineer should be left with is subject to debate, a good range would be 3dB to 6dB. Having established this range, you will provide the mastering engineer with enough room to perform their processing without causing clipping distortion. There is a good chance that you will need more compression in order to achieve a louder master.
A mix will consequently have transient peaks and a reduced dynamic range. Since the dynamic range is more controlled, a mix’s peak will be higher (roughly -3dB). Thus, a mastering engineer’s additional processing is less likely to clip peaks when added to a mix. This can be better understood by thinking of the mix as a less dynamic mix, which can be mastered higher without hindering the mastering engineer.
Generally speaking, if you want your master to be quieter, it will likely have a greater dynamic range because it will be compressed less overall. A good solution here would be to lower the max peak to roughly -6dB so that the mastering engineer is given more room to work.
Your Equipment Headroom
Amplifiers do not control power through their gain knobs. If you are using a mono power amp, you may be able to run it at full gain all the time (the monitors in your studio will probably operate similarly). Input knobs control the level of audio that reaches amplifiers.
There is always full headroom, so you are able to handle transients whenever they occur. The drawback is that this also means that you must take care not to increase the input level to the point where the headroom is no longer sufficient.
Unlike power amplifiers, loudspeakers do not have much headroom. If you feed in too much signal, your speakers may become distorted or even burst. Due to the integrated design of modern powered speakers, they feature limiters that limit the level of audio and protect your speakers from damage.
A passive speaker system and separate power amplifiers can create a number of problems since the speakers and the power amplifiers in analog systems do not communicate with one another.
Room for Breathing in a Dynamic Mix
In order to achieve a great mix, it is essential to start with a dynamic production – one whose energy varies throughout. It is strongly recommended that you resist the temptation to reduce headroom by increasing the faders – or worse, by adding a compressor or limiter to the main bus in order to increase volume.
You may need to try several times before you are able to incorporate enough headroom into your workflow. The result will be a far better mix. The quality of the mastering will be enhanced if you submit a mix with good headroom for mastering! Keeping your levels under 0 dBFS is the best way to keep your mix breathing.
The mastering engineer will be able to create a dynamic mix with this much headroom (without hard compression or limiting). Our mix doesn’t need to be loud to achieve loudness, since it depends largely on mastering.
Tips To Keep Good Headroom
It is recommended that you lower the volume of your tracks. Using this method will solve the headroom problem in the simplest way possible. The advice appears to be followed by few, however. You can increase headroom and clarity immediately by simply turning down your tracks in your digital audio workstation.
The more you consider this from the beginning, the fewer surprises you should encounter. When you turn down all tracks before mixing, we guarantee that your mixes will be completed faster and sound better.
A number of the engineering practices engineers were used to were carried over when digital audio began to replace analog audio. To maintain your signal above the noise floor, you would have to record the input signal as loud as possible. When recording to tape, this was an issue that was definitely of concern. An audible noise floor can be created by a group of tracks recorded in 16-bit digital format.
However, a 24-bit resolution resolves all of these issues. There is no problem with noise or resolution loss since the noise floor in 24-bit is so low. This allows you to leave yourself a considerable amount of room (15-20 dB) between your peaks and 0 dBFS.
Keep your mix’s transient-heavy elements under control. It is generally recommended that dynamics be kept under control with the use of gentle, effective compression. The mastering process will be less likely to have hard limiting effects if you master at a high intensity. Rather than adding a significant amount of compression at the end, add small amounts of compression throughout the mixing process.
Another question is how should you measure headroom. A master’s headroom is typically measured in dBTP or dB True Peak when someone requests a certain amount. By measuring the dBTP of a signal, you do not only consider the peak of your signal, but also the peak between samples. To put it another way, this measurement is based on the amplitude of the signal between digital samples within your audio signal.
Conclusion
Gain staging and headroom are very closely related. Feel free to read more on gain staging to understand how properly you can create headroom and have your track breathe. Once you are familiar with this process, you will have no problems further on and your tracks should sound okay.
Again, do not be tempted or disheartened if your mix sounds quiet, that is the job of the mastering engineer. If you deliver a properly leveled mix, they will have no problem providing you with the best possible outcome, which will sound loud enough and great on every audio system.
If you are having any questions about this topic we covered here, please let us know in the comment section below and we will be there to answer your needs!
Best Mastering Compressors: Top 9 Units For Your Mastering Studio!
What Are Optical Compressors: Top 5 Opto Compressors Listed!
What is FET Compressor: Best 5 Models, Guide, and Plugins!
What Is VariMu Compressor: Key To Achieve Classic Sound!
Top 10 Best 500 Series Compressors: Best Models Shown!