Studio Monitor Specifications
Introduction
My expertise as a music producer has taught me that choosing the best studio monitor could make a big difference when producing recordings of the best quality, which is something we are after. Because of this, we need to learn some of the basic specifications each monitor has in order to be prepared to get the best out of our purchase.
In this article, I will clarify all of the vital specs to search for in studio monitors as a way to allow you to make an informed decision and actually buy the pair you will love.
Here is a fun fact. Over 90% of home studios decide to go for an active pair. Maybe that is something that you will be interested in, like the majority out there. So, in this article, we’re going to go over the stuff that matters. Let’s start!
Frequency Response
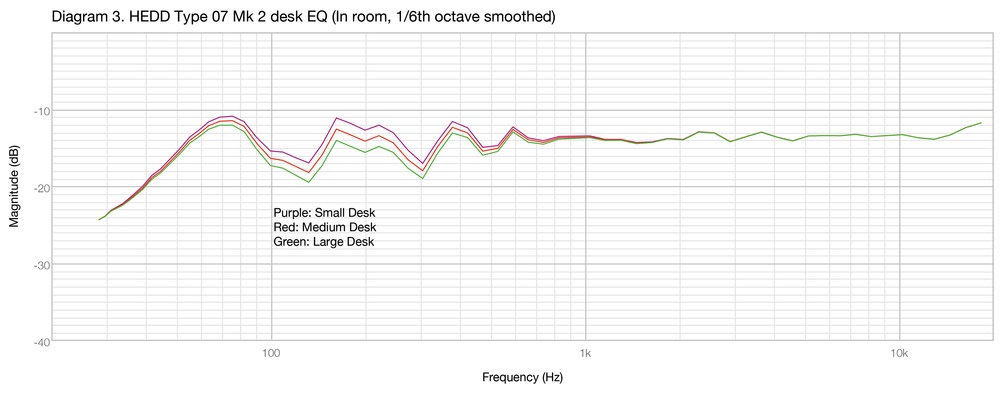
Any studio monitor has a certain range of frequencies that reproduces. It gives us an info relating to the accuracy of the speaker’s preproduction of sound and we are aware of the range that it covers. The frequency response of a studio speaker is based on the types of drivers that the said speaker uses and based on that – the developer gives us a detail on how accurate in frequencies the speaker is.
A standard studio speaker often is in the range of 40Hz to 20kHz however there are pairs that go beneath and above this range. There are a small number of monitor models that additionally give the choice of selecting the frequency response. Honestly, we never looked more deeply into this and we always believed the sets we are after were based on the developer’s specifications.
So because of this, we put the frequency response on top of the list because we think that is one of the most important specs when it comes to picking a studio speaker. The frequency response also defines how the sound will be reproduced, no matter if it is a low or high frequency, and the balance between them.
It’s important that you simply look more deeply into this spec before you buy a set because depending on the genre you produce, you might need something more specific. In the following chapter, I will briefly talk about the Max SPL that the speaker can produce and why is an important spec for the speakers.
Maximum SPL
Maximum SPL refers to the maximum sound pressure level that the speaker can give us and it is good to know the limits before blasting them out. The SPL is measured in decibels and there are several factors that weigh in when it comes to deciding the upper threshold such as size, power handling, wattage, etc.
A speaker’s headroom will be measured by how much sound pressure and volume it can handle before burning out. So once you have the decibel value, you will know how loud you can boost the volume of the speaker before ruining them, but I always suggest that you keep that to an optimal level just to be on the safe side.
At all times review the specs of studio monitors before buying them, because you definitively do not want to ruin the newly purchased pair and throw the money into the air. The higher the maximum SPL of a speaker is, the sound will be, and the more powerful and speaker exposed to loudness damage. For those who intend to play music at very high volumes on your studio monitor, just make sure that you are in the safe zone and you are good to go.
Despite the fact that an audio system might have a considerable amount of power, this doesn’t essentially point out that it is going to be able to reproduce louder sounds without distortion. Another thing about the volume is that you will need to take care of your hearing, so play the music in the optimal level, no need to lose your ability to precisely hear some frequencies.
Studio Monitor Impedance
So what is the impedance in a studio monitor? It’s the amount of electrical resistance that a speaker has that gives us the value of its impedance. It impacts sound quality and performance and this is measured in ohms. Also, this is something that you can find on the spec sheet of your monitors.
Here are some things that you need to have in mind in regard to the impedance:
- It’s very important for the speaker to use high-quality drivers, biamps, and amplifiers to make sure that the impedance ranges are at the correct stage that is good for the speaker.
- Studio monitors also impact their impedance ranges based on the elements that were used in the production of the said speaker.
When you are at the point of choosing a studio monitor, it’s good to know its impedance as a way to know how it performs when it comes to the audio quality and how can they handle the task. With this approach, it is possible for you to properly mix and master your audio projects no matter if you are at home or in a professional studio. Audio quality above all!
It might sound overwhelming at first, but this is all useful information when it comes to properly choosing the speakers that will give you great outcomes.
- Best Mixing Subwoofers: Top 10 Sub Monitors To Improve Your Mix!
- Best Midfield Studio Monitors: Top 8 Models You Can Go For!
- Best 8 Inch Studio Monitors: Top 11 Picks + Reviews!
- Best Passive Studio Monitors: Top 5 Models + Brief Reviews!
Power Handling
One other specification that will help us preserve the speaker for a longer period. This spec gives us details on how much power the speaker can handle in order to power them up properly.
Another thing that comes properly with this is that it helps us with the clarity and range that it covers and the wattage that the speaker needs. Bigger speakers usually require more power compared to the smaller ones, but that is absolutely up to your needs based on the room you will work in.
To accommodate EQs, biamps, and triamps, your chosen model might have to have a better power score. An amplifier’s power handling ought to match the monitor’s specs to forestall harm from overamplification or underpowering. Ensure each spec and capability are checked before buying to attain optimum efficiency.
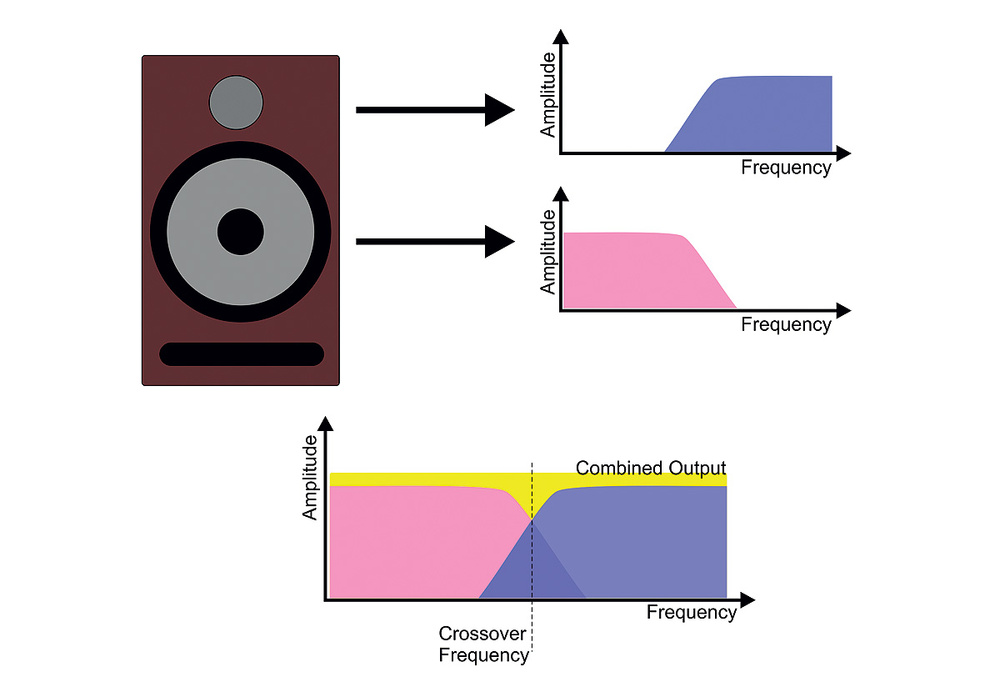
Consideration also needs to be given to the crossover frequencies for every monitor. Certain areas of the sound replica will be distorted by crossing over at too low or too high a frequency. The power to pick out the proper studio monitors for audio manufacturing requires information on power handling capability and crossover frequency settings.

Crossover Frequency
To attain optimum sound quality and readability, it’s good to set the best crossover frequency on your audio monitors. Relying on this, every speaker will be capable to deal with completely different frequencies. Subwoofers and different speakers obtain the signal from a studio monitor or passive monitor on the crossover frequency.
By doing so, it is possible for you to get a more precise sound stage and room correction for optimum audio quality and set your speakers properly to have a great balance of the frequencies. Take into account the crossover frequency when it comes to power requirements to satisfy the needs of the unit. Lower frequencies require extra power, whereas higher frequencies require much less which I already mentioned above with different words.
Along with room size, speaker sort and placement, there are various elements to think about when figuring out the crossover frequency and setting it properly for the setting you have. My suggestion here will be to go ahead and experiment with the settings and listen carefully to a song that you know and leave it at a setting that sounds most natural to you.
Setting up your studio monitors or passive monitors correctly with a suitable crossover frequency is essential for many reasons, but in my opinion, the most important one is the clarity of the representation of the sound. By doing this properly, you will lower the chance of distortion brought on by overlapping frequencies between the drivers and you will get more natural sound which is what we are all after.
This might be a hard process to regulate crossover frequency, however, when you do, you will be sure that all the things are done the right way and that your speakers will give the 100% of the performance you are after. Also, this will give you peace of mind that each aspect of your audio unit is clearly audible because you did it the right way.
Experimentation is important to seek out the best balance between low-end punchiness and high-end clarity. It does not matter the way you do it, you will find yourself with an incredible-sounding setup in the event you do it right. Now let’s check another point of the monitor we are going to pick, and that is the type and the size of it.
Driver Dimension and Type
The higher the quality of the driver, the better sound outcome you will have – that is something that even I do not tell you, you should be able to know by yourself. The size and type of driver will assist with the power of the sound and the clarity of it.
There are normally two drivers in a studio monitor – a woofer and a tweeter. These are the basic two drivers that each monitor has, but in some models, you will be able to find more than two drivers. When a low-frequency driver is bigger, it produces louder bass notes, whereas the tweeter focuses mainly on the upper frequencies of the spectrum.
Again, with the size of the speaker, you are choosing how much of a room you need to fill in with information. So that is another specification that you can look into. Usually, smaller speakers fit well in smaller rooms, and bigger speakers in bigger rooms. The reason is clear I believe.
Enclosure Kind
When it comes to the cabinet type of the speaker, it is also important that is properly built in order to prevent any unwanted sound interference and feedback that will ruin the listening experience.
With front-ported enclosures, low Total Harmonic Distortion (THD) and good transient element will be achieved and that is something that we want to be sorted out in order to have a clear uninterrupted sound. It is very important to set them up correctly in order to minimize the feedback and not get a muffled sound.
The rear-ported enclosure provides a better bass response but it lacks the clarity of the bass compared to the front-ported types. This is where proper monitor placement comes into play to get the most out of your system.
So, again the enclosure type is probably the final important spec that you need to look into before making a purchase. If you pay attention to all of the points we mentioned above, you will end up with a speaker set that will give the wanted sound for your music production and mixing purposes.
Conclusion
Well, here are all the basic specifications that you will need to look into when you are at the stage of purchasing a studio monitor for your studio. Today, the choice can’t be easier, having all those models out there and the level of technology that our world is at the moment.
So if you have anything to add or any questions in regards to the topic, please let us know below in the comments and I will try to answer as soon as I can!

