What is Sample Rate, Bit Depth, and Buffer Size
Introduction
Well, this blog post will be pretty clear. We are going to talk a bit about the sample rate, bit depth, and buffer size and how to set them right in your project. Sorting this out properly will set you on the right path for your project and will have a great basis to move on.
This is a process that should be done before doing anything in your DAW and if your DAW supports it, make this a default for every project to avoid setting it every time.
We understand that this might be a difficulty for a newcomer engineer, but after this text, nothing is going to be unclear and everything will be bright as a day. We won’t feed you silly stuff and take you straight to the point where you will understand everything we will cover in this article. Let’s start from the start now
What is Sample Rate?
The primary term we regularly hear about is the sampling rate or sampling frequency, which each refers to the identical thing. Among the values, you might have come throughout are 8kHz, 44.1kHz, and 48kHz. What precisely is the sampling rate of an audio file?
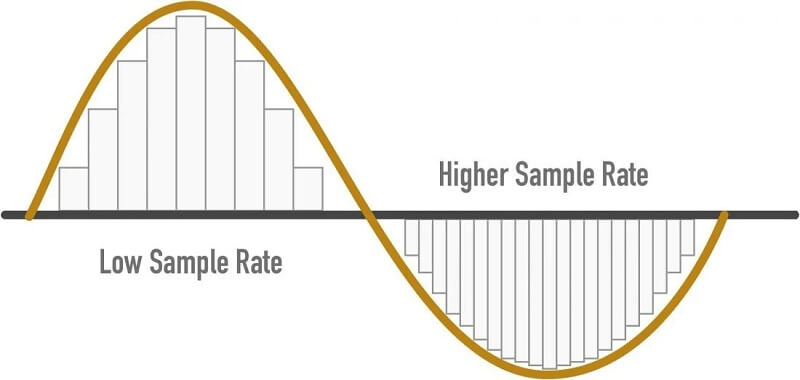
The sampling rate refers back to the variety of samples of audio recorded each second. It’s measured in samples per second or Hertz (abbreviated as Hz or kHz). An audio sample is only a quantity representing the measured acoustic wave worth at a selected point in time.
It’s crucial to note that these samples are taken at temporally equispaced instants in a second. For instance, if the sampling rate is 8000 Hz, it’s not sufficient that there be 8000 samples sampled throughout a second; they should be taken at precisely 1/8000 of a second apart. The 1/8000 quantity in this case can be known as the sampling interval (measured in seconds), and the sampling rate is simply the multiplicative inverse of that.
For audio, the minimal variety of samples per second to unambiguously characterize speech is 8000 Hz. Utilizing lower than that might lead to speech that may not be understandably attributable to quite a lot of reasons, considered one of which is how related utterances are not going to be distinguishable from each other.
The most typical values for the sampling rate are the aforementioned 8kHz (most typical for phone communications), 44.1kHz (most typical for music CDs), and 48kHz (most typical for audio tracks in films). Decreased sampling rates imply fewer samples per second, which in turn imply much less audio information since there’s a smaller variety of sample factors to represent the audio.
Stick to the most common sampling rates of 44.1 kHz or 48 kHz. In case you’re only focusing on music production, 44.1 kHz is a typical format.
Nevertheless, for those who’re planning on integrating with video, 48 kHz is a more sensible choice. Nearly all video cameras record audio at 48 kHz. You’ll have a better time keeping audio in sync for those who record at the same sampling rate.
What is Bit Depth?
The unit of calculation for bit depth is binary digits (bits); for each 1-bit increase, the accuracy doubles. The bit range is a vital integer that determines how good a recording sounds.
If the bit depth is simply too low, the recording will not be correct, and lots of quiet sounds are lost. MP3s saved in your music library which has been transformed from analog audio to digital audio signals utilizing pulse code modulation (PCM) with an excessive bit depth contain a wider spectrum of frequencies than ones encoded with low bit depths.
Bit depth is simply related to the scope of a PCM signal. Lossy compression audio codecs do not need bit depths. Pulse-code modulation (PCM) is the usual type of digital audio in computers.
The amplitude of an analog signal is sampled at common intervals (larger sample rate = shorter intervals) to create a digital illustration of the sound source. The sampled amplitude is quantized to the closest value inside a given range. The variety of values inside this range is decided by bit depth.
Without getting overly technical, every bit represents 6dB of dynamic range. That means that 16-bit equals 96dB in the dynamic range, 24-bit measures to 144dB, and so forth.
A bit depth of 24 is more than sufficient room to record quietly, then turn the signal up in our DAW without introducing noise. At 16-bit, you may need to record a bit hotter, but it’s usually advised to remain in 24-bit for many sessions.
Bit Depth: 32-bit Float
If you happen to export a 32-bit floating point file, the points above 0 dB will likely be saved to the file you export. Nonetheless, in the event you attempt to playback the file through your audio interface, your 24-bit fixed level D/A converter will trigger the data above 0 dB to disappear. This doesn’t imply the data is lacking from the digital file in your computer, your D/A converter simply can’t reconstruct the digital signal above zero dB within the analog realm.
If you happen to send a 32-bit floating level file that’s peaking above 0 dB to your mastering engineer, they will cut back the extent of the file after they import it into their DAW. The main advantage of bouncing 32-bit floating level audio information is that it lets you send your tracks to a mastering engineer without requiring you to use dither to your audio files.
To be fairly clear, 32-bit floating level audio information is usually not meant for distribution, they merely will let you keep pristine audio quality when sending audio information to an artist or engineer you are working with online.

What is Buffer Size?
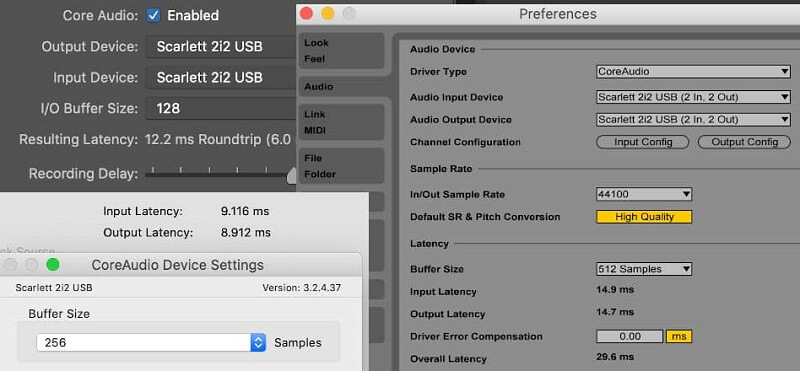
Buffer size determines how fast the pc processor can deal with the input and output of data. When your buffer size is lower, the computer handles info in a short time, it takes extra system sources, and it is fairly severe on the pc processor.
In order to use fewer system sources, you’ll be able to increase the buffer size so that the system processor handles info slower. This is applicable when experiencing latency, which is a delay in processing audio in real-time. You may cut back your buffer size to scale back latency however this may end up in a higher burden on your computer that may trigger glitchy audio or drop-outs.
When introducing extra audio tracks to your session, you may want a bigger buffer size to precisely record the signal with no distortion and restricted latency. Increasing the buffer size will enable extra time for the audio to be captured without distortion.
When recording set the buffer size as low as you’ll be able to reduce latency. In case you begin listening to clicks and pops or your DAW gives you an error message, either elevate the buffer size or cut back the number of effects plug-ins/audio tracks in your song.
In the case of mixing, the latency shouldn’t be really a factor, you can afford to place the buffer size at its highest setting. This can reduce the probability of any clicks and pops being heard while you add effects plug-ins.
A good buffer measurement for recording is 128 samples, however, you too can get away with raising the buffer size up to 256 samples without being able to detect a lot of latency within the signal. You may also lower the buffer size beneath 128, but then some plugins and effects might not run in real time.
Conclusion
Well, we believe that we covered the things that are important about the three topics that we have here. All the main stuff that you will need to follow are in bold, so you will not miss the critical stuff. We hope that you will have an easy road from here on and have all the basic things covered.
In case you are having any questions about the topic, please let us know in the comment section below and we will be more than happy to elaborate.