21 Beginner Mixing Mistakes
Introduction
Before signing with a record label, you’re by yourself in terms of finalizing your music. Owing to the price of studio time and professional mixing engineers, many producers begin off by mixing their tracks themselves. Truth to be told, mixing is an artwork that’s hard to master, however, there are many useful suggestions that may help you along the way, together with widespread pitfalls which can be best avoided.
For musicians, studying notes, chords, and scales are the primary steps. For engineers studying to mix, there’s a related set of abilities to master, however beginning engineers usually need to get through some hurdles which can be totally their own. Experience is one of the simplest ways to fight lots of the points listed under, however, this list will discover lots of the widespread errors that many engineers will encounter in some unspecified time in the future of their careers.
Audio mixing is the method of mixing a number of layers of audio to make one ultimate track. The mixdown process makes sure all of the components in the music to sound good collectively.
Mixing entails balancing ranges, panning sounds, equalizing, compressing, harmonics enhancing, fixing issues, and including varied effects. Mixing additionally entails automation, modifying sounds in inventive methods, and giving instruments their very own space within the mix. The objective is to sculpt a balanced and unified association prepared for mastering.
Below we will list some very common mistakes that any mixing engineer can make. So hold on and go through them to see if you make any and learn something new by avoiding them.
1. Not paying attention to gain-staging
You’d suppose in this world of floating-level algorithms that standard gain staging might be laid to rest. Nevertheless, many plug-ins—particularly analog mods—respond to the power of signal within the manner of yesterday’s gear.
Should you use analog gear/emulations on an aux track, juicing the extent of the devices feeding that aux would possibly distort the sound past what you’d need. This will turn out to be problematic, particularly in large sessions, where you want to pay attention to the levels of many shifting elements.
Additionally, you’re caught in your individual system if you don’t take note of good gain structure. What do we imply by this? Live mixing, working off a producer’s session, utilizing an analog board in any recording capability – these money-making duties are a lot tougher to execute when your modus operandi doesn’t play with these formats, a few of which call for correct, analog-style gain-staging.
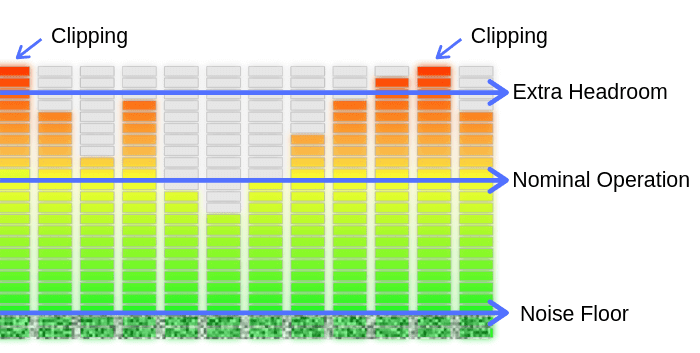
2. Not Enough Headroom
Managing your ranges at each stage all through the signal chain is significant. Gain staging ensures the audio signal flow is at an optimum stage because it passes via the varied processors and mixer levels. No track ought to be clipping! Additionally, test the master stage to verify your mix has sufficient headroom for mixing or mastering.
Test your track volume ranges. Sustaining optimum ranges prevents overloading the master. For best outcomes, hold the master quantity fader at ‘unity’ which is zero dB. Additionally, attempt to keep the master quantity stage at about -3 to -6 dB when mixing. These stage averages guarantee you’ve sufficient headroom for the mastering process.
3. Mixing Proactively, Not Reactively
A standard false impression is that mixing is one thing you have to do because it’s simply part of music production. This makes much less skilled producers slam on effects they don’t perceive why they’re utilizing, and things simply end up messy and never rigorously thought out and listened to.
Right here’s what mixing really is: you mix since you need to sort things, and repeatedly enhance the sound primarily based on the suggestions you get from listening to it. Mixing shouldn’t be accomplished proactively, however reactively. Listen to your mix, your sound, and react to it by tweaking it to sound as you need it to sound.
4. Mix At Low Volumes
After we mix at loud volumes, the whole lot sounds better. That is an unavoidable truth of psychoacoustics; the bass simply hits tougher, vocals cut better, the stereo picture is wider, and the whole lot sounds more in your face. However what occurs when the volume drops when the mix leaves your studio and ventures out into the world? Mixing at loud volumes usually tricks us into considering the mix is better than it really is.
Listening to your mix at low volumes means that you can better spot quantity imbalances and dynamic variations. Louder volumes additionally improve the high frequencies, which is able to trick you into considering that your hi-hats or acoustic guitar need extra treble chopping than they actually do. The consequence? A hollow-sounding mix missing air and presence.
5. Mixing in Solo
Clicking the solo button and mixing tracks in isolation isn’t the perfect strategy for making mixing selections. This behavior is tough to interrupt because it’s easier to listen to a sound in isolation. Nonetheless, a track that sounds superior soloed could not sound as nice when all of the tracks play collectively.
Mixing in solo shifts your focus to making that track sound superb by itself quite than making it match within the mix. The objective is to make all of the tracks in a mix sound nice together. So, attempt to make mix selections in context whereas all of the layers are playing simultaneously. If it’s hard to listen to the part you’re engaged on, increase the level fader till you get it sounding good. Then re-balance the levels after processing.
6. Not Checking The Mix in Mono
Checking your mix in mono is significant. Listening to your mix in mono helps determine points with the stereo picture, phasing, volume, readability, and extra. Mixing in mono additionally helps guarantee your tune interprets on mono speaker systems.
Verify your mix in mono by inserting a mono utility plugin on the master at the finish of the chain. Playback the mix and change between mono and stereo to determine mix issues.
7. Not checking Phase Relationships
It’s essential to examine phase relationships for the instruments which might be in your mixes. Particularly if a number of microphones have been used to seize the sounds. If in case you have phase cancellation points then frequencies disappear and they are going to be unbalanced. To examine the phase for every instrument you should use phase correlation plugins.
This helps decides if you have phasing points. One other subject is that in case you have phase issues your sounds will disappear when your music is played in mono. To keep away from guesswork then use phase correlation plugins along with phase align plugins as a result of doing all these items manually may be tedious and also you may miss it. Nevertheless, a well-trained ear detects these things easily. After fixing the phase your sounds ought to sound thicker and fuller.
8. Test Your Mix On Multiple Systems
While you’re mixing within the studio, you most likely use a pair of studio monitors or headphones. They’re nice for presenting a ‘clear’ version of your mix, however, they differ vastly from how common loudspeakers and consumer-grade headphones perform. These items of gear are designed to spice up and improve frequencies, whereas studio monitoring makes an attempt to maintain all frequencies as flat as doable.
The room you’re mixing in additionally affects the way you understand the sound. Untreated rooms without any acoustic absorbers often trigger issues with the low end. The bass frequencies both get trapped or hang around in the room. The outcome? They sound way louder than they are. Naturally, you begin slicing the bass frequencies once you’re in a surrounding like this, only to find things sounds skinny when listening to different systems.
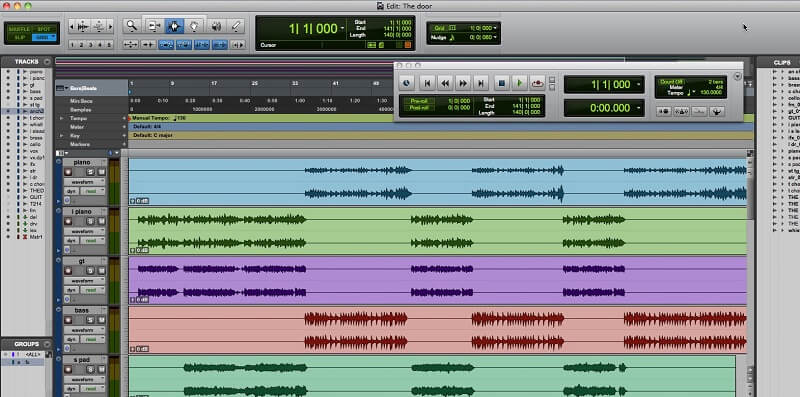
9. Not Fixing and Compiling your Tracks
The mixing process turns a lot simpler once you’re working with nice-sounding tracks. Though one part of that’s getting these sounds right on the source, one other part is ensuring you edit these tracks accurately. Which means enhancing both groove and unnecessary noise. Noisy tracks trigger issues once you add compression, and unhealthy timing means a lack of feel and listening enjoyment.
Additionally, in case you’ve recorded a number of takes, be sure you take the time to comp collectively the very best take out of all of them. If the vocal emotion of verse one is healthier in Take #1 and the texture of the chorus is tighter in Take #3, comp these takes collectively to push the tune to a brand new stage.
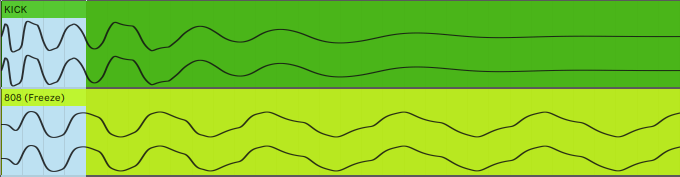
10. Ignoring Automation
Automation is a present, we actually believe that. Let’s look at vocals, there’ll usually be a major enhance in quantity during the chorus. If we wish a reasonable degree volume all through, we might slap on a compressor. Adding a compressor although will be fairly crushing on the life of the loud elements. We’d end up with a really compressed-sounding refrain and a reasonably dry verse.
As a normal rule, macroscopic volume issues will be resolved with automation. If the 30-second lengthy refrain is 6dB louder than the remaining for instance, simply drop it down so it’s only barely louder.
That means the compressor will be utilized a lot gentler and it’ll simply clean out the dynamics. For brief boosts of quantity similar to plosives, there is no such thing as a point in automating them (except they’re horrific), as they’re over so quick that a compressor wouldn’t be as noticeable.
Keep in mind that the tone of somebody belting out the volume might be very different sounding to somebody singing softly. The mind will acknowledge that tonality and perceive that they’re singing louder. If you compress out the entire dynamics, however, it won’t fairly sound like an actual voice and never benefit the tune.
11. Panning Everything Centrally
Such is the stereo width and sonic depth of most synth plug-ins as of late, it may be simple to miss the pan dial altogether. Maintaining everything panned centrally won’t assist your mix total though, as sounds that ought to be panned in the center, corresponding to kick drums, basslines, and lead vocals, must compete for space with each different sound within the mix.
Mixing on headphones compounds this drawback, as pan moves appear a lot more disarming without the ‘natural bleed’ you get when mixing on speakers.
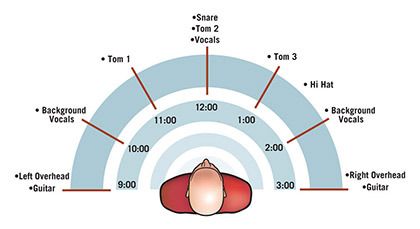
12. Lack of panning
Many individuals overlook this unbelievable feature. Music is stereo! And it is advisable to use it. It’s crucial to pan your instruments and use all of the stereo field, you’ll obtain higher clarity even with unhealthy panning (in comparison with no panning). However, how do I pan my channels? Whereas certain components ought to sometimes be centered, corresponding to main vocal, kick, snare, bass, and so forth.
Some others can and ought to be panned; don’t worry panning your backing vocals, secondary guitars, synths, effects. When potential, record your devices in stereo (particularly main guitars) to keep away from overlapping with the vocal tracks. Conserving the center much less cluttered permits your ear to listen to all the individual instruments extra distinctly.
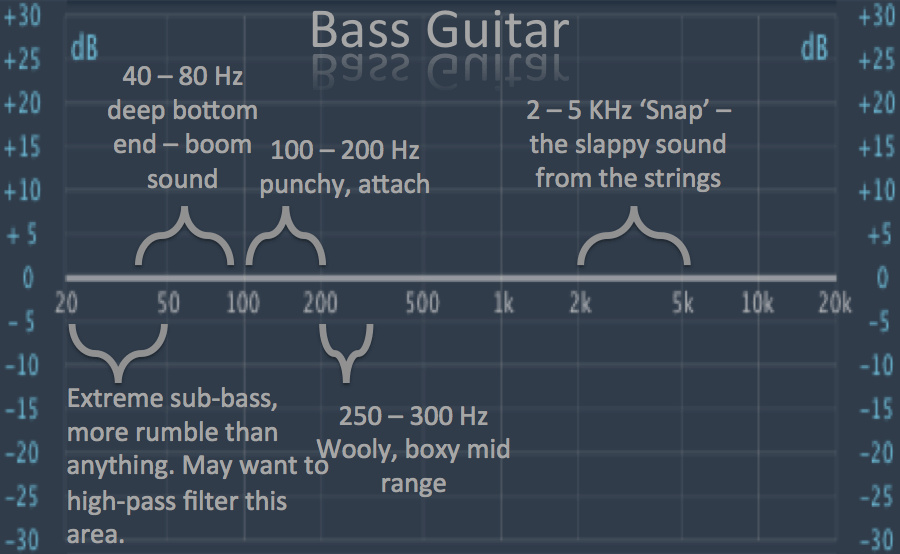
13. Too Many Low-End Sounds
Frequencies within the low end and low mids have lengthy and large wavelengths, so they’re naturally extra thick, massive and extra demanding – both to listen to and to reproduce from sound systems. Once you begin combining low sounds in a mix, they’re kind of exhausting to keep up and control so that they sit properly within the mix – it’s very straightforward to quickly get a muddy mix with an excessive amount of low bass and low mids sounds.
Two good options: be extra simplistic in your low finish, particularly when composing the track. Take one or two bass components and use them to outline the tonality of the chords and the depth of your music, don’t overdo it.
The second tip could be to high pass away more of the low rumbly stuff that goes on in instrument tracks where there isn’t an actual need for it – away with it. For instance, violins are fairly high-pitched instruments, so if there are any low rumbly sounds within the low-end sound spectrum that doesn’t assist the general sound, simply remove them. Pay attention and examine if it sounds better.
14. Be Cautious with Reverbs on the Bass End
Reverb is a necessary mix tool however while it is going to work wonders for some sounds in your mix, others will use that reverb to turn your mix right into a soup. That is notably true of sounds generously appointed with bass; kicks, basslines and even the lowest notes in pad sounds. Quite than offering punch and energy, the ‘diluting’ nature of reverb will de-focus a mix in the event you’re not careful.
In case you’re decided so as to add reverb to such sounds, strive to include an EQ after your reverb and dramatically chopping frequencies under 200Hz from the reverb signal in order that the bottom end doesn’t turn into a mess.
15. Too much reverb
Listening to an instrument in a room isn’t one thing we regularly take into consideration. The human ear combines the sound of the instrument with the space that it’s being performed in and offers us the flexibility to find out where it’s coming from and roughly how far it’s. That is how we hear and naturally, that is how we anticipate things to sound.
With reverb, we will mix the direct sounds with these plugins or hardware to provide the listener the effect of listening to an instrument in a space. Numerous choices allow for a lot of ways to make your tracks sound extra natural, however, an excessive amount of a good thing is usually a dangerous thing.
As nice as reverb is for giving a mix some life, it’s usually overdone when engineers are new to mixing. Relying on what area you need your instruments to be mixed with, you may find yourself with washed-out mixes in case you don’t handle what you might be affecting.
16. Making Huge Cuts or Boosts with EQ
Unless it’s for corrective, or subtractive functions – cuts and/or boosts above 5dB need to be utilized with excessive warning. Additionally, in case you go above 6-7dB, then a supplemental boost or cut needs to be made. This isn’t essential to make up for the big adjustment, however moderately to balance it out.
As at all times, this will not be true within the case of ALL source-material, however, it’s a basic rule of thumb for many conditions. In case you are, nonetheless, making massive EQ changes, at all times try maximizing its total potential by playing with the Q (band)-width. This can assist you to ‘zone in’ and focus more on a certain space. A tight or ‘narrow’ increase is more environment friendly when trying to focus on a selected zone, rather than utilizing a large ‘Q’ setting.
17. Using The Wrong Type Of Compression
The term “keyboard” can cover an enormous range of various sounds, from pianos to ambient synths. And everyone can have a really different capability with regards to the EQ spectrum. Some synth sounds for example, because they use waveforms to generate signals, are a lot “larger” within the lower register than they’re within the middle and upper ones.
This could imply that a single-band compressor utilized throughout the synth track would possibly work nicely at controlling the mids, however, leave the bass end too large and overwhelming. Or compressing the bass precisely deadens the mid-vary. A multiband compressor can resolve this, by letting you selectively manage which components of the frequency range are compressed and by how much. If a keyboard sound is less complicated, say only a lead line, a single band compressor will often suffice.

18. Lack of Clarity
It’s common for even the best mixes to have a little bit of confusion within the low-frequency presentation. These minor points are often a result of the monitoring system and mixing room acoustics and are very simply addressed in premastering.
A lack of clarity is an altogether completely different challenge. The clarity in a mix is the result of contrast. The easiest way to keep away from a lack of clarity is to reference materials you’re aware of in the mixing room. Discover a foundation for managing tonal contrast in your mixes, after which proceed to test in on it all through the mixing process.
One other approach to make sure your mixes have the form of built-in contrasts that present focus for the music is to show a few of these damned compressors off. That brings us to distortion.
19. Too Much Clarity
On with the music mixing tips! Making audio sound bright is a giant temptation when mixing. Lifting up the high frequencies could be an effective way of including additional sheen to production and making your music sound “big”.
Additionally, human hearing is especially delicate to frequencies between 2kHz and 5kHz, and it is an excellent temptation to load up this space with data in an effort to make components stand out or have a presence. However what can occur is the highs are inundated with further additive EQ, extra power, and additional bite, and all of it turns into one large spiked brick of harshness.

20. A Mix is Not a Master
Output channel processors designed to inflate and ‘master’ your mix are nice however watch out to not introduce these too early in the mixing process. It’s fascinating – in case you ‘mix’ a track with a Loudness Maximizer in place and then bypass it when the mix is completed, you’ll discover that the mix does not sound ‘right’.
The dynamic processing such a processor carries out will skew a mix’s stability so that it’s depending on the processor to sound right. This implies if you’re printing mix stems, or eradicating your processor when sending your track to be professionally mastered, you are likely to be upset with the results.
21. Not Taking Breaks
We can not even start to clarify in words, simply how essential giving your ears a break really is. At the very least, it’s going to find yourself inflicting to produce an unbalanced mix. Why? Well, because once your ears are uncovered to a full range of frequencies for lengthy intervals of time (even at very modest ranges), they start to lose their natural sensitivity.
This causes them to really change into desensitized to the mid-high frequency ranges, which is why you’ve most likely experienced false perceptions. In different words, what you initially thought was a flawless ultimate product, can show to sound strikingly totally different within the morning or later on that day, as soon as your ears have ‘readjusted’.
Conclusion
Well, we collected several tips on mistakes that are most common in the audio mixing world. There are certainly many more that are out there, but for this article, we listed these, because we thought that somehow these are overlooked.
If you have any other audio mixing mistakes that many beginners make and are not on the list, please share them with us in our comment section and we will compile another list for all of you!