
How to Use Panning
Introduction
As a newbie, whenever you have a look at a mixing desk, both inside your DAW or a hardware mixer, it may be quite intimidating. Other than all the controls, there’s the terminology to get your head around, too.
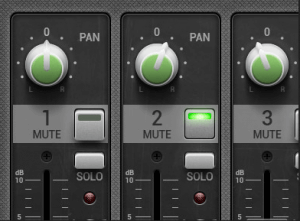
‘Panning’, or ‘Pan’ as it’s typically labeled, is one such term. There are a variety of Pan controls on a typical mixer, so you could well wonder ‘what’s panning?’
Panning gives probably the most powerful strategies for reaching better depth in a mix. As we’ve mentioned before, depth is all about space, both left and right, ahead and back.
Whereas volume handles the back and forth of the auditory dimension, panning determines the side-to-side. Within the early days of audio production, recordings may only be panned hard right or hard left.
At this time, we’ve got the entire stereo area to work with; we’re in a position to control the space between either side incrementally. Nevertheless, with a lot happening in a mix, how can one determine how far left or right a mix component ought to go?
What’s the philosophy behind these choices? Well, in reality, there isn’t any mathematical method for panning instruments.
You will need to handle this process completely based on the project you have at hand. Every project will need a different approach to the panning decisions so you will have to analyze your track first and then sort this out.
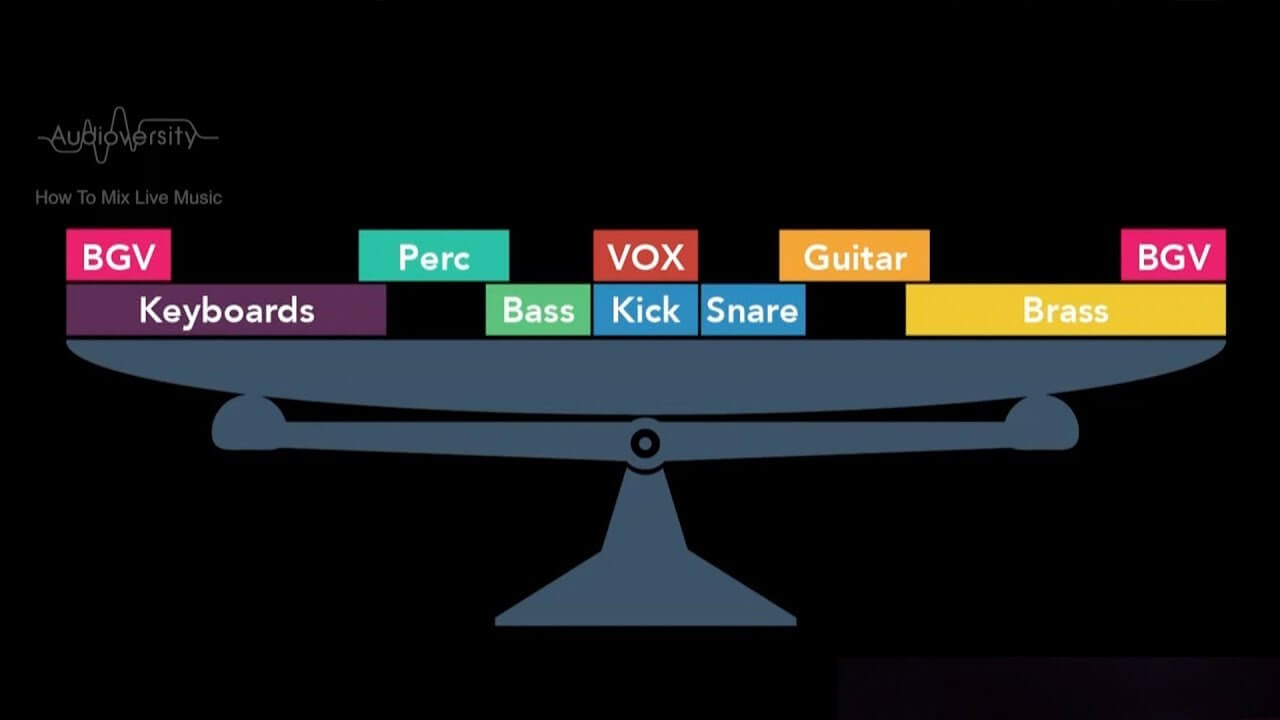
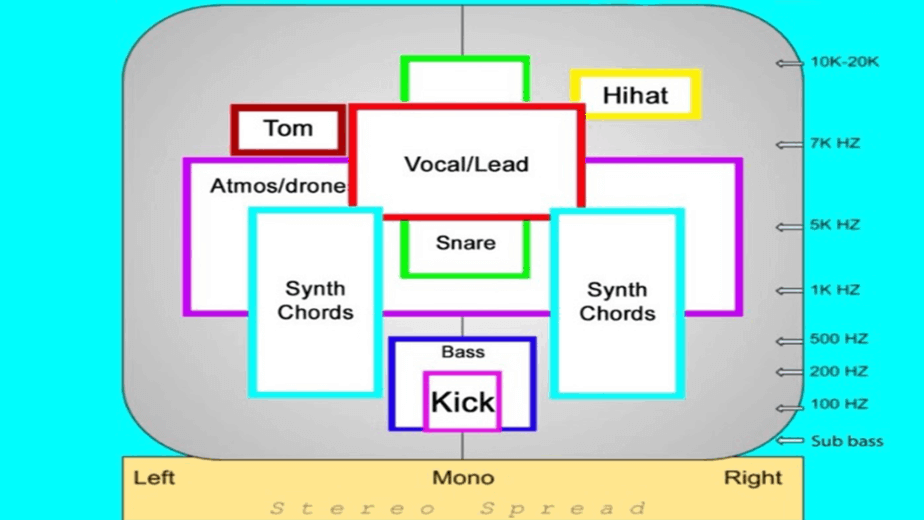
There are some basic rules that you will need to follow in order not to mess something up. For instance, that is not to pan bass or kick drum, or vocals in most cases. These, of course, are not hard rules that you need to follow all the time. If you think you need to step out of the box and pan something slight or hard of the center, try to do it.
Generally, these elements tend to stay in the center as we are able to hear in most of the commercial and modern songs nowadays. That’s why you will have other elements that you can try panning to one side or another in the stereo field. Now it’s not the past to pan hard left or right, so you will be able to go mid-way on one side or on the other – the choice is yours!
Like most mixing choices, panning comes down to artistic impulse, context, and easily what sounds right. That doesn’t imply some suggestions can’t turn out to be useful, though. Let’s check out six suggestions for panning instruments or a lead vocal in a mix.
1. Panning: at first, pan hard or don’t pan at all.
Everybody tackles a project in a different way. Some want to have all of the instruments and vocals recorded before making any mixing strikes. For these folks, panning comes afterward.
This order of operations permits one to listen to the mix in its purest type, after which make gradual changes to move parts throughout the stereo area, working outward from the inside.
The counter to this methodology is to start out wide after which work inward. After all, not each mix ingredient must be panned, however some will. For instance, rhythm guitars are sometimes doubled, with one on either side.
Whilst you may play it safe and pan these parts partially left or right, think about going all the best way instead.
The mix won’t keep this way, however, designating the width of the stereo field from the start can turn out to be useful afterward.
If it seems you need another instrument to own these spatial extremities, you’ll be able to always move the rhythm guitars (or no matter what else) in a bit.
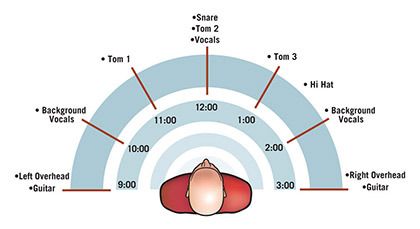
2. Pan the close mic drums to match the overheads
In case your intention is to create naturalistic, acoustic drums, make sure that your close mics match the aural positioning of your overheads.
You might have considered trying the widest tom sound possible, however, it’s fairly tough to negate the inclinations of the overheads and never sound instantly different from them.
This may be your intent, sure, however, the intention is everything: the snap and ambiance of close-mic’d drums are regularly present in stereo overheads, so tread carefully, lest you induce disorienting phasing mixups.
3. Keep away from just slightly off-center sounds
Moving sounds slightly off-center in hopes of giving sure parts some further separation is commonly a fool’s errand. In truth, when the midpoints within the stereo area (the positions simply across the center) are left uncluttered, the far left and right edges can sound much more dramatic.
So, by all means, experiment with slightly off-center sounds if you want – you might happen upon something! – however, definitely don’t count on it to be the fast magic answer to stereo separation issues.
4. When you have two similar-sounding instruments, pan one left and the other right
When you have two guitars strumming away all through the course of a track, then if they’re panned to the identical location within the stereo picture they may sound confused, virtually as if only one instrument is taking part in.
And any lack of synchronicity may make it sound as if the instrument is being performed badly. Panning half-left and half-right is commonly an excellent answer. Keep in mind however that it is best to always verify that a mix sounds good in mono.
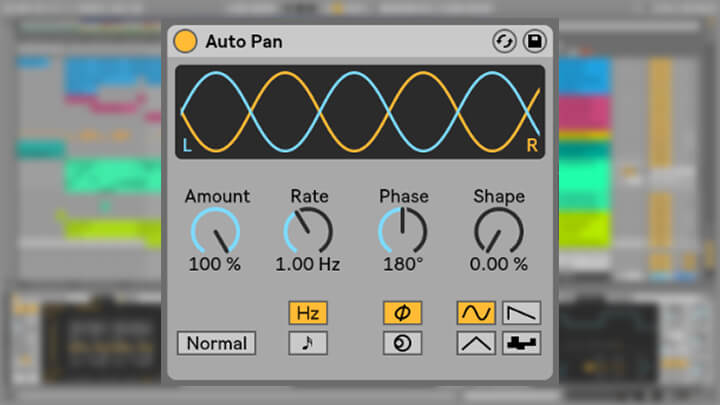
5. Use Stereo Effects
Correct use of stereo effects can add an impressive but pure sense of width to your stereo picture.
Certainly one of my favorite effects for this purpose is a stereo delay set with totally different delay times on the left and right channels. For instance, you can use a quarter-note delay on the left side, and a dotted-eighth-note delay on the right.
This impact will create a distinction between the left and right sides of your mix, and the outcome will probably be a feeling of width and dimension. This typically works nicely on a lead vocal.
It’s also possible to use reverb to create a wider stereo image. Experiment with a number of totally different reverb plugins and presets to find ones that sound the widest to you. There will typically be key variations in width from plugin to plugin.
6. Pan Affected Source Opposite Of The Dry Source For Extra Stereo Width
These are methods we take advantage of on a regular basis. Even with just one guitar part, you’ll be able to create a variety of widths with an easy combination of panning the guitar from close to the center to 100% left or right if there’s an affected and slight version of that very same guitar panned opposite.
Watch out to make use of a delay time that isn’t going to break the groove and in addition isn’t too short that it causes phase/polarity issues.
Conclusion
Doubtlessly we are able to discover more panning eventualities and more attainable options for all of your panning woes. Since we’ve given enough to get you begun, we’re going to stop right here and dwell once more on intention.
The intention is probably the most important factor in a mix—it dictates your every choice.
No matter if you want to pan acoustic guitar, hi-hat, or double-tracked vocals, you can spread them across the stereo field to separate them from the center.
It’s the why behind your what, how, or when. It applies to all points of the mix, and panning isn’t an exception. It’s our hope, now, that the information we’ve supplied will get you nearer to the mix that you’re intending.


[…] What’s Panning? […]